Chapter 1. Introduction
7
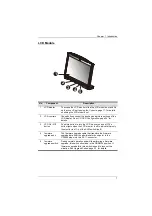
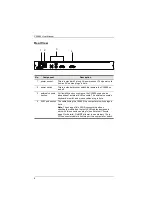
LCD Module
No.
Component
Description
1
LCD display
To access the LCD monitor, slide the LCD module out and flip
up the cover. See
, page 17, for details
on sliding the LCD module out.
2
LCD controls
These buttons control the position and picture settings of the
LCD display. See
, page 24, for
details.
3
LCD On / Off
button
Push this button to turn the LCD monitor on and off. The
button lights when the LCD monitor is off to indicate that only
the monitor is off – not the KVM switch itself.)
4
firmware
upgrade port
The firmware upgrade cable that transfers the firmware
upgrade data from the administrator's computer to the
CL5800 plugs into this RJ-11 connector.
5
firmware
upgrade switch
During normal operation and while performing a firmware
upgrade, this switch should be in the NORMAL position. If
firmware upgrade fails, this switch is used to recover the
situation. See
, page 32, for details.
3 4
5
1
2
Summary of Contents for CL5800
Page 1: ...CL5800 LCD Console User Manual...
Page 10: ...CL5800 User Manual x This Page Intentionally Left Blank...
Page 26: ...CL5800 User Manual 16 This Page Intentionally Left Blank...
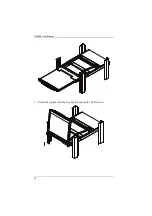
Page 28: ...CL5800 User Manual 18 3 Rotate the top panel all the way back to expose the LCD screen...
Page 44: ...CL5800 User Manual 34 This Page Intentionally Left Blank...
Page 58: ...CL5800 User Manual 48 This Page Intentionally Left Blank...
Page 60: ...CL5800 User Manual 50 U User Notice vii W Warranty 47...


