Chapter 8. User Management
144
Users and Groups
There are two ways to manage users and groups: from the Users notebook; and
from the Group notebook.
Note:
Before you can assign users to groups, you must first create them.
See
, page 136 for details.
Assigning Users to a Group From the User’s Notebook
To assign a user to a group from the User’s notebook, do the following:
1. In the Sidebar
User
list, click the user’s name
– or –
In the main panel, select the user’s name
2. Click
Modify
.
3. In the
User
notebook that comes up, select the
Groups
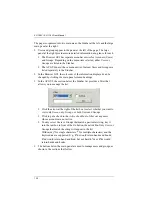
tab. A screen,
similar to the one below, appears:
4. In the
Available
column, select the group that you want the user to be in.
5. Click the
Right Arrow
to put the group’s name into the
Selected
column.
6. Repeat the above for any other groups that you want the user to be in.
7. Click
Save
when you are done.
Note:
If a user has permissions in addition to the ones assigned to the group,
the user keeps those permissions in addition to the group ones.

