9
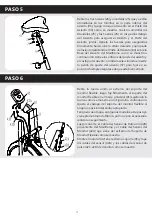
STEP 5
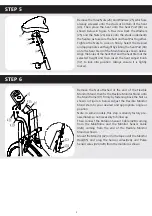
Remove the three Nuts (26) and Washers (25) which are
already screwed onto the studs at bottom of the Seat
(43). Then place the Seat onto the Seat Post (04) as
shown below in figure 5. Re-screw back the Washers
(25) and the Nuts (26) back onto the studs underneath
the Seat so as to secure the Seat and Seat Post together.
Tighten the Nuts to lock on firmly. Select the desired
and appropriate seat height by sliding the Seat Post (04)
onto the Seat Stem of the Mainframe as shown below.
Align the holes of the Seat Post and the Seat Stem at the
selected height and then insert the Seat Adjust Knob
(37) to lock into position. Always ensure it is tightly
locked.
STEP 6
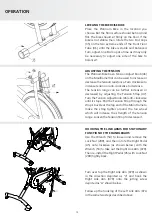
Remove the Nut attached at the end of the Flexible
Monitor Stand, then fix the Flexible Monitor Stand onto
the Main frame (01) firmly by fastening back the Nut as
shown in Figure 6 below. Adjust the Flexible Monitor
Stand stem to your desired and appropriate angle or
position.
Note, in some models, this step is already factory pre-
assembled, so not necessary to follow up.
Then connect the Rotation Sensor Cable (42B) coming
from the Mainframe and the Monitor Sensor Cable
(42A) coming from the end of the Flexible Monitor
Stand as shown.
Mount the Monitor (42) onto the top end of the Monitor
Rack(05) and plug the Sensor wires(42A) and Pulse
Sensor wires (42C,42D) from the monitor as shown.


