background image

Technical Manual & Parts Lists 

22 


Machines with Alternating Pressers 

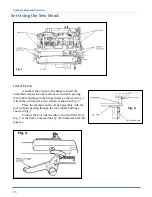
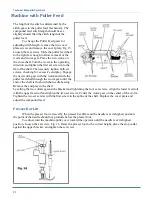
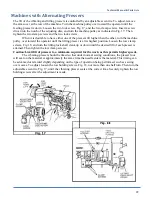
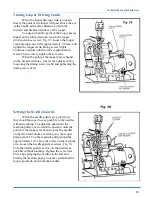
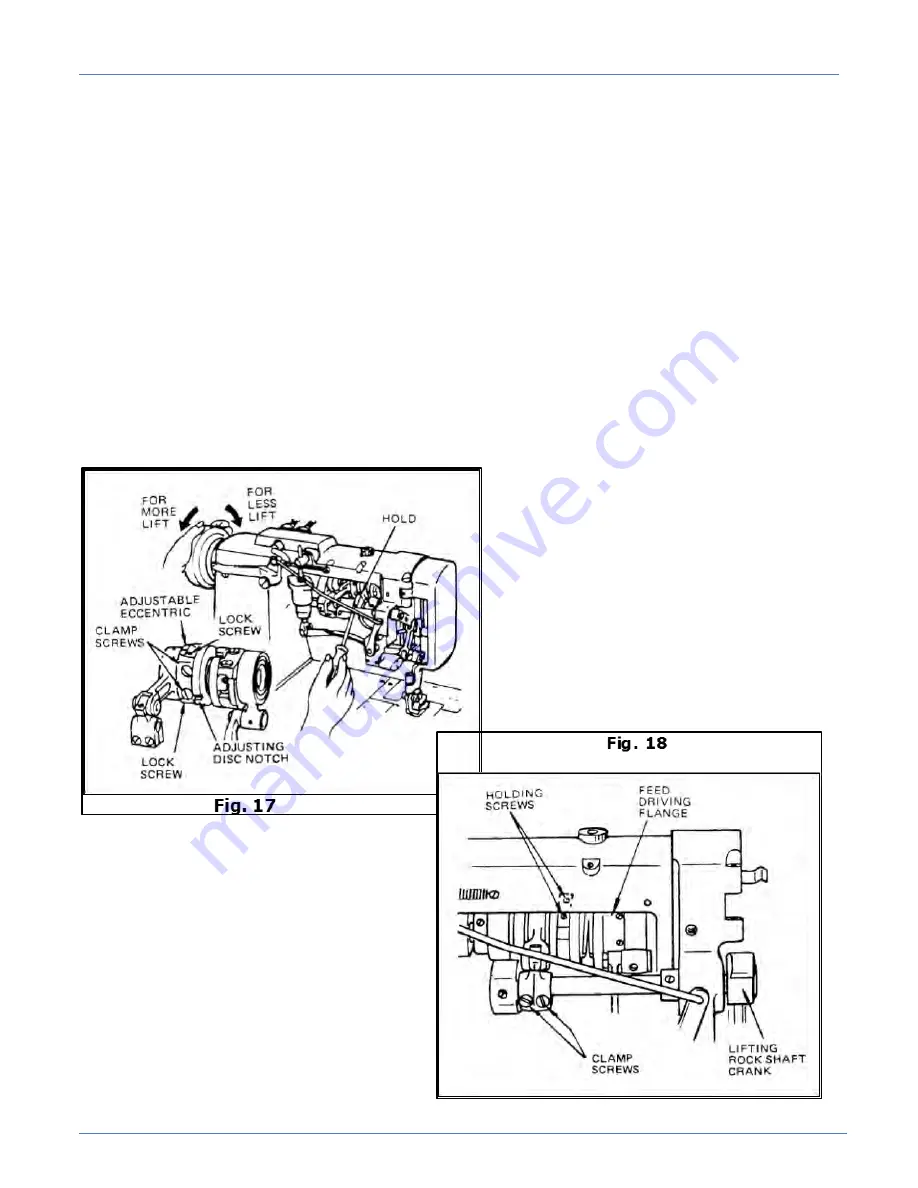
The lift of the vibrating and lifting pressers is controlled by an adjustable eccentric. To adjust, remove 

the arm cover at the rear of the machine. Turn the machine pulley over toward the operator until the 

feeding presser is down. Loosen the two lock screw, Fig. 17, and the two clamp screws. Insert a screw 

driver into the notch of the adjusting disc, and turn the machine pulley as indicated in Fig. 17. Then 

tighten the two clamp screws and the two lock screws. 


When it is desirable to have either one of the pressers lift higher than the other, turn the machine 

pulley over toward the operator until the lifting presser is at its highest position. Loosen the tow clamp 

screws, Fig. 18, and turn the lifting rock shaft crank up or down until the desired lift of each presser is 

attained. Then tighten the tow clamp screws. 

Caution: Limit lift of pressers to a minimum required for the work, as this permits higher speeds. 


The vibrating presser should be timed so that under normal sewing conditions, the presser foot 

will seat on the material at approximately the same time the needle enters the material. This timing can 

be advanced or retarded slightly depending on the type of operation being performed, such as sewing 

over seams. To adjust, loosen the tow holding screws, Fig. 18, not more than one half turn. Then turn the 

adjustable eccentric, Fig. 17, until the vibrating presser seats at the correct time. Securely tighten the tow 

holding screws after the adjustment is made. 


Summary of Contents for 1345-6A

Page 1: ...Atlanta Attachment Company 362 Industrial Park Drive Lawrenceville GA 30046 770 963 7369 www atlatt com Technical Manual Parts Lists model1345 6A Revision 0 Updated Apr 4 2012 ...

Page 2: ...Technical Manual Parts Lists ...

Page 3: ... Attachment Company which consent may be withheld in Atlanta Attachment Company s sole discretion You may not alter or remove any copyright trademark or other notice from copies of these materials Patents Patents Pending The sale of this product does not sell or otherwise transfer any license or other rights under any U S Patent or other corresponding foreign patent This equipment is manufactured ...

Page 4: ...ts or Errors 3 Signs on the Machine 3 Protective Eyewear 4 Tools 4 Oils Lubricants Chemicals 4 No Smoking Fire Explosion Hazard 4 Workplace 4 Emergency STOP 4 First Aid 4 Important Notices 5 Reporting and Fighting Fires 5 Electrical Power Supply 5 Delivery of the Machine Packaging 6 Transport Damage 6 Interim Storage 6 Transporting the Machine 6 Workplace Environment 7 Local Regulations 7 Maintena...

Page 5: ... Upper Threading 18 Lower Threading 18 Threading the Loopers 19 Tension 19 Pressure 19 Presser Foot Pressure 19 Alternating Pressers 19 Alternating Presser with Pneumatic Pressure Control 20 Upper Feed Roll Pressure 20 Stitch Length 20 Machine with Puller Feed 21 Presser Bar Lift 21 Machines with Alternating Pressers 22 Setting the Height of Feed Bar 23 Centralizing the Feed Dog 23 Setting the Hei...

Page 6: ...haft in Sewing Bed 42 External Parts Sewing Arm 44 External Parts Sewing Arm 46 External Parts Sewing Arm 48 External Parts Sewing Arm 50 Installation of Footlift Link Handle 51 Tools Required 51 Installation 51 Adjustments 51 ASSEMBLY ADJUSTMENT INSTRUCTIONS 52 Assembly Drawings Parts Lists 54 1345 6A Tape Edge Machine 55 13451000 Table Base Assembly 56 13452500A Table Assembly 57 134549300A Cont...

Page 7: ...Technical Manual Parts Lists SSIN 300UX6M Sewing Head 76 13453800 Gear Lock Assembly 77 13453600 Column Assembly 78 1345 500 Parts List 79 1345 6WD1 Wiring Diagram 80 ...

Page 8: ... list of recommended spare parts Instruction Manual s for components made by other manufacturers The layout and installation diagram containing information for installation Intended Use Our machines are designed and built in line with the state of the art and the accepted safety rules However all machines may endanger the life and limb of their users and or third parties and be damaged or cause da...

Page 9: ... work on the machine is only carried out by reliable persons who have been appropriately trained for such work either within the company by our field staff or at our office and who have not only been duly appointed and authorized but are also fully familiar with the local regulations Work on the machine should only be carried out by skilled personnel under the management and supervision of a duly ...

Page 10: ...airing safety are observed in the machine or its mode of operation such as malfunctions faults or changes in the machine or tools appropriate steps must be taken immediately the machine switched off and a proper lockout tagout procedure followed The machine should be examined for obvious damage and defects at least once per shift Damage found shall be immediately remedied by a duly authorized pers...

Page 11: ...ny obstructions whatsoever is essential for safe operation of the machine The floor should be level and clean without any waste The workplace should be well lit either by the general lighting or by local lights Emergency STOP The emergency STOP buttons bring all machine movements to a standstill Make sure you know exactly where they are located and how they work Try them out Always ensure easy acc...

Page 12: ... so that it cannot be switched on again without authorization In practice this may mean that the technician electrician and operator all attach their own padlock to the master switch simultaneously so that they can carry out their work safely Locking extension plates should be available for multiple locks if required The primary purpose for a lockout tagout procedure is to protect workers from inj...

Page 13: ...ditional precautions taken to avoid corrosion Transporting the Machine Disconnect the machine from all external connections and secure any loose assemblies or parts Never step under a suspended load When transporting the machine or assemblies in a crate ensure that the ropes or arms of a forklift truck are positioned as close to the edge of the crate as possible The center of gravity is not necess...

Page 14: ...d be secured so that it cannot be switched on again inadvertently before starting any maintenance work whatsoever Use proper lockout tagout procedures to secure the machine against inadvertent startup Remove any oil grease dirt and waste from the machine particularly from the connections and screws when starting the maintenance and or repair work Do not use any corrosive cleaning agents Use lint f...

Page 15: ...ing resistance must be tested before restarting the machine after all assembly or repair work on electric parts Signal generators limit switches and other electrical parts on the safety mechanisms must not be removed or bypassed Only use original fuses or circuit overloads with the specified current rating The machine must be switched off immediately if a fault develops in the electrical power sup...

Page 16: ...vements Read the Instruction Manual carefully to establish which keys and functions start machine movements A Word to the End User The end user has sole responsibility to enforce the use of safety procedures and guards on the machine Any other safety devices or procedures due to local regulations should be should be retrofitted in accordance to these regulations and or the EC Directive on the safe...

Page 17: ...ls are located on the equipment near the immediate areas of potential hazards These decals should not be removed or obliterated Replace them if they become non readable ALWAYS keep safety shields and covers in place except for servicing ALWAYS maintain a safe distance from people when operating ALWAYS operate equipment in daylight or with adequate working lights Follow daily and weekly checklists ...

Page 18: ...rectly For the Sew Efka the first few stitches will be very slow because the Efka is detecting the pulley ratio and adjusting automatically While the default values of the parameters cause the machine handle most mattresses well certain parameters may be adjusted to improve performance in special cases Parameters for Sew Efka Controller that has a three digit display Parameter 111 sets the max str...

Page 19: ... The new parameters must be saved before turning off power See instructions above for saving parameters Instructions for the AB221 with four digit display When replacing or installing a new Efka Controller perform a master reset of the parameters using the following instructions Master Reset of parameters if the Efka Controller has a four digit display 1 Power on holding down the P button till the...

Page 20: ...et out Min is 1000 max is 9990 default is 3300 Parameter 702 sets the deceleration speed step in RPM sec which controls the slowdown of the motor independent of how fast the knee pad is pushed in Min is 1000 max is 9990 default is 9990 Parameter 703 sets the max normal corner carriage speed in RPM Min is 200 max is parameter 111 default is 1300 Parameter 704 sets the max glide straight carriage sp...

Page 21: ...Technical Manual Parts Lists 14 ...

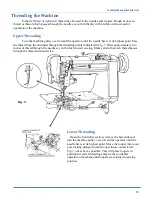
Page 22: ...g four rubber bushings in the hanger holes as shown in Fig 1 Attach the oil drain jar to the oil pan as shown in Fig 2 Place the machine on the oil pan assembly with the four bed pins passing through the four rubber bushings shown in Fig 1 Connect the foot lifter treadle to the foot lifter lever Fig 3 at the back of the machine by chain furnished for this purpose Fig 1 Fig 3 ...

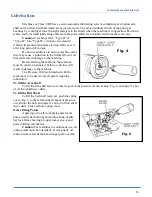
Page 23: ...he machine Before starting the machine the machine must be oiled as instructed Failure to do this will result in damage to the machine The Pressure Oil Can furnished with the machine is to be used to oil all points requiring lubrication To Oil the Arm Shaft To fill the arm shaft reservoir insert spout of the pressure oil can in hole Fig 4 and inject 1 shot of oil into shaft twice daily To Oil the ...

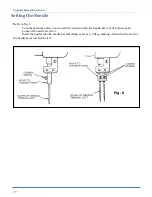
Page 24: ... 6 Turn the machine pulley over toward the operator until the needle bar is at its highest point Loosen the needle set screw Insert the needle into the needle bar and clamp as far as it will go making certain that the scarf of the needle faces toward the left Fig 6 ...

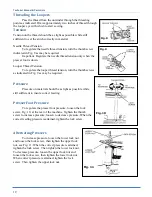
Page 25: ...rough the threading points indicated in Fig 7 Draw approximately two inches of thread through the needle eye with which to start sewing Make certain that each thread passes through the thread tension device Lower Threading Open the front table section remove the bed slide and turn the machine pulley over toward the operator until the needle bar is at its highest point Move the looper throw out gea...

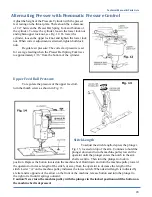
Page 26: ...mb screws as indicated in Fig 9 as may be required Pressure Pressure on material should be as light as possible while still sufficient to insure correct feeding Presser Foot Pressure To regulate the presser foot pressure loosen the lock screw Fig 10 at the rear of the machine Tighten the thumb screw to increase pressure loosen to decrease pressure When the correct feeding pressure is attained tigh...

Page 27: ...ssure of the upper feed roll turn the thumb screw as shown in Fig 13 Stitch Length To adjust the stitch length depress the plunger Fig 15 located on top of the arm Continue to hold the plunger down and turn the machine pulley toward the operator until the plunger enters the notch in the arm shaft eccentric Then turn the plunger to lock in position Depress the button located on the machine bed Hold...

Page 28: ...th the worm and slide the puller feed shaft through the worm gear until the end of the shaft is flush with the needle bearing Remove the end play in the shaft by setting the two collars against the bracket and tightening the four set screws Align the lower feed roll with the upper feed roll and tighten the two set screws Center the worm gear on the center of the worm Tighten the two set screws wit...

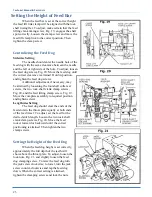
Page 29: ... the lifting presser is at its highest position Loosen the tow clamp screws Fig 18 and turn the lifting rock shaft crank up or down until the desired lift of each presser is attained Then tighten the tow clamp screws Caution Limit lift of pressers to a minimum required for the work as this permits higher speeds The vibrating presser should be timed so that under normal sewing conditions the presse...

Page 30: ...ning the four shaft collar set screws the two rock shaft crank clamp screws Fig 20 and the feed lifting clamp screw Fig 19 Move the complete assembly to required position and tighten screws Lengthwise Setting The feed dog should clear the ends of the feed slots in the throat plate equally at both ends of the feed travel To adjust set the feed for the desired stitch length Loosen the two rock shaft...

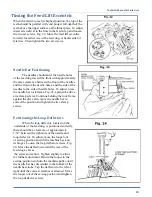
Page 31: ...ig 23 against the drive arm clamp screws Continue holding the rock frame against the drive arm move the needle bar to correct the position and tighten the two clamp screws Positioning the Loop Deflectors When the loop deflector located on the underside of the feed dog is positioned correctly there should be a clearance of approximately 1 32 between the right side of the needle and loop deflector T...

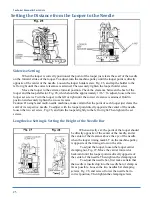
Page 32: ...ti needle machines make certain that the point of each looper just clears the scarf of its respective needle To adjust with the looper point directly opposite the center of the needle loosen the two set screw Fig 26 and turn the looper slightly to the left or right Then tighten the set screws Lengthwise Setting Setting the Height of the Needle Bar When correctly set the point of the looper should ...

Page 33: ...r on the backward stroke reverse the adjustment by loosening the timing screw right and tightening the timing screw left Setting the Needle Guards When the needle guards are properly set they should pass as close as possible to the needles without touching To adjust the guard turn the machine pulley over toward the operator until the points of the loopers are about to pass the needles on their for...

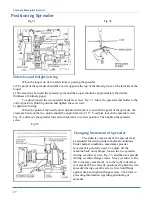
Page 34: ...r the clearance between the two points should be approximately 1 16 To adjust loosen the spreader screw Fig 32 and move the spreader forward or backward to correct position Then tighten the spreader screw Fig 33 Changing Movement of Spreader The sidewise movement of the spreader may be adjusted for sewing under abnormal conditions Under normal conditions maximum spreader movement is generally used...

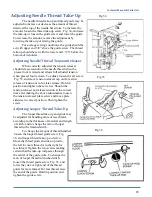
Page 35: ...lease of tension or in for later release Hold in position and tighten the set screw Should the tension releaser not release tension at the correct time after making the above adjustments loosen the tension releaser plate screw and move plate sidewise to correct position Then tighten the screw Adjusting Looper Thread Take Up The looper thread take up and guide may be adjusted for handling more or l...

Page 36: ...Technical Manual Parts Lists 29 ...

Page 37: ...Tape Edge machines We can also supply proprietary parts in most cases for Cash Spuhl Porter United Tape Edge workstations Orders may be placed by Phone 770 963 7369 Fax 770 963 7641 Email sales atlatt com A registered trademark of The Singer Company Limited Copyright 2000 The Singer Company Limited All rights reserved throught the world Cash Spuhl Porter and United are the trademarks of their resp...

Page 38: ...Technical Manual Parts Lists 31 ...

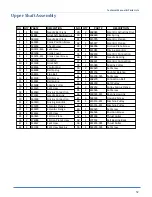
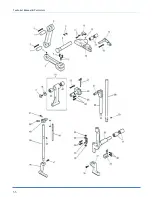
Page 39: ...crew 25 2 267623 Friction Plate 26 2 374098 Friction Plate Screw 27 4 414557 Set Screw 28 4 241763 Set Screw Packing NO QTY PART DESCRIPTION 29 2 268065 Eccentric Adjusting Disc 30 1 268618 Disc Spring 31 1 415076 Eccentric Flange 32 1 415077 Eccentric Flange 33 2 544286 Friction Plate Screw 34 1 415081 Driving Eccentric 35 1 268490 Eccentric Connection 36 1 271055 Needle Bearing 37 1 268491 Eccen...

Page 40: ...Technical Manual Parts Lists 33 ...

Page 41: ...ng Link 20 2 270266 Needle Bearing 21 1 268512 Thread Guide 22 1 281914 Connecting Stud 23 1 202330 Oil Wick 24 2 414511 Pinch Screw NO QTY PART DESCRIPTION 25 1 414545 Thread Guide Set Screw 26 1 267657 Presser Bar 27 1 267658 Hinge Stud 28 1 281912 Needle Bar 29 1 414519 Set Screw 30 1 415045 Rock Frame 31 2 268029 Needle Bearing 32 2 268144 Oiling Felt 33 2 268278 Felt Holder 34 2 414522 Felt H...

Page 42: ...Technical Manual Parts Lists 35 ...

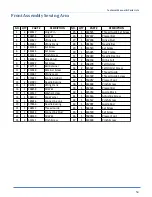
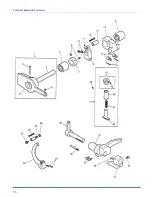
Page 43: ...5071 451 Shaft Bracket 15 2 414504 Bracket Screw 16 2 543841 001 Position Pin 17 1 415098 Regulating Stud 18 1 415099 Stud Cap NO QTY PART DESCRIPTION 19 1 414528 Set Screw 20 1 268149 Stud Sleeve 21 1 214529 Stud Spring 22 1 268148 Regulating Stud 23 1 414527 Set Screw 24 1 415092 Hinge Stud 25 2 268258 Oil Wick 26 1 541197 Hinge Stud Nut 27 1 545297 Cap Screw 28 1 415094 451 Driving Arm 29 2 414...

Page 44: ...Technical Manual Parts Lists 37 ...

Page 45: ...Driving Connection 30 1 415213 Crank 31 2 414511 Pinch Screw 32 1 415092 Hinge Stud 33 1 268258 Oil Wick NO QTY PART DESCRIPTION 34 1 541197 Hinge Stud Nut 35 1 545297 Cap Screw 36 1 415082 Eccentric 37 1 415073 Eccentric Flange 38 1 415074 Eccentric Flange 39 2 414555 Set Screw 40 2 414557 Set Screw 41 1 241763 Set Screw Packing 42 1 267263 Friction Plate 43 2 374098 Friction Plate Screw 44 1 267...

Page 46: ...Technical Manual Parts Lists 39 ...

Page 47: ...Shaft 23 2 415065 Shaft Collar 24 2 504020 Set Screw 25 1 415204 Lifting Crank 26 1 414501 Pinch Screw 27 1 545213 Set Screw NO QTY PART DESCRIPTION 28 1 281208 Needle Guard 29 1 268380 Looper 30 1 281207 Needle Guard 31 1 141478 Set Screw 32 1 141494 Set Screw 33 1 281223 Driving Connection 34 1 415500 Connection Bushing 35 1 414516 Pinch Screw 36 1 268208 Hinge Pin 37 1 268258 Oil Wick 38 1 4151...

Page 48: ...Technical Manual Parts Lists 41 ...

Page 49: ... 268184 Spreader Bar Bracket 8 2 414524 Screw 9 1 559065 Spreader Bar 10 1 268190 Driving Pin 11 2 415297 Bushing 12 1 415389 Driving Rock Shaft NO QTY PART DESCRIPTION 13 1 415194 Crank 14 2 544204 001 Set Screw 15 1 414575 Screw Stud 16 1 32825 Oil Wick 17 1 545424 Screw Stud Nut 18 2 415065 Shaft Collar 19 4 504020 Set Screw 20 1 268052 Thread Take Up Rod 21 1 504019 Set Screw 22 1 269619 Threa...

Page 50: ...Technical Manual Parts Lists 43 ...

Page 51: ...Lever Rod 12 1 248423 Cotter Pin 13 1 267650 Housing Support Retainer 14 2 545205 451 Retainer Screw 15 1 415106 Spring Housing 16 1 559077 Collar 17 2 541198 Nut NO QTY PART DESCRIPTION 18 1 267714 Housing Support 19 1 414567 Hinge screw 20 1 548154 Washer 21 1 545405 Nut 22 1 267738 Spring Arm 23 1 412373 Rod Connection 24 3 541166 001 Connection Nut 25 1 559068 Lifting Rod 26 1 559067 Rod Conne...

Page 52: ...Technical Manual Parts Lists 45 ...

Page 53: ...ring Bushing 13 1 143658 Locking Spring 14 1 59539 Tension Stud 15 1 50326 Tension Stud 16 1 51570 Thumb Nut NO QTY PART DESCRIPTION 17 1 54279 Thread Guide 18 1 226206 Releasing Pin 19 1 415357 Tension Releaser 20 2 543853 003 Spacing Collar 21 1 268167 Tension Bracket 22 2 544336 Tension Bracket Screw 23 1 204365 Tension Releaser Spring 24 1 415252 Tension Releaser Cap 25 1 504048 Set Screw 26 2...

Page 54: ...Technical Manual Parts Lists 47 ...

Page 55: ...4 1 268033 Lock Stud 5 1 228661 Face Plate Cushion 6 1 268032 Lock Spring 7 1 415016 Spring Plate 8 2 414534 Screw NO QTY PART DESCRIPTION 9 1 267701 451 Arm Side Cover 10 4 545295 Screw 11 1 267656 452 Thread Lubricator 12 1 504019 Screw 13 3 236957 Oil Pad Felt 14 1 559032 Face Plate Locker 15 4 374397 002 Screw 16 1 415009 Needle Bar Crank Housing ...

Page 56: ...Technical Manual Parts Lists 49 ...

Page 57: ...d Cover 13 2 414520 Screw 14 1 559076 Bed Cover 15 7 544217 052 Screw 16 1 559072 Looper Cover 17 1 559074 Bed Cover Left NO QTY PART DESCRIPTION 18 1 559073 LooperCoverThumb Screw 19 1 415294 Thread Tension 20 1 415291 Thread Tension Stud 21 2 412203 Thread Tension Disc 22 1 10148 Thread Tension Spring 23 1 541452 Thumb Nut 24 1 415255 Tension Bracket 25 2 543853 003 SpacingCollar 26 2 414532 Scr...

Page 58: ...link is touching the bearing surface on the pivot bracket Then snug the stop collar on the other side against the other bearing surface on the pivot bracket Be sure the stop does not prevent the handle from turning upwards approximately 90 degrees on the handle side Place one of the two threaded studs of the linkage included in accessory box into the hole at the end of the collar link Put the othe...

Page 59: ...djustment screws item E 3 Tighten or loosen the 4 upper and 4 lower adjustment screws item E as required to put pressure on the column assembly item A and align it in the support column NOTE EXCESSIVE PRESSURE WILL CAUSE BINDING AND PREMATURE FAILURE OR WEARING OF PARTS Apply only the minimun ammount of pressure required to reduce the rotational movement of the table to an acceptable level 4 Tight...

Page 60: ...Technical Manual Parts Lists 53 ...

Page 61: ...a Attachment Company In addition to any confidentiality and non disclosure obligations that currently exist between you and Atlanta Attachment Company your use of these materials serves as an acknowledgment of the confidential and proprietary nature of these materials and your duty not to make any unauthorized use or disclosure of these materials ...

Page 62: ...563000A CARRIAGE ASSEMBLY 7 1 1345LAB2 LABEL TABLE DON T SIT STAND 8 1 311 129 SLEEVE TAPE MOUNT ADJUST 9 1 BB305705C BEARING CAM ROLLER 10 1 MMCCF3_4SB CAM FOLLOWER 3 4 DIA 11 1 MMSH 98 RING SNAP EXTERNAL 12 1 NNH5 8 18 NUT HEX 5 8 18 13 2 SSBC80032 6 32 X 1 2 BUT HEAD 14 3 SSHC01048GR8 1 4 20 X 3 4 HEX CAP 15 1 SSIN 300UX6M HEAD MOD GEN TAPE EDGE 16 3 SSSC70040 4 40 X 5 8 SCREW SOCKET CAP 17 1 W...

Page 63: ...RT 4 2 13451020 GEAR RACK LONG 5 4 13451021 GEAR RACK CORNER 6 4 13451029 PAD RUBBER 7 1 13459500 CONTROL BOX 8 8 IIS016X112 ROLL PIN 1 8 DIA X 1 1 2 SS 9 4 MML 2 LEVELING PAD 5 8 11 10 8 NNSH5 8 11 NUT SQUARE 5 8 11 11 40 SSHC10112 SCREW HEX 5 16 18X1 3 4 12 8 SSSC10080 5 16 18 X 1 1 4 SOC CAP 13 4 SSSC98032 10 32X1 2 SOC CAP 14 4 WWFS10 WASHER FLAT 10 SAE 15 4 WWL10 WASHER LOCK 10 S S 16 40 WWL5...

Page 64: ...ABLE ASSY TWIN 5 2 BBTRA613 WASHER THRUST STL 375B 6 1 NNJ5 16 18 NUT JAM 5 16 18 7 4 PPP2217 WIRE CLAMP 337I D 8 1 SSFC10056S 10 32 x 2 FLAT ALLEN 9 4 SSFC45064 1 2 13 X 1 SOC FLAT CAP 10 2 SSHC10048 5 16 18 X 3 4 HHCS 11 4 SSHC45080 1 2 13X1 1 4 HEX CAP 12 4 SSSC98032 10 32X1 2 SOC CAP 13 2 WWF5 16 WASHER FLAT 5 16 14 4 WWFS1 2 WASHER FLAT SAE 1 2 15 4 WWFS10 WASHER FLAT 10 SAE 16 4 WWL1 2 1 2 L...

Page 65: ...K P B CONTACT N C 6 10 EE3X10 BLOCK P B CONTACT N O 7 8 EEA3L LATCH PUSH BUTTON 8 3 EED5N157 LAMP INCONDECENT BAYONET 9 1 EEPFA6 BUTTON PUSH BLU FLUSH 10 2 EEPLE3 BUTTON PUSH GRN ILLUM 11 1 EEPLE4 BUTTON PUSH RED ILLUM 12 1 EEPMTS44 E STOP BUTTON TWIST REL 13 3 EEPU2A3 BUTTON PUSH 22MM 2X G MOM FLUSH 14 2 EESL110B SHAFT LOCK NYLON 1 4 15 6 FT FF18988C CABLE 8 COND 18GA 16 24 FT FF19511 CABLE 3 CON...

Page 66: ...Technical Manual Parts Lists 59 ...

Page 67: ...NG ASSY 15A 8 COND 18 1 MM85200 12 5 ACTUATOR ELEC 220V 12 5 19 1 MM98306A289 PIN CLEVIS 3 8X3 1 2 20 1 MM98338A445 COTTER PIN 1 8 X 2 1 2 21 8 NNH1 4 20 NUT HEX 1 4 20 22 2 NNJ1 4 20 NUT HEX JAM 1 4 20 23 1 PPP2217 WIRE CLAMP 337I D 24 2 SSBC01048 SCREW BUTTON CAP 1 4 20X3 4 SS 25 16 SSFC01032 1 4 20 X 1 2 FLAT ALN CAP 26 24 SSFC98032 10 32 X 1 2 FLAT ALLEN CAP 27 4 SSHC01224 1 4 20 X 3 1 2 HEX C...

Page 68: ...Technical Manual Parts Lists 61 ...

Page 69: ...1024 CONTACTOR MINI 240V 8 2 EECLIPFIX ANCHOR DIN RAIL 9 1 EETS35X7 5A DIN RAIL EURO 10 4 FF1724 STRAIN RELIEF 11 15 FF19511 CABLE 3 COND 14GA 12 7 FF264 341 TERMBLK WAGO TOP DUAL GRY 13 1 FF264 347 TERMBLK WAGO TOP DUAL GRN 14 1 FF264 371 TERMBLK WAGO TOP END 15 1 FF3120L420A CIRCUIT BREAKER THERMAL 16 1 FFL722C BREAKER CIRCT THERM MAG 17 1 NNK8 32 NUT KEP 8 32 18 6 SSPS80016 6 32 X 1 4 LG PAN HD...

Page 70: ...Technical Manual Parts Lists 63 ...

Page 71: ...E 19 1 33005110A HANDLE 9 25 L 20 1 33005116B SPACER HANDLE MOUNT 21 1 EE49111AS PUSH BUTTON SWITCH ASSY 22 2 MM40450010 FASTENER SLIDE LOCK 23 1 MMGP 105 GRIP HANDLE FOAM 3 4 ID 24 4 MMSLD ECH 1 2 DIA RUBBER BUMPER 25 4 NNH3 8 16 NUT HEX 3 8 16 26 4 NNK1 4 20 NUT HEX KEP 1 4 20 W LOCK 27 4 SSBC90016 8 32 X 1 4 BUTTON CAP 28 8 SSBC98032 10 32 X 1 2 BUTTON CAP SC 29 2 SSFC01048 1 4 20 X 3 4 FLAT CA...

Page 72: ...Technical Manual Parts Lists 65 ...

Page 73: ...TIC 35 1 AAOEM 5BSAL SHOCK 3 4 18 X 3 5 36 1 AATPWL3_4 LOOM WIRE 3 4 37 1 4 FF2226 EDGING GROMMET 38 1 4 FF2230 EDGING GROMMET 25 NO QTY PART DESCRIPTION 39 1 FF3234 STRAIN RELIEF LIQ TIGHT 40 1 FF8465 NUT LOCK 3 4NPT NYLON BLK 41 1 FFSM312LV BANNER MINI BEAM w OUT PL 42 1 FFUZP101 PROX SWITCH 43 4 K 235 CONNECTOR ROMEX 1 2 44 1 MM9307K69 GROMMET 5 8 1 125 125GV 45 2 MM98330A245 CLEVIS PIN 2 25LG ...

Page 74: ...Technical Manual Parts Lists 67 ...

Page 75: ...ER ASBY 10 5 MM9540K53 BUMPER 3 4 DIA 11 1 MMAGH25CAN LINEAR BEARING 12 1 MMAGR25360M1 RAIL LINEAR MODIFIED 13 5 NNK8 32 KEP NUT 8 32 14 4 RRLE018B1 SPRING EXT 020X 19X1 5 15 1 RRLE055E10 SPRING EXT 020X 19X1 5 16 2 SSHC01040 1 4 20 X 5 8 HHCS 17 2 SSHC01080 1 4 20 X 1 1 4 HHCS 18 4 SSHC90032S 8 32 X 1 2 HEX CAP 19 2 SSSC01048 1 4 20 X 3 4 SOC CAP SC 20 6 SSHC98032 10 32X1 2 HEX HD 21 4 WWL1 4 WAS...

Page 76: ...Technical Manual Parts Lists 69 ...

Page 77: ...787B 11 2 BB305702C BEARING CAMROLLER 12 1 FF3460 STRAIN RELIEF LIQ TIGHT 13 1 FF8465 NUT LOCK 3 4NPT NYLON BLK 14 2 MM1095K44 GREASE FITTING 1 4 28 15 4 MMH0 185 CLIP RING INT 1 962 OD 16 2 MMSH 59 CLIP RING EXT 546 ID 17 2 NNE1 2 13 NUT NYLOCK 1 2 13 18 2 NNH1 2 13 NUT HEX 1 2 13 19 1 NNH3 8 16 3 8 16 HEX NUT 20 2 SSBC98032 10 32 X 1 2 BUT HEAD 21 1 SSHC25080 3 8 16 X 1 1 4 HEX HEAD 22 2 SSHC251...

Page 78: ...Technical Manual Parts Lists 71 ...

Page 79: ...1 TERMBLK WAGO TOP DUAL GRY 8 2 FF264 347 TERMBLK WAGO TOP DUAL GRN 9 5 FF264 371 TERMBLK WAGO TOP END 10 2 FFL722C BREAKER CIRCT THERM MAG 11 1 FFR4 7 RESISTOR 4 7K 1 4W 12 3 FFR47 RESISTOR 47 1 4W 13 1 MM1770A12 DOOR LATCH CAM KEYED 14 1 MM40450010 FASTENER SLIDE LOCK 15 6 MM9376K141 ISOLATOR URETHANE 16 10 NNK8 32 NUT KEP 8 32 17 10 SSPP90024 8 32 X 3 8 PAN HD PHIL 18 1 SSPP90032 8 32 X 3 8 PAN...

Page 80: ...Technical Manual Parts Lists 73 ...

Page 81: ...W DC CONTROLLER 18 1 4059 PM58 PULLEY 58MM 14MM BORE 19 1 MM20UM1 GEAR BOX MOD 20 1 MM231572 COUPLING 21 1 MM231631M1 CLUTCH 22 1 MMHX7 8 BUSH TAPER LOCK 7 8 BORE 23 1 MMS1040 GEAR 40T 10P 24 2 MMVPS 112 BEARING PILLOW BLOCK 3 4B 25 1 NNE10 32 NUT ELASTIC LOCK 26 1 PP3X910 PULLEY V BELT MOTOR 4 27 4 SSFC80032 6 32 X 1 2 FLAT CAP 28 4 SSHC01048 1 4 20 X 3 4 HEX CAP 29 10 SSHC10064 5 16 18 X 1 HHCS ...

Page 82: ...Technical Manual Parts Lists 75 ...

Page 83: ...ST 13 3 AAF11752 3 BRASS BARB FOR AIRLINE 14 1 GG124L050 BELT 3 8P 1 2W 15 1 PP20LB050M2 PULLEY GEAR 3 8P 63B 20T 16 1 RRBEEHIVEH SPRING HEAVY BEEHIVE 17 10 SN62X59 NEEDLE SIZE 24 180 18 1 SSAS020048 SCREW ALLEN SHOULDER 19 1 SSIN 300UX6 HEAD MOD GEN TAPE EDGE 20 1 SSPS50024 2 56 X 38L PAN HD PHIL 21 3 SSSC70040 4 40 X 5 8 SCREW SOCKET CAP 22 2 SSSC90040 8 32 X 5 8 SOC CAP SC 23 1 SSSC95040 10 24 ...

Page 84: ... Lock Assembly AAC Drawing Number 9001130 Rev 1 NO QTY PART DESCRIPTION 1 1 13453801 SUPPORT GEAR LOCK ASSY 2 1 IIS012X096 SPRING PIN 3 16X1 5 3 1 MM61095K53 KNOB BALL 3 8 16 TAP 4 1 RRLC0742HJ SPRING COMP 072X 66X3 5 1 13453804 MANDREL GEAR LOCK ...

Page 85: ...VOT SUPPORT ACTUATOR 6 1 MM85151 10M1 ACTUATOR MOD 7 3 MM98330A245 CLEVIS PIN 2 25LG STL 8 3 MM98335A064 SPRING CLIP 9 4 MMAGH25CAN LINEAR BEARING 10 1 MMAGR25590N RAIL LINEAR AG SERIES 11 1 MMAGR25710N RAIL LINEAR AG SERIES 12 4 SSFC01048 1 4 20 X 3 4 FLAT CAP 13 2 SSFC10056 5 16 18X7 8 FLAT HD CAP 14 4 SSSC01064 1 4 20 X 1 SOC CAP 15 22 SSSC05040 1 4 28 X 5 8 SOC CAP 16 4 WWFS1 4 WASHER FLAT SAE...

Page 86: ...ts List AAC Drawing Number 192500B Rev 7 NO QTY PART DESCRIPTION 1 1 1349518 Foot Lift Lever 2 1 1345 503 Pivot Bracket 3 2 1345077 Stop Clamp 4 1 1345 504 Pivot Arm 5 1 MMBTH 2 Handle 6 3 SSSC98048 Screw Socket Cap 7 AR 1345 500INS Instructions ...

Page 87: ...Technical Manual Parts Lists 80 1345 6WD1 Wiring Diagram ...

Page 88: ...ent upon proper application installation and maintenance AAC Limited Warranty may not be changed or modified and is not subject to any other warranty expressed or implied by any other agent dealer or distributor unless approved in writing by AAC in advance of any claim being filed What Is Covered Electrical components that are not included within the Serial Bus System that fail due to defects in m...

Page 89: ... AAC no puede ser cambiado o modificado y no está sujeto a cualquier otra garantía implicado por otro agente o distribuidor menos al menos que sea autorizado por AAC antes de cual quier reclamo Lo Que Está Garantizado Componentes eléctricos que no están incluidos dentro del sistema Serial Bus que fallen por defectos de materiales o de fabricación que han sido manufacturados por AAC son garantizado...

Page 90: ...Atlanta Attachment Company 362 Industrial Park Drive Lawrenceville GA 30046 770 963 7369 www atlatt com Printed in the USA ...

Reviews: