background image

Technical Manual & Parts Lists 


Liability


The machine should only be operated when in perfect working order, with due regard for safety and the 

potential dangers, as well as in accordance with the Instruction Material. Faults and malfunctions 

capable of impairing safety should be remedied immediately. We cannot accept any liability for personal 

injury or property damage due to operator errors or non-compliance with the safety instructions 

contained in this booklet. The risk rests exclusively with the end user. 


The Instruction Material should always be kept near the machine so that it is accessible to all concerned.  


The local, general, statutory and other binding regulations on accident prevention and environmental 

protection must also be observed in addition to the Instruction Material. The operating staff must be 

instructed accordingly. This obligation also includes the handling of dangerous substances and 

provision/use of personal protective equipment.  


The Instruction Material should be supplemented by instructions, including supervisory and notification 

duties with due regard for special operational features, such as the organization of work, work 

sequences, the personnel deployed, etc.  


The personnel's awareness of the dangers and compliance with the safety regulations should be checked 

at irregular intervals. 

Choice and Qualification of Personnel 

Ensure that work on the machine is only carried out by reliable persons who have been appropriately 

trained for such work - either within the company, by our field staff or at our office - and who have not 

only been duly appointed and authorized, but are also fully familiar with the local regulations. Work on 

the machine should only be carried out by skilled personnel, under the management and supervision of a 

duly qualified engineer.  


This not only applies when the machine is used for production, but also for special work associated with 

its operation (start-up and maintenance), especially when it concerns work on the hydraulic or electrical 

systems, as well as on the software/serial bus system.  

Training 

Everyone working on or with the machine should be duly trained and informed with regard to correct 

use of the safety equipment, the foreseeable dangers which may arise during operation of the machine 

and the safety precautions to be taken. In addition, the personnel should be instructed to check all safety 

mechanisms at regular intervals.  

Responsibilities 

Clearly define exactly who is responsible for operating, setting-up, servicing and repairing the machine. 

Define the responsibilities of the machine operator and authorize him to refuse any instructions by third 

parties if they run contrary to the machine's safety. This applies in particular for the operators of 

machines linked to other equipment. Persons receiving training of any kind may only work on or with 

the machine under the constant supervision of an experienced operator. Note the minimum age limits 

permitted by law.  


Summary of Contents for 1335MD

Page 1: ...Atlanta Attachment Company 362 Industrial Park Drive Lawrenceville GA 30046 770 963 7369 www atlatt com Technical Manual Parts Lists Model 1335MH Revision 6 4 Updated May 27 2016 ...

Page 2: ......

Page 3: ...erials contained herein are additionally protected by United States Copyright law and may not be used disclosed reproduced distributed published or sold without the express written consent of Atlanta Attachment Company which consent may be withheld in Atlanta Attachment Company s sole discretion You may not alter or remove any copyright trademark or other notice from copies of these materials IMPO...

Page 4: ...3 2 1 1 Foot Pedal 13 2 1 2 Wipe Switch 13 2 1 3 EdgeGuide Panel Tension Assembly 13 2 1 4 Efka Motor 14 2 1 5 Control Box 14 2 2 Changing the Needle 15 2 3 Threading 16 2 3 1 1335MG Yamato 2002 16 2 3 2 1335MH Singer 300UX6 24 2 4 Loading Material 31 1 Border or Gusset Load 31 2 Panel or Non Skid Load 35 2 5 Sewing Procedure 37 2 5 1 Closing Procedure Option 1 39 2 5 2 Closing Procedure Option 2 ...

Page 5: ...g 63 3 Stitch Length 68 4 Puller 71 3 3 Pneumatically 73 3 3 1 Air Regulators 73 3 4 Electrical 74 3 4 1 Main Power Switch 74 3 4 2 Stepping Motor Control Box 75 3 4 3 AP 28 800Y1 Stepper Control Box 75 3 4 4 Ruffler Control Box 76 3 4 5 Eyes 78 3 5 Efka Motor 80 3 5 1 Connections 80 3 5 2 Parameters 81 3 5 3 Programming 82 3 6 Maintenance 86 3 6 1 Daily 86 3 6 2 Weekly 87 3 6 3 3 Month 89 3 6 4 6...

Page 6: ...Assembly 116 1335M 2400 Ball Screw Nut Assembly 117 NOTES 118 1335M 430E Guide Roller Assembly 119 1335M 9500A Stepper Box Assembly 120 1335A 10B Sew Head Assembly 122 1335 110B Footlift Assembly 123 1334 1200A Material Guide Assembly 124 1335105 Unwinder Assembly 126 1335140B Puller Assembly 128 1335294A Ruffler Assembly 130 1335298A Ruffler Mount Angle Assembly 132 1335332 Ruffler Cylinder Lift ...

Page 7: ... and Frame Assembly 156 33008708 Ball Bearing Disc Assembly 157 1959 PD Pneumatic Diagram 158 1335MH PD Pneumatic Diagram 159 1335MF WD Wiring Diagram 160 1334S 02WD Wiring Diagram 161 1335MH 34WD Wiring Diagram 162 1335MH WD1 Wiring Diagram 163 ...

Page 8: ...e A list of recommended spare parts Instruction Manual s for components made by other manufacturers The layout and installation diagram containing information for installation Intended Use Our machines are designed and built in line with the state of the art and the accepted safety rules However all machines may endanger the life and limb of their users and or third parties and be damaged or cause...

Page 9: ... work on the machine is only carried out by reliable persons who have been appropriately trained for such work either within the company by our field staff or at our office and who have not only been duly appointed and authorized but are also fully familiar with the local regulations Work on the machine should only be carried out by skilled personnel under the management and supervision of a duly ...

Page 10: ...airing safety are observed in the machine or its mode of operation such as malfunctions faults or changes in the machine or tools appropriate steps must be taken immediately the machine switched off and a proper lockout tagout procedure followed The machine should be examined for obvious damage and defects at least once per shift Damage found shall be immediately remedied by a duly authorized pers...

Page 11: ...ny obstructions whatsoever is essential for safe operation of the machine The floor should be level and clean without any waste The workplace should be well lit either by the general lighting or by local lights Emergency STOP The emergency STOP buttons bring all machine movements to a standstill Make sure you know exactly where they are located and how they work Try them out Always ensure easy acc...

Page 12: ... so that it cannot be switched on again without authorization In practice this may mean that the technician electrician and operator all attach their own padlock to the master switch simultaneously so that they can carry out their work safely Locking extension plates should be available for multiple locks if required The primary purpose for a lockout tagout procedure is to protect workers from inj...

Page 13: ...hen transporting the machine or assemblies in a crate ensure that the ropes or arms of a forklift truck are positioned as close to the edge of the crate as possible The center of gravity is not necessarily in the middle of the crate Note the accident prevention regulations safety instructions and local regulations governing transport of the machine and its assemblies Only use suitable transport ve...

Page 14: ... Do not use any corrosive cleaning agents Use lint free rags Retighten all screw connections that have to be loosened for the maintenance and repair work Any safety mechanisms that have to be dismantled for setting up maintenance or repair purposes must be refitted and checked immediately after completing the work Maintenance Care Adjustment The activities and intervals specified in the Instructio...

Page 15: ...fault develops in the electrical power supply The electrical equipment of our machines must be checked at regular intervals and any defects found must be remedied immediately If it is necessary to carry out work on live parts a second person should be on hand to operate the emergency OFF switch or master switch with voltage release in the event of an emergency The working area should be cordoned o...

Page 16: ...ating this equipment It is also the owner s responsibility to make certain that the operator is a qualified and physically able individual properly trained in the operation of this equipment Specific safety warning decals are located on the equipment near the immediate areas of potential hazards These decals should not be removed or obliterated Replace them if they become non readable ALWAYS keep ...

Page 17: ...nual Parts Lists 10 1 INSTALLATION MANUAL It is important that the machine operator read this manual and is familiar with all the functions and safety concerns of the unit before operating 1 2 Parts and Components ...

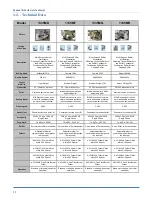
Page 18: ...r required Pre set speed 4 000 3 500 3 200 2 500 Presser foot Pneumatic foot and puller lift Pneumatic foot and puller lift Pneumatic foot and puller lift Pneumatic foot and puller lift Electrically 220VAC 5 Amp 50 60 HZ Single Phase 220VAC 5 Amp 50 60 HZ Single Phase 220VAC 5 Amp 50 60 HZ Single Phase 220VAC 5 Amp 50 60 HZ Single Phase Pneumatic 70 80 Psi 2 SCFM 70 80 Psi 2 SCFM 70 80 Psi 2 SCFM ...

Page 19: ...Mount and adjust the Guide Roller Assembly See 1 2 Parts and components Oil is removed before shipping Check the oil level in the oil pan If you have the 1335 MH Singer 300UX6 To check oil unclamp the puller motor bracket and lean the puller motor back See Fig 2 Then lean the head back to access the oil pan Be sure to re clamp the puller motor bracket and insert the puller drive shaft into the u j...

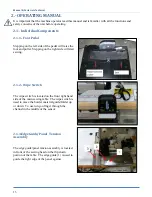
Page 20: ...Stepping on the right side will start sewing 2 1 2 Wipe Switch The wipe switch is located on the front right hand side of the main sewing table The wipe switch is used to move the border material guide folder up or down To use run you finger through the channel in the middle of the sensor 2 1 3 EdgeGuide Panel Tension Assembly The edge guide panel tension assembly is located in front of the sewing...

Page 21: ...he foot pedal is pressed 2 1 5 Control Box The Efka Motor Control Box contains an On Off switch which should remain in the ON position at all times A Display that shows the current maximum set RPM when in normal mode Green Push Buttons that are used during programming the motor and to activate the backtack foot up or down and needle position at stop The only LED that is lighted on this machine is ...

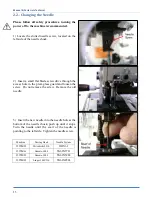
Page 22: ...ough the access hole in the plexi glass guard and loosen the screw Do not remove the screw Remove the old needle 3 Insert the new needle into the needle hole at the bottom of the needle chuck push up until it stops Turn the needle until the scarf of the needle is pointing to the left side Tighten the needle screw Machine Sewing Head Needle System 1335MD Mitsubishi 2210 DBX1 2 1335MG Yamato 1804 SN...

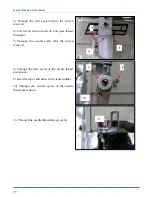
Page 23: ... Please follow all safety procedures turning off power is recommended Swing out the ruffler assembly to access the thread 1 Start by threading the needle thread through the thread guide 2 Then through the first thread tension eyelet 3 Around the bottom of and between the tension disks 4 Then through the second thread tension eyelet ...

Page 24: ...on reservoir and pass thread through it 7 Through the second eyelet after the silicon reservoir 8 Through the first eyelet of the needle thread pre tension 9 Over the top of and between the tension disks 10 Through the second eyelet of the needle thread pre tension 11 Through the needle thread take up eyelet ...

Page 25: ...Technical Manual Parts Lists 18 12 Through the needle thread take up eyelet on the needle bar 13 Through the needle thread eyelet on the needle chuck 14 Through the needle eye should go in right to left ...

Page 26: ...f power is recommended 1 Thread through the top thread tension eyelet 2 Go around the right of the tension and between the tension disks 3 Through the bottom thread tension eyelet 4 Lift up on the stripper blade and swing out to the right 5 Lift up on the front table access and fold down ...

Page 27: ...Lists 20 6 Open the first front cover of the sewing head 7 Open the second front cover of the sewing head Table and sewing head should look like picture to the right 8 Thread through the first eyelet after the thread tension ...

Page 28: ...ond eyelet on the side of the sewing head 10 Thread through the first eyelet of the looper thread take up bracket 11 Thread through the looper take up lever 12 Thread through the second eyelet of the looper thread take up bracket 13 Thread through the eyelet ...

Page 29: ...age or injury may occur 16 By hand turn the hand wheel towards the front of the sewing head so that the P on the hand wheel gets closer to the brass marker on the sewing head The lever will get harder to hold up and the hand wheel will be harder to rotate Keep the lever up and rotate the hand wheel until the looper pops forward the Hand wheel will stop turning when the looper is completely out ...

Page 30: ... back hole on the looper 19 Pass the thread along the groove in the looper 20 Go up through the eye of the looper 21 Turn the Hand wheel about turn to pop the looper back in place If you forget when you start sewing the looper will go back in place by themselves without damaging the machine Close all covers and doors ...

Page 31: ...the material guide folder and swing out the ruffler assembly 1 Pull the thread through the eyelet located on the ruffler assembly mount Top right on the sewing head 2 Thread through the top eyelet of the needle thread tension assembly 3 Thread around and between the tension disks 4 Thread through the bottom eyelet of the needle thread tension assembly ...

Page 32: ...the first thread guide after the needle thread tension assembly Located on the side of the sewing head 6 Undo the latch for the crank case cover and open the door 7 Thread through the needle thread take up eyelet located on the side of the sewing head ...

Page 33: ...al Parts Lists 26 8 Thread through the bottom thread guide of the needle thread take up 9 Thread through the take up rod located on the needle bar clamp 10 Thread through the thread guide just in front of the needle ...

Page 34: ...ead through the eye of the needle going right to left 2 Looper 1 Swing out the ruffler assembly and the stripper blade assembly Open the access door in the table top 2 Undo the latch for the looper access door 3 Open the looper access door ...

Page 35: ...ttom of and between the disks of the looper thread tension 7 Thread through the bottom eyelet of the looper thread tension assembly 8 Thread through the first thread guide of the looper thread take up assembly 9 Thread through the looper thread take up arm 0 Thread through the second thread guide of the looper thread take up assembly 11 Thread through the third thread guide of the looper thread ta...

Page 36: ...d thread guide of the looper thread take up assembly 12 Thread through the eyelet post located in the access slot on the cover of the looper assembly 13 Thread through the hole in the casting also located in the access slot on the cover of the looper assembly ...

Page 37: ...d out through the tube just before the looper 15 Thread through the needle guard eyelet on the looper 16 Thread through the hole in the back of the looper 17 Thread through the channel on the top side of the looper and up through the eye of the looper ...

Page 38: ... button on the Main Power Switch 2 Check that the On Off switch on the Efka motor controller is Orange and that the Display shows the RPM If not press the On Off switch in the down position to turn on 3 Check to make sure that the Power light located on the stepping motor box is on If these lights are not on then turn the power off at the main switch and notify the plant mechanic ...

Page 39: ...so the tick side is up as it feeds off the roll Replace the disk and tighten the thumb screw 5 Place the material in the guide rods over the first bar under the second Move the edge just so that it touches the edge of the material Loosen the ratchet handle and slide the edge guide in or out as needed 6 The material will next pass through the feed rollers To get the material between the rollers you...

Page 40: ...the picture to the left 8 Next lift up the border or use your hand to block the border loop eye The yellow light on the eye will come on either solid or blinking 9 Step on the left side of the foot pedal and the material will automatically start feeding from the feed rollers ...

Page 41: ...s of the gusset Extra spacers can be ordered to fit any thickness gusset from 1 8 to 9 16 Adjust the lower portion of the folder in the same manner 12 The right side of the border guide folder has fixed guides for the right edge of the border The left side has movable guides there are thumb screws on the backside of the border guide folder loosen the screws and slide the guides left or right until...

Page 42: ...bout half an inch is behind the puller 2 Panel or Non Skid Load 1 Load the PANEL so that the good side of the material is up Start by sliding the panel under the border top plate and stripper blade 2 To get the panel completely under the top plate step on the left side of the foot pedal to get the panel tension finger to go down the foot to go up and puller go up Slide the panel until it contacts ...

Page 43: ...until the center notch is even or just behind the needle Make sure that the panel is even with the right edge of the border material 4 Use the wipe switch to lower the border guide folder 5 You are now ready to start sewing when the machine looks like picture to the left ...

Page 44: ...ntrol box The sewing head will go into slow stitch speed the sped of which is set by thumbwheel 2 3 Once the stop count has ended the ruffling blade will drop and make the ruffles The number of ruffles is based on what thumbwheel 5 is set to in this example it is set to 7 for two ruffles in square or straight sew mode While the ruffle is being pushed under the foot and sewn the machine is counting...

Page 45: ...l 6 Then press back on the right side of the foot pedal The machine will sew two more stitches thumbwheel 1 on the ruffler control box Then the machine will make one more ruffle in the corner While the ruffle is being pushed under the foot and sewn the machine is counting the number of stitches set in thumbwheel 6 once this count has been reached the ruffling blade will retract Once the ruffle ruf...

Page 46: ...will need to slow down and stop the machine just as the leading starting edge of the border gets to the top plate Fold the leading edge back towards you and sew until the starting stitches reach the edge of the table top as shown 2 Use the wipe switch to raise the folder 3 Pull out some extra material 0 ...

Page 47: ...nsion finger and the top plate and pull it over the top of the top plate Fold the leading edge material towards you 6 Lay the trailing edge of the border material over the leading edge and sew forward until you get close to the center point Step on the left side of the foot pedal and raise the foot and puller and pull the material out from under them ...

Page 48: ...better seam alignment when placing under the presser foot for sewing 8 Place the border under the presser foot by stepping on the left side of the foot pedal Line up the location or mark for the seam with the needle Use the right side of the foot pedal to sew the seam closed You can insert a law label in when you do this operation 9 Depending on your plants specs you may have to sew this seam twic...

Page 49: ...e a book and lay them flat Raise the foot and puller by stepping on the left side of the foot pedal and slide the material under them Line up the needle with the existing sew line and sew across the seam 11 You should have a completed cover when the seam is closed ...

Page 50: ...g Procedure Option 2 1 After turning the fourth corner you will need to slow down and stop the machine just as the leading starting edge of the border gets to the top plate 2 Use the wipe switch to raise the folder 3 Pull out some extra material ...

Page 51: ...swing the ruffler assembly out of the way 5 Pull the panel out from between the panel tension finger and the top plate and pull it over the top of the top plate Fold the leading edge material towards you 6 Fold back the leading edge of the border material as shown ...

Page 52: ...leading edge 8 Use the right side of the foot pedal and Sew across until you get to the existing sew line Step on the left side of the foot pedal and raise the presser foot and puller and remove the material from under them 9 Keeping the leading edge folded so that you have three ply of material ...

Page 53: ...mount of fold for the leading edge or the seam will not come out straight Use the right side of the foot pedal and sew down to the bottom edge of the material You may insert a law label if needed You can chain off on this machine but it needs to stay under the puller and at a slower rpm 12 You should have a completed border with the seam closed as shown in the picture to the left ...

Page 54: ... ruffler assembly Turning the knob clockwise makes the ruffler smaller turning the knob counter clockwise will make the ruffle larger There is a scale located on the side of the right side of the ruffler assembly The pointer will move as the knob is turned the smaller the number the smaller the ruffle the larger the number the larger the ruffle ...

Page 55: ...Technical Manual Parts Lists 48 2 7 Sizing the Panel Panel size W 2 x X 2 x Y Example Frame size 80 Waterfall 3 Seam allowance panel Panel size 80 2x 3 2x Panel size 80 6 1 Panel size 75 ...

Page 56: ...Manual Parts Lists Technical 49 2 7 1 Flow Chart Sizing Box Springs Page 1 ...

Page 57: ...e stitch count too See A If changing the ruffle size sometimes you need to change the stitches per ruffle See E D Changing number of the ruffles in the corner The number of ruffles can be changed by changing the number on the control box 2nd from r Numbers 1 6 are round corners Numbers 7 9 are square corners were 7 2 ruffles 8 4 ruffles and 9 6 ruffles If changing the seam most of the time you nee...

Page 58: ...Manual Parts Lists Technical 51 2 7 2 Flow Chart Cover Adjustments Page 2 ...

Page 59: ...ght hard to pull on or sunk in Rerun a cover and check the corners on it if the problem still exists then increase the size of the ruffle Increase the number of ruffles if permitted Cover is too small won t fit on the spring unit Rerun cover and check size if size is too small do the following 1 Check the cut panel size 2 Add more pressure to the panel tension 3 Increase the size of the ruffle 4 I...

Page 60: ...nance a Daily Maintenance Open up all the covers on the sewing head and blow out the lint from the machine Wipe all the electric eyes off with a soft nonabrasive cloth Check for and clean threads from around the puller housing and puller wheel ...

Page 61: ...ugh the border guide folder while the machine is sewing Adjustment of the angled roll depends on the width and type of border being sewn Adjustment is made with the ratchet handles 3 1 2 EdgeGuide Panel Tension Assembly The air cylinder 4 located under the table pushes the panel tension finger 2 up until it contacts the bottom of the top plate 3 The amount of pressure is determined by the middle p...

Page 62: ... located on the front right of the table and the ruffler blade 6 The front of the ruffler drive assembly has the ruffle adjustment knob 7 used to adjust the size of the ruffle Under the cover of the ruffler drive assembly there is the stepping motor 8 which is controlled by the stepping motor box located under the table The ball screw assembly 9 which moves the ruffling blade in and out and the ru...

Page 63: ...the swing out bracket 14 Located on the back of the swing out bracket 14 there is a lock pin 15 This locks the swing out bracket in place when the border guide folder 2 is down To the right of the ruffler drive assembly is the swing out bracket closed proximity switch bracket 16 The proximity switch is mounted under the bracket and is used to detect when the guide folder is in the closed position ...

Page 64: ...he panel 2 30 3 1 4 Stripper Blade Set the front edge of the stripper blade so that it is as close to the presser foot that still allows the stripper blade to swing out Set the height of the stripper blade high enough that it doesn t pinch the panel between it and the sewing head when the ruffler blade comes down To adjust the in distance of the front edge of the blade loosens the two button head ...

Page 65: ...eight of the stripper blade loosen the socket head cap screws resting against the pins on the mounting block Move the blade up or down as needed rotate the collars until the socket head cap screws are resting against the pins and tighten the screws ...

Page 66: ...right side of the ruffle assembly Remove the cover by lifting up Locate the two proximity switches to the right of the ball screw The back sensor is the Home sensor and the front sensor is the ruffle Out sensor Put the Auto Manual toggle switch to the manual mode then press the Ruffle button once ...

Page 67: ...ion on top of the stripper blade Tap on the right side of the foot pedal The stepping motor will move the flag to the out sensor and stop There should be a red L E D that lights up on the sensor when the sensor reads the flag If not then the flag is too far away from the sensor or the sensor is unplugged or bad ...

Page 68: ...To adjust loosen the proximity sensor screw and slide the sensor left or right in the slot Press the reset button once to reset the ruffle blade back to the home position Repeat steps to check settings if any changes were made When done be sure to put the Auto Manual switch back to the AUTO position before the operator starts sewing ...

Page 69: ...ile turning the panel in square corner mode The needle thread pre tension 2 has a release pin on it that releases by separating the tension disks apart when the border guide folder is up The bed plate has the stitch length adjusting button 3 the stripper blade mount bracket 4 the presser foot 5 and the throat plate 6 The back of the sewing head has the manual puller up push button 7 the puller 8 t...

Page 70: ...is set with as little spring pressure as possible The panel tension works by pinching the panel between it and the top plate This is adjusted based on the type of panel being sewn 15 psi is normal If the panel gathers then there may be too little tension on it if the border gathers then there may be too much tension on it 2 Lopper Timing With the looper 1 all the way back and the needle 2 all the ...

Page 71: ...e point of the looper 4 is even with the center of needle The looper point should come into the midpoint of the scarf of the needle 5 In order to get the correct height of the needle in relation to the looper point access the needle bar clamp screw by removing the rubber plug on the face plate of the sewing head Loosen the screw and move the needle bar up or down be sure to keep the needle chuck s...

Page 72: ...le of the looper blade is set by loosening the two slotted screws 10 and turning the looper until the 90 degree setting is achieved The looper point to needle clearance is set by loosening the slotted hex head screw 11 and sliding the base left or right Adjust the needle guard so that it pushes the needle 0 to 0 05 mm This is done by loosening the socket cap screw on the looper and turning the nee...

Page 73: ... the left of the looper The height of the spreader is set so that as the spreader is moving to the right and passes over the looper it clears the top of the looper by 0 1 to 0 4 mm Both the left right adjustment and the height adjustment of the spreader point is made by loosening the two set screws 15 on the spreader holder 16 and moving the spread left or right up or down as needed ...

Page 74: ...en using the tighter clearances turn the Hand wheel to make sure that the spreader point when moving to the left does not hit the needle and that it doesn t pick up the needle thread as it passes over the looper when moving to the right The clearance of the spreader point to the needle 17 is made by loosening the screw 18 on the spreader holder and moving the spreader forward or backward as needed...

Page 75: ...on the back of the feed dog holder to raise or lower the feed dog as needed Tighten the nut 21 then tighten screw 20 Replace the throat plate feed dog does not have to be removed when making this adjustment 3 Stitch Length Start by pressing on the feed dog regulating button 1 located on the bed of the sewing head Push until the button stops going down ...

Page 76: ...ber 3 on the Hand wheel lines up with the brass marker 4 located on the front right side of the sewing head release the button The numbers on the Hand wheel range from 2 to 6 this indicates the length of a single stitch in mm not the number of stitches per inch Checking the Stitch Length Start out by sewing with the puller up To do this press and hold the manual puller lift button on the top left ...

Page 77: ... on the same scrap piece of material Count the stitches per inch with the puller The stitches per inch without the puller should be to 1 full stitch more than with the puller Example stitches per inch without the puller is 7 then the stitches per inch with the puller should be 6 to 6 1 2 ...

Page 78: ...bout the wear plate on the sewing head A business card or other heavy paper should be able to slide between the puller wheel and the wear plate To adjust the height loosen the lock nut 3 on the puller shaft clamp block and turn the screw 4 until the correct height is achieved Tighten nut 3 after making the adjustments ...

Page 79: ... nut lock nut 1 on the puller drive dog bone and moving it up or down in the slot 2 on the puller drive arm 3 Moving it up in the slot will decrease the feed amount and moving it down in the slot will increase the feed amount Set the puller so that it pulls out to 1 full stitch more than when sewing without the puller Example Sewing without puller 8 stitches per inch sewing with the puller 8 stitc...

Page 80: ... 1335MH Singer 300UX6 Rufflers using the Singer 300UX sewing head have 4 regulators located under the table The far right hand one is for the main air pressure and should be set to 70 to 80 psi The second from the right is the panel tension pressure regulator and should be set to 15 psi this will change depending on the type of non skid being used The second from the left is the puller pressure re...

Page 81: ...g the following Make sure that the machine is unplugged before proceeding and that all lock out tag out procedures have been correctly followed Loosen the cover screw found at the bottom of the switch You do not have to remove the screw Remove the front cover Check that the 5 5 reading on the Amp Dial is in line with the pointer Press the reset button if it pops back in then the contact had gotten...

Page 82: ...adjust unlock the dial and turn counter clockwise to reduce the speed turn clockwise to increase The back of the box has an on off switch fuse and cables Leave the on off switch on all the time When working on the box always disconnect the power cord before servicing 3 4 3 AP 28 800Y1 Stepper Control Box The Ruffler box is located under the table and has three Thumbwheels A on the front which are ...

Page 83: ...last ruffle This reduces the sewing speed for a few stitches to help the material to feed to the puller before the machine goes to high speed The stitch count equals twice the number shown on the thumbwheel This feature can be turned off by setting thumbwheel 1 to 0 Thumbwheel 2 controls the sewing speed of the sewing head during ruffling Each increment is approximately 100 rpm The normal setting ...

Page 84: ...ffles per corner If the thumbwheel is set to 9 three ruffles will be made on each side for a total of six ruffles per corner Thumbwheel 6 sets the number of stitches sewn in each ruffles and is adjusted according to the ruffle size There should be enough stitches to sew to the folded edge of each ruffle The Auto Manual Switch turns on the automatic ruffling cycles for the corners When this switch ...

Page 85: ...el end sew eye is located under the table top part of the flip down access The panel end eye looks for the end of the panel When the end of the panel goes by it sends a signal to the ruffler control box to start counting stitches for the stop count thumbwheels 3 and 4 2 Hand wheel Eye The Hand wheel eye 1 is mounted to the top of the table behind and to the right of the sewing head The Hand wheel ...

Page 86: ... Sensitivity Screw to the or clockwise until the L E D starts blinking the L E D should blink about 2 times per second when set correctly Border Loop Eye The border loop eye activates the unwinder motor when the border material is lifted up towards it and the yellow activity light comes on To adjust the eye you need to turn the Gain Sensitivity screw turning it clockwise will increase the sensitiv...

Page 87: ... back of the Efka Motor has all of the cables 1 Power Cable for the Efka Motor Goes to the Efka Motor 2 Foot Pedal Cable 3 Commutation Transmitter goes to the Efka Motor 4 Hand wheel Eye 5 Socket for solenoid inputs and outputs solenoid valves displays keys and switches ...

Page 88: ... 0200 2550 1000 1000 1000 1000 1000 Drive ratio between motor pulley and handwheel pulley If handwheel pulley is smaller than motor pulley increase this value to slow down sewing head until measured speed matches speed set with parameter 111 For Yamato and Pegasus setting should be 100 for Rimoldi setting should be 124 436 0 0 0 0 0 Use code 5913 This disables an input that was causing box to rese...

Page 89: ...code appears in the display release the P button and press the button The code to enter in is 311 3 000 will appear on the display with the left 0 blinking Press the three times to get a 3 in the display if you go past 3 then either continue pressing the button until it cycles back or press the button to go back Then press the button Page 1 ...

Page 90: ...s the middle number Then press the button 5 Display should look like picture to the left with the right 0 blinking if not press the button until the right 0 is blinking Press the button once to get a 1 as the right number 6 Display should look like picture to the left with the right 1 flashing It does not matter which number in the display is blinking as long as it reads 311 Press the E button ...

Page 91: ...er to be programmed when starting new only using as an example You may need to access a different parameter number use the same method as above 8 With 2 9 0 or parameter number you chose in the display which is parameter 290 press the E button once 9 The display will change from 2 9 0 to 05 your display may not be the same depends on the type of sewing head being used refer to your machines progra...

Page 92: ... to the programming sheet After the last parameter has been set if the number displayed DOES NOT have the between them press the E button then press the P button If it DOES have the between them then only press the P button 11 The display will now show the set maximum RPM The display only shows three numbers the actual RPM in the example picture is 3200 RPM You will need to sew at least one stitch...

Page 93: ...Maintenance 3 6 1 Daily Open up all the covers on the sewing head and blow out the lint from the machine Wipe the electric eyes off with a soft nonabrasive cloth Check for and clean threads from around the puller housing and puller wheel ...

Page 94: ...he threads Check the condition of the reflective tape for the panel eye Clean with a dry soft cloth or replace as needed If the tape is replaced it may be necessary to adjust the sensitivity of the eye follow the instructions in the Hand wheel and Panel Eye Adjustment section Check the condition of the reflective tape for the Hand wheel eye Clean with a dry soft cloth or replace as needed If the t...

Page 95: ...be between the two red lines inside the sight glass To add oil swing out the ruffler assembly to access the rubber plug over the oil hole Remove the rubber plug and add oil until the correct oil level is reached Replace rubber plug after filling Blow out the dust on the screen of the air table blower motor ...

Page 96: ...Drain the oil by opening the valve and allowing the oil to completely drain into the container then closing the valve Replace the oil filter by removing the three screws holding the cover on the back of the sewing head Insert a new filter and replace the cover and screws Fill the oil reservoir by swinging out the ruffler assembly and removing the rubber plug Replace rubber plug after filling ...

Page 97: ...Technical Manual Parts Lists 90 Fill the oil level until the oil is between the two red lines viewed through the sight glass ...

Page 98: ... programmed speed The cause of the E1 error is that the Hand wheel eye is not seeing the reflective tape do the following See check list on the next page with details about this error 1 Check that nothing is blocking the eye 2 Check the condition of the tape replace if necessary 3 Adjust the position of the eye 4 Adjust the sensitivity of the eye See page 4 11 5 Replace the eye 6 Check the cables ...

Page 99: ...Technical Manual Parts Lists 92 3 7 2 Flow Chart EFKA Error E1 ...

Page 100: ...hapter 3 1 4 Check the sewing adjustments see chapter 3 2 Long stitch at the start of the ruffle or on the ruffle This stitch will look like a skip but on the bottom side you will not see a needle hole or a loose stitch but still may cause a open spot in the seam 1 Adjust the ruffling blade so that it doesn t push the ruffle in past the needle see chapter 3 1 4 2 Adjust the stitches per ruffle cou...

Page 101: ...Ruffler Assembly If required move the motor mount block all the way backwards to the rear of the adjusting slots insuring that there is no spindle worm gear binding present after tightening up the socket cap screws With power off move the assembly up and down by hand to check for binding With power on the ruffle assembly will move to the up or home position If motor binds in home position move hom...

Page 102: ...le shank e Push the reset button one time and the ruffle blade will return upward to the home position Normally the blade points should stop even with the needle shank However if you are using a dense material and the blade is lifting the foot too much it may push the material backwards creating a long stitch To reduce the long stitch adjust the distance A from even up to 3 8 which is measured fro...

Page 103: ...ded to obtain the necessary distance A 4 Any change to this adjustment may also require changes to thumbwheel 6 stitches pre ruffle and the depth of the ruffle Instruction to check stitches per ruffle a Switch the manual automatic button to the manual position b Push the reset button one time and the ruffle blade will come down c Step on the treadle control one time and the ruffle blade will move ...

Page 104: ...ontrolled by turning the knob inward or outward noting where the indicator arrow is pointing The higher the number the greater the depth of the ruffle The object of this setting is to ruffle fold up or use up material within the corner as needed for the width of sewing margin or distance from the right edge of material to the needle This is same concept as the amount of material you would need to ...

Page 105: ...Technical Manual Parts Lists 98 3 7 5 Flow Chart Stops at the corner ...

Page 106: ...Manual Parts Lists Technical 99 ...

Page 107: ...ta Attachment Company In addition to any confidentiality and non disclosure obligations that currently exist between you and Atlanta Attachment Company your use of these materials serves as an acknowledgment of the confidential and proprietary nature of these materials and your duty not to make any unauthorized use or disclosure of these materials ...

Page 108: ... Down Treadle Assy 2 1 1335105 Unwinder Assy 3 1 1335M 430E Guide Roller Assy 4 1 1335MH G Generic Console 5 2 WWL3 8 Lock Washer 6 2 NNH3 8 16 Hex Nut 7 2 SSHC01048 Screw Hex Cap 8 2 SSHC25192 Screw Hex Cap 9 2 WWFS1 4 Flat Washer 10 4 WWFS3 8 Flat Washer 11 1 1335821 Brkt Frame Support Page 110 Page Page 119 Page Page 126 Page Page 106 Page ...

Page 109: ... 1 1335M 430E Guide Roller Assy 4 1 1335MH G Generic Console 5 3 SSZH 10064 Screw Sheet Metal 6 2 NNH3 8 16 Hex Nut 7 2 SSHC01048 Screw Hex Cap 8 2 SSHC25192 Screw Hex Cap 9 2 WWFS1 4 Flat Washer 10 4 WWFS3 8 Flat Washer 11 2 WWL3 8 Lock Washer 12 1 11337AT Air Table Assy 13 1 1335081 Shelf Support 14 1 1335821 Brkt Frame Support Page 110 Page Page 119 Page Page 126 Page Page 106 Page Page 147 Pag...

Page 110: ...U Manual Ruffler Stand Up AAC Drawing Number 192103A Rev3 NO QTY PART DESCRIPTION 1 1 4059 FP301D Foot Switch Assy 2 1 1335105 Unwinder Assy 3 1 1335M 430E Guide Roller Assy 4 1 1335MH G Generic Console Page 110 Page Page 119 Page Page 126 Page ...

Page 111: ...1335M 430E Guide Roller Assy 4 1 1335MH G Generic Console 5 3 SSZH 10064 Screw Sheet Metal 6 2 NNH3 8 16 Hex Nut 7 2 SSHC01048 Screw Hex Cap 8 2 SSHC25192 Screw Hex Cap 9 2 WWFS1 4 Flat Washer 10 4 WWFS3 8 Flat Washer 11 2 WWL3 8 Lock Washer 12 1 11337AT Air Table 13 1 1335081 Shelf Support 14 1 1335M 2002E Ruffler Blade 15 10 SN62X8524 Needle Page 126 Page Page 119 Page Page 110 Page Page 147 Pag...

Page 112: ... Technical 105 11335MHR SU Manual Ruffler Heavy Duty AAC Drawing Number 192143A Rev6 NO QTY PART DESCRIPTION 1 1 4059 FP301D Foot Pedal Assy 2 1 1335MH G Console Assy 3 1 1335155 Unwinder Assy Page 138 Page Page 110 Page ...

Page 113: ...bly AAC Drawing Number 192857C Rev1 NO QTY PART DESCRIPTION 1 2 1335M 105 Treadle Brkt 2 2 160929A Show Stand Brkt 3 1 K 100 30M Treadle Brace 4 1 K 340 Threadle W BRKT 5 12 NNK1 4 20 Kep Nut 6 4 NNC1 4 20 Cap Nut 7 18 SSHC01048 Screw Hex Cap 8 30 WWFS1 4 Flat Washer ...

Page 114: ...Manual Parts Lists Technical 107 ...

Page 115: ...ter 5 1 3206007 Rod Clamp 6 1 A 2212A Rod Bent 7 2 785 A95 06 Disc Assy 8 AR 1335M 03 Instructional 9 AR 1335MH 34WD Wiring Diagram 10 1 4060 0652 PC Board 11 1 A 2216L5 16 Folder 12 AR EP 1335M34 Eprom 13 4 FF89F2009 Spacer 14 3 FF8524 10 Wire 15 2 FF8524 2 Wire 16 1 1959 106A Tube 17 4 SSHC10112 Screw Hex Cap 18 2 SSSC01040 Screw Socket Cap 19 4 WWF5 16 Flat Washer 20 2 WWL1 4 Lock Washer Page 1...

Page 116: ...Manual Parts Lists Technical 109 ...

Page 117: ...1000 STAND AND MOTOR ASSEMBLY 10 AR 1335MH PD DIAGRAM PNEUMATIC 11 1 1959 112 2 POS THREAD PLATE ASSY 12 4 228444 MACHINE CUSHION 13 1 1335148 STRIPPER BLADE ASSY 14 1 D 2 THREAD STAND 15 2 NNH1 4 20 1 4 20 HEX NUT 16 2 NNH3 8 16 3 8 16 HEX NUT 17 2 SSBC98032 10 32 X 1 2 BUT HEAD 18 4 SSHC01048 1 4 20 X 3 4 HEX HEAD 19 2 SSHC25192 3 8 16 X 3 HEX HEAD 20 4 SSSCM6X30 M6 1 0 X 30 SOC CAP 21 10 WWFS1 ...

Page 118: ...Manual Parts Lists Technical 111 ...

Page 119: ...18 13 1 26151 TOOL TRAY 1X3 5X9 41 1 NNW1 4 20 NUT WING 1 4 20 14 1 1335243 FRAME WELDT 1335MF 42 1 SSBK01160 1 4 20 X 2 1 2 BOLT CARG 15 6 1335244 ROD THRD 5 16 18 X 8 75 43 3 SSBK10160 BOLT CARRAGE 5 16X2 5 16 1 1335274 WASHER PLATE PANEL TENS 44 2 SSFS98112 10 32 X 1 3 4 FLAT SLOT 17 1 1335275 TOP PLATE PANEL TENSION 45 14 SSHC01048 1 4 20 X 3 4 HEX HEAD 18 1 1335278 PANEL TENSION FINGER 46 4 S...

Page 120: ...Manual Parts Lists Technical 113 ...

Page 121: ...ODIFIED 13 1 CCCL6F CLAMP COLLAR 3 8 14 1 GG100XL037 BELT GEAR 1 5P 3 8W 15 1 MM741 3A HINGE 3 X 3 STANLEY 16 1 MM8096307 CLAMP 17 1 NNH1 4 20 1 4 20 HEX NUT 18 4 NNH10 32 HEX NUT 10 32 REG 19 2 PP24XLB37M1 PULLEY GEAR 1 5 PITCH 20 1 SSFC01160 1 4 20 X 2 1 2 FLAT CAP 21 2 SSFC98032 10 32 X 1 2 FLAT ALLEN CAP 22 2 SSHC01160 1 4 20 X 2 1 2 HHCS 23 3 SSPS80024 6 32 X 3 8 LG PAN HD 24 4 SSSC90040 8 32...

Page 122: ...Manual Parts Lists Technical 115 ...

Page 123: ... 2010 BLOCK DRIVE LINK PIVOT 6 1 1335M 2011 PIVOT SHAFT 7 2 1335M 2012 SIDE LINK 8 1 1335M 2013 LINK SHAFT 9 1 1335M 2014 LINK SHAFT 10 2 1335M 2015 LINK YOKE 11 2 BBNTA815 BEARING THRUST 1 2BORE 12 4 BBTRA815 WASHER THRUST STEEL 1 2 13 2 IIS012X064 SPRING PIN 3 16 DIA 14 6 MM8407A134 RING RETAINING E 3 8 15 1 NNE3 8 16 NUT ELASTIC 3 8 16 16 1 SSAS032096 SHOULDER BOLT 1 2 X 1 50 17 6 SSSC98048 10 ...

Page 124: ...Manual Parts Lists Technical 117 1335M 2400 Ball Screw Nut Assembly 9000982 ...

Page 125: ...Technical Manual Parts Lists 118 NOTES ...

Page 126: ...1 1335 838E ROLLER ASSY W FLANGE 5 2 28201 CROSS BLOCK LARGE 6 1 28201A CROSS BLOCK LARGE 7 1 780 100 ROD STRAIGHT CRS 1 2 8 1 8732 0576 ROD STRAIGHT SS 1 2 X 9 1 97 1711C TUBE 3 4 OD X 17 0L 10 1 97 1711E TUBE 3 4 OD X 24 0L 11 2 CCCL8F CLAMP COLLAR 1 2 12 2 SSHC10064 5 16 18 X 1 HEX HEAD 13 2 SSSC95048 10 24 X 3 4 SOC CAP 14 1 SSSS01048 1 4 20 X 3 4 KNURL PT 15 3 TTH32425 HANDLE THRDED 5 16 18X3...

Page 127: ...ION 1 2 1335M 9010 Step Box Brkt 2 2 1335M 9011 Shelf Motor Box 3 2 1335M 9012A Mnt Ctrl Box 4 1 AP 28 800C3 Control Box 5 1 AP 28 800Y1 Stepper Box 6 2 EE37F3312 Power Cord 7 8 MMSLD ECH Rubber Bumper 8 8 SSFC80032 Screw Flat Allen 9 12 SSPP98032 Screw Pan Phillips 10 12 WWL10 Lock Washer 11 2 1335M 9014 Shipping BRKT ...

Page 128: ...Manual Parts Lists Technical 121 ...

Page 129: ... PULLER MNT 1335MS 10 1 1335Q 10M2 SEWING HEAD MODIFIED 11 1 311 128 HUB HANDWHEEL TAPE MOUN 12 1 311 129 SLEEVE TAPE MOUNT ADJUST 13 1 AP 1883 Rod Threaded 14 1 M1T31 052A FOOT HOLDING RUFFLER 15 1 M1T31 052B FOOT WALKING RUFFLER 16 3 NNH1 4 20 NUT HEX 1 4 20 17 2 SSSC01064 1 4 20 X 1 SOC CAP 18 1 SSHC10048 5 16 18 X 3 4 HHCS 19 6 SSFC01040 1 4 20 X 5 8 FLAT ALN CAP 20 1 SSFC10056 5 16 18X7 8 FLA...

Page 130: ...otlift Assembly AAC Drawing Number 9000989 Rev7 NO QTY PART DESCRIPTION 1 1 1317307 CYLINDER END FOOT LIFT 2 1 1335910 BRACKET CYLINDER 3 2 AA198RA508 Body 4 1 AAC5DP 2 AIR CYLINDER SMC 5 1 CCSCL7F CLAMP COLLAR 7 16 6 1 NNHM5X0 8 M5 X 0 8 HEX NUT ...

Page 131: ...ber 192092B Rev0 NO QTY PART DESCRIPTION 1 1 1334 1023 Guide Mount 2 1 1334 1024 Support 3 3 1335 318 Rod Slide Arm 4 3 1335 319 Rod Clamp Arm 5 3 1335 320C Rod 3 8 x 9 6 3 1335Q 130A Rod 3 8 x 24 7 10 SSSS01024 Screw Socket Set 8 3 SSSC95048 Screw Socket Cap 9 6 TTH34311 10 24 Handle ...

Page 132: ...Manual Parts Lists Technical 125 ...

Page 133: ...EX HEAD 19 1 1335139 ROD SS 3 4 X 28 0L 62 2 SSHC25192 3 8 16 X 3 HEX HEAD 20 1 1335189 LINK IDLER ROLLER 63 2 SSPS70048 4 40 X 3 4 PAN HD SLOT 21 1 1335497 ROLLER FLUTTED IDLER 64 1 SSSC01048 1 4 20 X 3 4 SOC CAP 22 1 1335498 DRIVE ROLLER FLUTED 65 4 SSSC01064 1 4 20 X 1 SOC CAP 23 1 1335771 UNWINDER FRAME K3 66 1 SSSC01096 1 4 20 X 1 1 2 SOC CAP 24 1 1335797 BRKT SUPPORT 67 2 SSSC90024 8 32 X 3 ...

Page 134: ...Manual Parts Lists Technical 127 ...

Page 135: ...DLER 9 2 3524 06A U JOINT MODIFIED 10 1 3524 6352 SHAFT 3 8 HEX 5 50L 11 1 AACMGPM25100 CYLINDER AIR GUIDED 12 2 AAQME M4 8 QUICK MALE ELBOW 13 1 CCCL10F CLAMP COLLAR 5 8 ID 14 1 CCCL6F CLAMP COLLAR 3 8 15 1 GG150XL037U BELT GEAR 1 5P 3 8W 16 1 PP18XL037M PULLEY GEAR 1 5P 18T 3 8B 17 2 SSPP98024 10 32 X 3 8 PAN HD PHILIP 18 2 SSSC01048 1 4 20 X 3 4 SOC CAP SC 19 2 SSSC98032 10 32X1 2 SOC CAP 20 4 ...

Page 136: ...Manual Parts Lists Technical 129 ...

Page 137: ... 1335M 2039 NUT SPRING RETAINER 49 2 SSTS98040 10 32 X 5 8 TRUSS HD 16 1 1335M 2040 SCREW ADJUSTMENT 50 1 TTCL1APPK1 PLASTIC KNOB 10 32 17 1 1335M 2042 COVER 51 2 WWF2 WASHER FLAT 2 18 1 1335332 RUFFLER CYL LIFT ASSY 52 2 WWF8 WASHER FLAT 8 19 1 1335298A RUFFLER MTG ANGLE ASSY 53 4 WWFS1 4 WASHER FLAT 1 4 20 1 1335M 2300A PIVOT ASSY 54 8 WWFS10 WASHER FLAT 10 21 1 1335M 2400 BALL SCREW AND NUT 55 ...

Page 138: ...Manual Parts Lists Technical 131 ...

Page 139: ...17 ROD END 8 1 1335M 2034 PLATE NUT 2 56 9 2 AA198RA510 FLOW CONTROL 5 32X10 32 10 1 AAC8DP 5 CYL AIR DA 9 16 B 1 2S 11 1 AAFBP 8C BRKT PIVOT 5 32 BORE 12 1 NNH10 32 10 32 HEX NUT 13 1 SSPS50032 2 56 X 1 2 PAN HD SLOT 14 1 SSSC01024 1 4 20 X 3 8 SOC CAP SC 15 3 SSSC01048 1 4 20 X 3 4 SOC CAP 16 2 SSSC90024 8 32 X 3 8 SOC CAP 17 3 SSSC98032 10 32 X 1 2 SOC CAP 18 2 SSSC98048 10 32 X 3 4 SOC CAP 19 ...

Page 140: ...Manual Parts Lists Technical 133 ...

Page 141: ... 18 1 AA198RR510 REV FL CONT 5 32X10 32 19 1 AAC024DXP CYL BIMBA 9 16 B 4 S 20 1 AAC8DP 1 5 CYL AIR DA 9 16B 2S 21 2 AAFBP 8C BRKT PIVOT 5 32 BORE 22 2 BBAW 3Z BRG ROD END F 10 32 23 2 CCCL3F CLAMP COLLAR 3 16 24 3 MMGN12HZ0HN MGN12H BEARING BLOCK 25 2 MMGNR12R0165HN 165MM RAIL MGN12H BLK 26 1 MMGNR12R090HN 12MM X 90MM RAIL 27 1 NNH10 32 10 32 HEX NUT 28 1 NNJ10 32 NUT JAM THIN 10 32 29 2 NNW10 32...

Page 142: ...Manual Parts Lists Technical 135 ...

Page 143: ... 2 1 1335M 5003E Stripper Blade 3 1 1335M 5004 Washer Plate 4 1 1335239 Stop Block 5 1 1335305 Mount Plate 6 1 1335364A Mount Arm 7 1 RRBEEHIVEH Spring 8 1 SSFC01032 Screw Flat Allen 9 1 SSM200246 Screw Shoulder 10 4 SSM22593 Screw Fillister 11 1 SSMBK13 Plastic Knob 12 2 SSSC90024 Screw Socket Cap 13 1 WWFS1 4 Flat Washer 14 2 WWF8 Flat Washer ...

Page 144: ...Manual Parts Lists Technical 137 ...

Page 145: ...QME 4 8 ELBOW QUICK MALE 1 4X1 8 19 1 AAV41V VALVE TOGGLE 20 1 FFQM42VN6A EYE ELECTRIC 10 30VDC 21 1 FFRK44T3P5 CABLE EURO 3P 22 2 MM132 1496 PLUG 1 X 2 23 1 MM503022LB CASTER 3 LOCKING 24 1 NNH3 8 16 3 8 16 HEX NUT 25 3 NNK1 4 20 KEP NUT 1 4 20 26 6 NNK5 16 18 KEP NUT 5 16 18 27 1 SSHC01048 1 4 20 X 3 4 HEX HEAD 28 3 SSHC01064 1 4 20 X 1 HEX HEAD 29 2 SSHC01112 1 4 20 X 1 3 4 HEX HEAD 30 2 SSHC01...

Page 146: ...Manual Parts Lists Technical 139 ...

Page 147: ... 11 1 1335M 2046 PLATE NUT 8 32 43 CTC 36 3 SSPS90024 8 32 X 3 8 PAN HD SLOT 12 1 1335M 4007 COVER BELT 37 5 SSPS98016 10 32 1 4 PAN HD SLOT 13 1 211 057 PULLEY 3 8P 12T 1 2B 38 1 SSSC10064 5 16 18 X 1 SOC CAP 14 1 23218DM MOTOR ASSY GEAR 39 2 SSSC90024 8 32 X 3 8 SOC CAP 15 2 AA198RA510 FLOW CONTROL 5 32X10 32 40 2 SSSC98040 10 32 X 5 8 SOC CAP 16 1 AAC8DP 3 CYLINDER AIR DA 41 1 SSSC98048 10 32 X...

Page 148: ...Manual Parts Lists Technical 141 ...

Page 149: ...784B 2437 PLATE ALU 23 75 X 31 76 44 14 WWL1 4 1 4 LW 22 1 5 1325 347 HOLDER ROD 1 2 D SLOT MNT 45 4 WWL5 16 5 16 LW 23 1 5 1335 826 DRAG TENSION ASSEMBLY 46 2 WWL10 10 LW 1 1 784B 2436 PLATE ALU 23 75 X 31 75 24 2 NNJ1 1 4 12 NUT HEX JAM 1 1 4 12 2 1 1325 346 HOLDER ROD 1 2 D SLOT MNT 25 1 NNJ1 2 20 1 2 20 HEX JAM NUT 3 1 1335 825 DRAG TENSION ASSEMBLY 26 2 NNK1 4 20 KEP NUT 1 4 20 4 1 1961 253A ...

Page 150: ...Manual Parts Lists Technical 143 ...

Page 151: ...WWL1 4 Lock Washer 40 4 0411 1906 Prox Switch Cable 13 2 SSHC01032 Screw Hex Cap 41 1 FF313005 Fuse 5A Slow 14 4 SSPP80016 Screw Pan Head 42 AR 1335MH WD1 Wiring Diagram 15 2 SSPS98032 Screw Pan Head 43 6 SSPS90024 Screw Pan Head 16 1 AAE1335 6 Solenoid Assy 44 AR 1335MF LAB1 Label 17 1 1987 513A Cable 45 4 AAF1 8 Plastic Clamp 18 5 WWFS10 Flat Washer 46 1 AP 28 610U Cable 19 4 FF67F4079 Threaded ...

Page 152: ...Manual Parts Lists Technical 145 ...

Page 153: ...her 39 1 0211 705D Remote Cable 13 2 SSHC01032 Hex Cap Screw 40 3 0411 1906B Prox Switch Cable 14 4 SSPP80016 Pan HD Phillips Screw 41 1 FF313005 Slow Fuse 5A 15 2 SSPS98032 Pan HD Slotted Screw 42 AR SEE NEXT LEVEL Wiring Diagram 16 1 AAE1335 5 Solenoid Assembly 43 6 SSPS90024 Pan Slotted Screw 17 1 1987 513A Cable 44 AR 1335MF LAB1 Control Box Lable 18 3 WWFS10 Washer SAE 45 4 AAF1 8 Plastic Cla...

Page 154: ...F 2 1 1337023 BRACKET TABLE TOP RUFFLR 3 1 1337024 MOUNT AIR TABLE 4 2 1337A 0168B BRACKET RETAINER 5 1 1337A 160 AIR TABLE ASSY SINGLE TBL 6 1 1337A 175C SHELF AIR TABLE 23 X30 7 2 NNK5 16 18 KEP NUT 5 16 18 8 3 SSZH 10048 SCREW SHT METAL HEX 10 9 9 WWFS5 16 WASHER FLAT SAE 5 16 10 5 WWL5 16 WASHER LOCK 5 16 11 7 SSHC10064 5 16 18 X 1 HHCS ...

Page 155: ...Technical Manual Parts Lists 148 1337A 160 Air Table Sub Assembly AAC Drawing Number 1337296 Rev 9 ...

Page 156: ...Manual Parts Lists Technical 149 ...

Page 157: ...READ PLTAE ASSY 8 1 1334 3012 CABLE 9 1 AATPWL1 WIRE LOOM 10 1 1959 700B TABLE FRAME 11 1 1959 800 ROLL HOLDER 12 4 SSHC01128 SCREW HEX CAP 1 4 20X2 13 AR 1959 PD PNEUMATIC DIAGRAM 14 AR 1334S 02WD WIRING DIAGRAM 15 1 1334 1200A MATERIAL GUIDE 16 10 WWFS1 4 FLAT WASHER 17 2 SSHC01064 SCREW HEX CAP 1 4 20X1 18 2 WWL1 4 LOCK WASHER 19 2 AAQME 5 8 QUICK MALE ELBOW 20 1 AAVMB43 VALVE 21 2 SSZH 6096 SC...

Page 158: ...Manual Parts Lists Technical 151 ...

Page 159: ...Cylinder 5 1 11200A Bumper 6 1 AA198RR508 Flow Control 7 2 SSSCM6X20 Screw Socket Cap 8 1 54242B9016 Spreader 9 1 1959 412 Guard 10 1 54205A9016 Feed Dog 11 1 54420X9016 Presser Foot 12 1 54224A9016 Throat Plate 13 1 1334041 Guard 14 2 SSSC98032 Screw Socket Cap 15 2 WWFS10 Flat Washer 16 1 3300012M Needle Bar Mod 17 1 RRLC105J10 Puller Spring 18 1 1862N95016 Looper Holder 19 10 SN11318GB Needle S...

Page 160: ...Manual Parts Lists Technical 153 ...

Page 161: ...HC01160 Screw Hex Cap 5 4 WWL1 4 Lock Washer 6 4 WWFS1 4 Flat Washer 7 2 1959 801 Rod 1 2 x 28 8 1 1959 105 Tube Assy 9 1 1959 106 Tube w Flange 10 1 1312021 Material Frame Assy 11 2 SSHC01080 Screw Hex Cap 12 2 4009 1 Material Ctrl 13 1 MM503022LB Caster 14 1 780 102 Rod L 1 2 x 6 x 12 15 2 785 A95 36 Disc Assy 16 2 786B16 2 2 Disc Cone Assy 17 1 A U Rod Conn 18 2 SSHC10064 Screw Hex Cap ...

Page 162: ...Manual Parts Lists Technical 155 ...

Page 163: ...EC BOX 12 1 K 234 COVER 13 3 K 235 ROMEX CONN 14 6 WWFS FLAT WASHER SAE 15 1 1961 159 PLATE FOOT PEDAL 16 1 EE24F163 FOOTSWITCH TREADLITE 17 3 NNH5 16 18 HEX NUT 18 3 NNM103 RECESSED NUT 19 4 SSPS70048 Screw Pan Head Slotted 4 40x3 4 20 12 SSZH 10064 SCREW SHEET METAL 10x1 21 5 TTW1 4 20 THREADED INSERT 22 3 WWF5 16 FLAT WASHER SAE 23 3 010 054 THD ROD 5 16 18 X 3 25L 24 2 FFRK44T 4 CABLE 25 3 WWL...

Page 164: ...BB23216 88 BEARING BALL 1 0B 6 1 RRLC026B1 SPRING COMP 026X 18X 25 7 1 JJ012 3 16 STAINLESS BALL 8 1 SSSP01016 1 4 20 X 1 4 NYLOCK 9 1 SSSC01064 1 4 20 X 1 SOC CAP 10 2 SSFS80016 6 32 X 1 4 FLAT SLOT BALL BEARING DISC ASSEMBLY 33008732 3 1 33008632 DISC 32 DIA BALL BEARING DISC ASSEMBLY 33008724 3 1 33008624 DISC 24 DIA BALL BEARING DISC ASSEMBLY 33008716 3 1 33008616 DISC 16 DIA BALL BEARING DISC...

Page 165: ...Technical Manual Parts Lists 158 1959 PD Pneumatic Diagram 125492C ...

Page 166: ...Manual Parts Lists Technical 159 1335MH PD Pneumatic Diagram 125586B ...

Page 167: ...Technical Manual Parts Lists 160 1335MF WD Wiring Diagram 125665C ...

Page 168: ...Manual Parts Lists Technical 161 1334S 02WD Wiring Diagram 125690C ...

Page 169: ...Technical Manual Parts Lists 162 1335MH 34WD Wiring Diagram 125186B ...

Page 170: ...Manual Parts Lists Technical 163 1335MH WD1 Wiring Diagram 125704C ...

Page 171: ...Technical Manual Parts Lists 164 ...

Page 172: ...ent upon proper application installation and maintenance AAC Limited Warranty may not be changed or modified and is not subject to any other warranty expressed or implied by any other agent dealer or distributor unless approved in writing by AAC in advance of any claim being filed What Is Covered Electrical components that are not included within the Serial Bus System that fail due to defects in m...

Page 173: ... AAC no puede ser cambiado o modificado y no está sujeto a cualquier otra garantía implicado por otro agente o distribuidor menos al menos que sea autorizado por AAC antes de cual quier reclamo Lo Que Está Garantizado Componentes eléctricos que no están incluidos dentro del sistema Serial Bus que fallen por defectos de materiales o de fabricación que han sido manufacturados por AAC son garantizado...

Page 174: ...Atlanta Attachment Company 362 Industrial Park Drive Lawrenceville GA 30046 770 963 7369 www atlatt com Printed in the USA ...

Reviews: