Unloading and loading under power
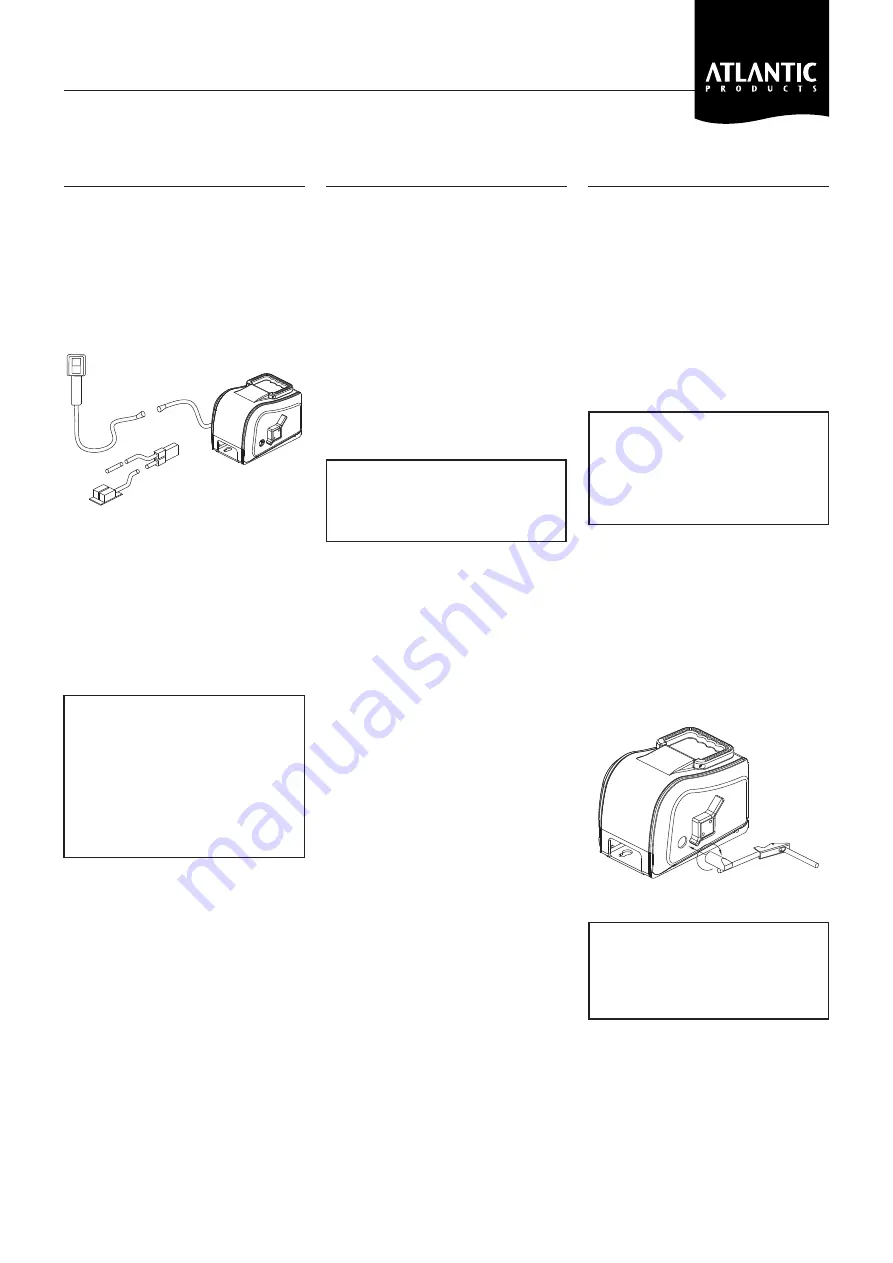
1. Attach the power supply plug into the
connector located at the back of the
winch. This plug pushes and snaps into
place easily and will fit in only one
direction. Connect the remote switch cord
to the short cord coming from the back of
the winch. Leave the car engine running
on fast idle as a precaution in case the
battery is not in top condition.
Figure 5
2. With the clutch lever in the engaged
gears position, you may power the winch
in either the load or unload direction.
Allowing the switch to return to the OFF
position will automatically stop the winch
and lock the load in position.
NOTE: It is normal for smoke to be
produced during the initial power out
use.
WARNING: Even though the winch
is equipped with circuit breaker
overloaded protection, particular
care should be taken not to create
an overload. Pay attention to the
sound of the winch and the load
being pulled. Make certain that the
cable tension does not rise suddenly
because of a bind in the load.
CAUTION: The electric motor is
designed for intermittent service
only. Extended use without cooling
off periods will cause overheating
resulting in motor damage.
Maximum recommended continuous
run time is four minutes.
3. When the winching operation is
complete, always secure the load with
appropriate tie down straps or chains.
When the load is being transported on
a trailer, it is advisable to relieve the
tension on the winch cable to avoid
damage to the winch and trailer due
to high shock loads encountered when
traveling.
4. Always disconnect the switch when the
winching operation is complete. Never
leave the switch connected to the winch
when not in use
Operating the clutch
1. The clutch lever provides a means for
releasing a load without power while
maintaining control of the speed, and
provides for free wheeling so that cable
can be removed from the winch by hand.
The clutch lever is spring loaded so that
it returns to the engaged position when
released. The lever will, however, remain
in the free wheeling position if rotated
completely forward to free wheel.
2. In order to release a load without
power, rotate the clutch lever slowly
and carefully forward toward” Free
Wheel.”When the load begins to move, it
can be controlled by the clutch lever will
provide smooth control of the load.
WARNING: Always maintain control
of the load. Allowing excess speed
could result in winch damage and
severe personal injury.
3. Remember that the gear train and brake
mechanism are completely disengaged
in the “Free Wheel” position and in order
to power the winch or hold a load in
position, the lever must be allowed to
return to the “Engaged gears”position.
NOTE: It is not necessary to turn the
clutch lever completely to the “Engaged
Gears” position manually. The spring
tension built into the winch provides
adequate force on the clutch lever.
CAUTION: Never force clutch lever in
either direction.
Auxiliary Handle
1. An emergency crank handle is provided.
For use in the event of a power failure,
Remove the electrical power from the
winch.
2. Remove the plastic plug from the side of
the winch housing and insert the handle
so that it completely engages with the
drive shaft. The handle can be cranked
in either direction with the clutch in
the engaged position. To make cranking
easier, the clutch can be placed in the
free wheel position while holding onto
the emergency handle.
WARNING: If the clutch is placed
in free wheel for hand cranking,
be sure to maintain a firm grip on
the handle at all times. If handle is
released, it will spin violently. Do not
lose control.
Because the emergency crank handle
for Model EMW3000R attaches to the
clutch side of the winch, it is equipped
with a spring operated clip which will
be depressed by the clutch handle in
the free wheel position when cranking
in a clockwise direction to retrieve the
cable. This clip is a safety feature and will
re-engage the clutch mechanism in the
event that the operator loses control of
the handle with a load on the winch.
Figure 6 - Emergency Handle Illustration
WARNING: Even with this safety
feature the handle will still spin
violently one or two turns before
re-engaging the clutch to stop the
winch. Do not lose control.
3. Always remove the handle from the
winch after use and replace the plastic
plug.
Operating the Winch
4


