background image

○ ○ ○ ○ ○ ○ ○ ○ ○ ○ ○ ○ ○ ○ ○ ○ ○ ○ ○ ○ ○ ○ ○ ○ ○ ○

3

○ ○ ○ ○ ○ ○ ○ ○ ○ ○ ○ ○ ○ ○ ○ ○ ○ ○ ○ ○ ○ ○ ○ ○ ○ ○

Atlantic Technology

®

Warning:

 To prevent risk of electrical shock or damage to your equipment, always switch off the amplifier or

receiver when making connections to the speakers.

You can connect your T90 speakers by using a variety of audio connectors such as pin connectors,
spade lugs, etc., or you can:

1.

Remove 1/2" of insulation from each wire end.

2.

Twist the stranded wire together, keeping the two conductors separate.

3.

Place the appropriate conductor through the appropriate postholes in the connectors. These holes are
revealed when you loosen the connector capscrew.

4.

Screw down the capscrew tightly, but be careful not to over tighten. Check the tightness of the
capscrews 24 hours after hookup and occasionally thereafter, as they can loosen over time.

We recommend that you check your local electrical codes to make sure that you are not using an
improper connector.

It’s important to observe polarity while making speaker connections: red (+)
terminals on the amplifier to red (+) on the speaker, black (-) on the amplifier
to black (-) on the speaker. Look carefully at the wires you are using and note
that one of conductors of each pair will be identified by color, printing on the
outer jacket, ridges on the outer jacket, or a thread intertwined with the wire
strands. By convention, the marked wire is connected to the red (+) terminal.

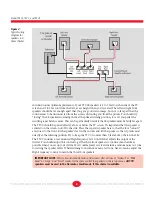
When you’re done hooking up your T90 system the wiring should look like the diagram in Figure 2.

WARNING:

 Before turning on the amplifier, be certain that no stray wire strands are touching across any

terminals, as this might damage your amplifier.

After all the connections are made check the polarity of your front speakers by listening to stereo
music. If the sound seems hollow, unusually spread out, or has weak bass, recheck your connections
for proper polarity and reverse any out of phase connections, if necessary. Usually one speaker wired
out of phase is the culprit.

Placement and Operation

Speaker/room interactions have a huge impact on the sound of the system. Moving the speakers just a
little bit can make a dramatic difference in what you hear. The compact design of T90 provides
maximum placement flexibility, while creating a large, seamless, acoustically accurate soundfield for
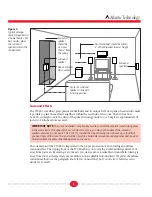
your system. The best placement of the speakers will vary from room to room. Use the following
placement guidelines and Figure 3 as a starting point. But also feel free to experiment. In fact, it may
be beneficial to hook up the speakers with some extra wire and to simply drape the wire across the
floor before installing the speakers permanently. This will allow you the opportunity to move the
speakers around easily so you can find the best sonic and visual locations.

Home Theater Placement

Our philosophy is simple. We believe the primary goal of a surround sound system isn’t to make you
think you’re in a movie theater. It’s to make you believe you’re 

in the movie or at the concert

. So for

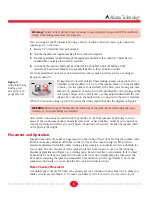
Figure 1:

Gold plated 5-way
binding posts.
Accepts up to 10
gauge bare wire

Summary of Contents for System T90

Page 1: ...eaterLoudspeakerSystem Instruction Manual AtlanticTechnology I N N O V A T I V E H O M E T H E A T E R C o v e r s M o d e l s T 9 0 L R T 9 0 C a n d T 9 0 S R 343 Vanderbilt Avenue Norwood MA 02062 781 762 6300 www atlantictechnology com ...

Page 2: ... used in a horizontal position directly above or below the TV screen It too is magnetically shielded and will have no adverse effects on the TV T90 SR Surround Speaker The T90 SR TriVector Surround Speaker is intended to be used in multi channel audio video sound systems only as a dedicated surround speaker Each enclosure has a 5 25 TCMG woofer on its front and two wide dispersion 3 4 Modified Dom...

Page 3: ...k like the diagram in Figure 2 WARNING Before turning on the amplifier be certain that no stray wire strands are touching across any terminals as this might damage your amplifier After all the connections are made check the polarity of your front speakers by listening to stereo music If the sound seems hollow unusually spread out or has weak bass recheck your connections for proper polarity and re...

Page 4: ... cutouts are closest to the front Sit the speaker s feet in the cutouts and tilt the speaker so that it points most directly at the listening position Try to keep the T90 C no more than 2 feet above or below the LRs The T90 C includes a rear mounted High Frequency Level control that adjusts the output of the tweeter You should adjust this control to get the three front speakers to sound as much al...

Page 5: ... The surround speakers are primarily used to re create the ambient sounds taking place in the movie scene Throughout part or even most of a movie you may not be aware of the surround speakers presence Do not panic This is OK Try to avoid the trap of turning the surrounds up so loud that you hear them all the time The result will be a much less believable surround sound experience and constant dist...

Page 6: ...at moving your speakers even a few inches can dramatically change and possibly improve their sound Setting Speaker Volume Levels You should set all the speakers in the surround sound system to the same volume level hopefully using an SPL Sound Pressure Level meter As of this writing you can buy a fairly inexpensive one at Radio Shack stores that will help you properly set up your system Set the me...

Page 7: ...ge to the speaker system This type of damage is easily identifiable through examination of the speaker s voice coil and is not covered by the warranty or extended service agreement Care and Feeding of Your Speakers Clean your speaker cabinets using a soft cloth moistened with a mild non abrasive glass cleaner being careful not to wet the edges of the cabinet Also be careful not to get any cleaning...

Page 8: ...sover 3 kHz 4th Order 3 kHz 4th Order 3 kHz 4th Order Frequency Sensitivity 85dB 88dB 85dB Recommended 10 130 Watts 10 130 Watts 10 130 Watts Amplifier Power Magnetic Shielding Yes Yes No Size W x H x D 6 7 x 10 4 x 7 6in 16 5 x 7 4 x 8 75in with base 6 3 x 9 7 x 7 7in 170 x 264 x 193mm 420 x 188 x 222mm with base 160 x 245 x 195mm Weight ea unpacked 8 5lbs 3 9kg 13 2lbs 6 0kg with base 7 2lbs 3 3...

Reviews: