Introduction
Thank you for purchasing the Atlantic Typhoon Professional Diffuser Kit.
Diffuser Connections
Remove the rubber fill plug located on the bottom of the diffuser. Fill the diffuser cavity with
sand or small gravel. The additional weight will ensure the diffuser stays in place when
positioned at the bottom of the pond. Replace the rubber fill plug. Unroll the weighted tubing
and connect one end to open Tee on the diffuser. Submerse the diffuser in the pond in the
desired location and route the weighted tubing to the area the Air pump will be installed.
Note: TADK1800 includes 20’ of weighted tubing for one diffuser. TADK3600 includes 40’
of weighted tubing that can be cut to the proper length depending on the location of two
diffusers. These lengths do not have to be equal.
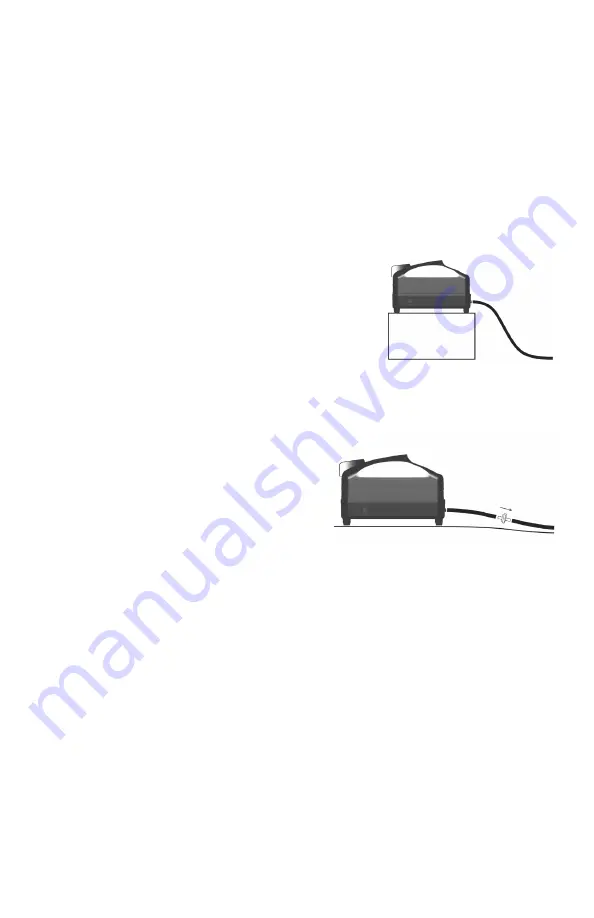
Air Pump Connections
In cooler weather, the air produced by the TA1800 and
TA3600 is often warmer than the ambient outside temperature.
These conditions will create condensation inside the weighted
tubing. To prevent any water from flowing backwards into the
air pump when powered off, it is recommended to elevate the
pump a minimum of 12” above the surrounding grade. The
tubing must immediately run at a downward slope as it exits
the compressor. Gravity will carry the moisture away from the air pump. In this installation it is
not necessary to install the check valve supplied with this kit. If the air pump is not elevated,
then the supplied check valve must be installed.
TADK1800
Cut a short (6”) piece of weighted tubing from the end
of the roll opposite the diffuser. Insert the unmarked
side of the check valve into one end of the 6” piece
of tubing and connect the other end to the ⅜” brass
outlet fitting included with the TA1800 air pump. Trim
the remaining tubing from the diffuser to length and
connect to the outlet end of the check valve.
Note: The outlet side of the check valve has a small “OUT” molded in the side. Direction of flow
can be easily verified by blowing into the end of the check valve.
TADK3600
Cut three short (6”) pieces of weighted tubing from the end of the rolls opposite the diffusers.
Connect one piece of tubing to the included tee and connect the other end to the ⅜” brass
outlet fitting included with the TA3600 air pump. Insert the unmarked side of the check valves
into the ends of the two remaining short pieces of tubing and connect the other ends to the
tee. Trim the weighted tubing from the diffusers to length and connect to the outlet end of
the check valves.
Caution
Avoid kinks and tight turns in the tubing run and take care to never fully close off the pump
outlet. Ensure that the pump can discharge sufficient air at all times, otherwise the pump will
overheat leading to diaphragm failure. rom the diffuser to length and connect to the outlet
ends of the check valves.
Warranty
The Typhoon Professional Diffuser Kit carries a three-year warranty. This limited warranty is
extended solely to the original purchaser commencing from the date of original purchase
receipt. A misused or abused product voids this warranty.
2