background image

113

Instruction book

9096 3313 00


        Control panel Elektronikon Graphic

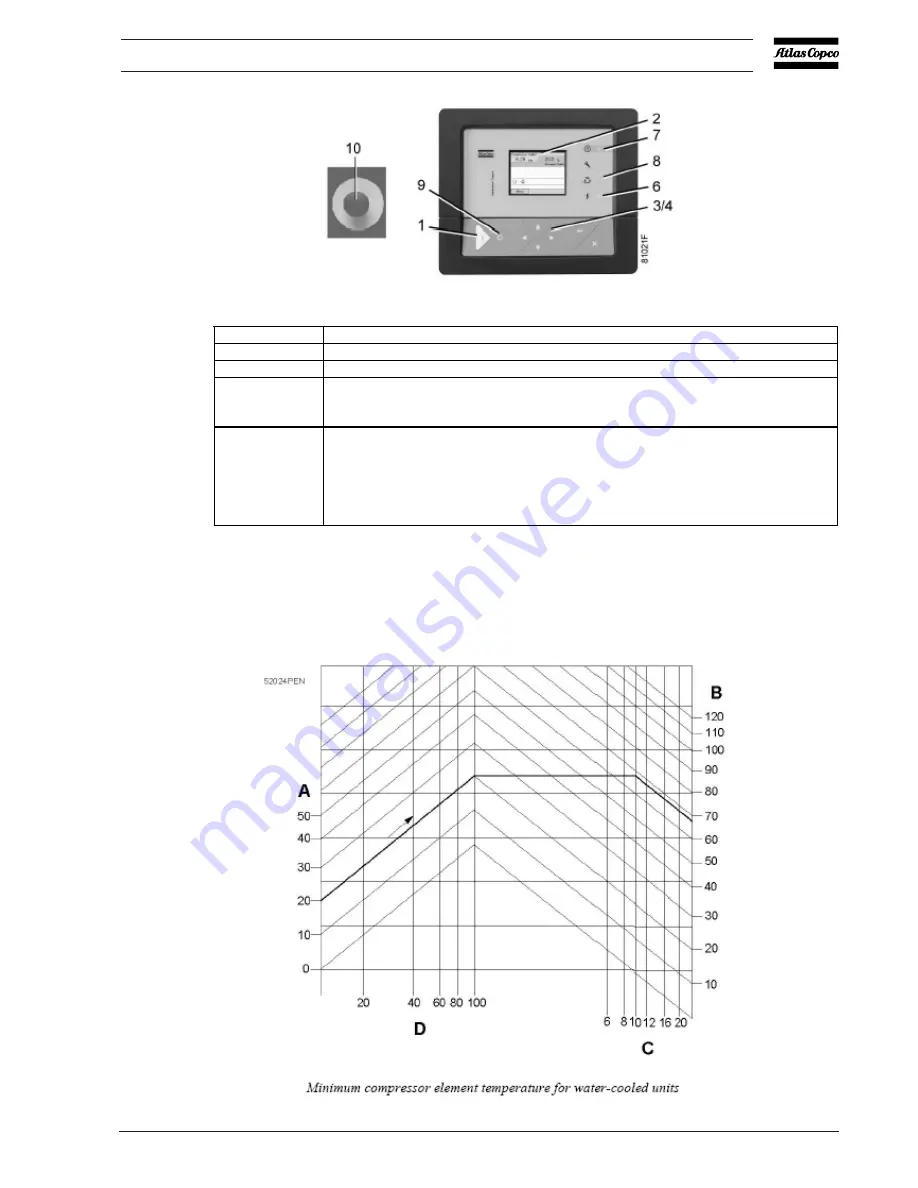
Step Action 

Switch on the voltage. Check that voltage on LED (6) lights up. 

Open the air outlet valve. 

Press start button (1) on the control panel. The compressor starts running and the 
automatic operation LED (8) lights up. Ten seconds after starting, the drive motor 
switches over from star to delta and the compressor starts running loaded. 

On water-cooled compressors, regulate the cooling water flow during  loaded running 
to obtain the most suitable temperature at the outlet of the compressor element, i.e. 
between 2

o

C and 7

o

C above the relevant temperature in the figure below. For 

optimum operation, the cooling water outlet temperature must never exceed the valve 
specified in section Compressor data. Consult Atlas Copco if condensate should form 
during frequent unloading periods.  


Summary of Contents for GA 55+

Page 1: ...GA 55 GA 75 GA 90 Instruction book Atlas Copco Oil injected rotary screw compressors ...

Page 2: ......

Page 3: ...ontents or any part thereof is prohibited This applies in particular to trademarks model denominations part numbers and drawings This instruction book meets the requirements for instructions specified by the machinery directive 98 37 EC and is valid for CE as well as non CE labelled machines Instruction book GA 55 GA 75 GA 90 From serial No PNA922285 ...

Page 4: ......

Page 5: ...TRODUCTION 15 2 2 AIR FLOW 19 2 3 OIL SYSTEM 21 2 4 COOLING SYSTEM 22 2 5 CONDENSATE SYSTEM 24 2 6 REGULATING SYSTEM 25 2 7 ELECTRICAL SYSTEM 26 2 8 ELECTRICAL DIAGRAMS 28 2 9 AIR DRYER 32 3 Elektronikon Graphic controller 34 3 1 ELEKTRONIKON GRAPHIC REGULATOR 34 3 2 CONTROL PANEL 36 3 3 ICON USED 37 3 4 MAIN SCREEN MENU 40 3 5 CALLING UP MENUS 42 3 6 INPUTS MENU 43 3 7 OUTPUTS MENU 45 3 8 COUNTER...

Page 6: ...N COMMISSIONING 77 4 4 PICTOGRAPHS 78 4 5 ELEKTRONIKON DISPLAY AND WARNNGS 78 4 6 DATA DISPLAYED DURING NORMAL OPETATION 79 4 7 WARNING 80 4 8 MAINTENANCE 82 4 9 SERVICES KITS 85 4 10 PROBLEM SOLVING 85 5 Energy recovery optional 88 5 1 ENERGY RECOVERY UNIT 88 5 2 ENERGY RECOVERY SYSTEMS 89 5 3 OPERATION 90 5 4 MAINTENANCE 93 5 5 ENERGY RECOVERY DATA 94 6 Installation 96 6 1 DIMENSION DRAWINGS 96 ...

Page 7: ...PPING 117 7 8 TAKING OUT OF OPERATION 117 8 Maintenance 119 8 1 PREVENTIVE MAINTENANCE SCHEDULE 119 8 2 DRIVE MOTOR 121 8 3 OIL SPECIFICATIONS 122 8 4 OIL AND OIL FILTER CHANGE 122 8 5 DISPOSAL OF USED MATERIAL 124 8 6 STORAGE AFTER INSTALLATION 124 8 7 SERVICE KITS 125 9 Adjustments and servicing procedures 126 9 1 AIR FILTER 126 9 2 COOLERS 127 9 3 SAFETY VALVES 128 10 Problem solving 129 10 1 P...

Page 8: ... BREAKER 134 11 4 SETTINGS FOR MOTOR OVERLOAD RELAY 134 11 5 DRYER SWITCHES 135 11 6 RERERENCE CONDITIONS AND LIMITATIONS 135 11 7 COMPRESSOR DATA 136 11 8 TECHNICAL DATA ELEKTRONIKON CONTROLLER 141 12 Instruction for use of air receiver 143 12 1 INSTRUCTIONS FOR USE 143 13 Guideline for instruction 144 13 1 GUIDELINES FOR INSPECTION 144 ...

Page 9: ......

Page 10: ...nance repair work adjustment or any other non routine checks stop the compressor press the emergency stop button switch off the voltage and depressurise the compressor In addition the power isolating switch must be opened and locked 6 Never play with compressed air Do not apply the air to your skin or direct an air stream at people Never use the air to clean dirt from your clothes When using the a...

Page 11: ...or working on the machine To this end a suitable notice shall be affixed to the start equipment 10 Air cooled machines must be installed in such a way that an adequate flow of cooling air is available and that the exhausted air does not recirculate to the compressor air inlet or cooling air inlet 11 The electrical connections must correspond to the applicable codes The machines must be earthed and...

Page 12: ...switching on remotely controlled machines shall take adequate precautions to ensure that there is no one checking or working on the machine To this end a suitable notice shall be affixed to the remote start equipment 3 Never operate the machine when there is a possibility of taking in flammable or toxic fumes vapours or particles 4 Never operate the machine below or in excess of its limit ratings ...

Page 13: ... air to clean dirt from your clothes When using the air to clean equipment do so with extreme caution and wear eye protection Precautions during maintenance or repair 1 Always wear safety glasses 2 Use only the correct tools for maintenance and repair work 3 Use only genuine spare parts 4 All maintenance work shall only be undertaken when the machine has cooled down 5 A warning sign bearing a lege...

Page 14: ...he compressor drive shaft has been reinstalled 17 Every time the separator element is renewed examine the discharge pipe and the inside of the oil separator vessel for carbon deposits if excessive the deposits should be removed 18 Protect the motor air filter electrical and regulating components etc to prevent moisture from entering them e g when steam cleaning 19 Make sure that all sound damping ...

Page 15: ...r cooled and water cooled version GA Workplace GA Workplace are enclosed in a sound insulated bodywork The compressors are controlled by the Atlas Copco Elektronikon regulator The electronic control module is fitted to the door on the right side An electric cabinet comprising the motor starter is located behind this panel A condensate trap with Electronic Water Drain EWD is provided Front view GA ...

Page 16: ...ed behind this panel They are provided with an airdryer The condensate is automatically drained The dryer is integrated in the sound insulated bodywork The dryer removes water from the compressed airby cooling the air to near freezing point Rear view GA 55 up to GA 90 Workplace Reference Name AV Air outlet valve Ca Air cooler Co Oil cooler CV Vs Check valve oil stop valve Da Automatic condensate o...

Page 17: ...e AF Air filter AR Air receiver oil separator vessel AV Air outlet valve Ca Air cooler Co Oil cooler Da Automatic condensate outlet Da1 Automatic condensate outlet dryer DR Dryer ER Elektronikon Graphic controller FN Fan M1 Compressor drive motor VP Vent plug oil cooler S3 Emergency stop button OF Oil filter housing ...

Page 18: ...o GA 90 Workplace Full Feature Reference Name E Compressor element CV Vs Check valve oil stop valve FN Cooling fan M1 Compressor drive motor MT Condensate trap AV Compressed air outlet valve DR Dryer AF Air filter Co Oil cooler Ca Air cooler UA Unloader ...

Page 19: ...19 Instruction book 9096331300 Coolers on water cooled compressors 2 2 Air flow Flow diagrams Water cooled air cooler and oil cooler Reference Name Ca Air cooler Co Oil cooler ...

Page 20: ...e air receiver oil separator AR via check valve CV The air isdischarged through outlet valve AV via minimum pressure valve Vp and air cooler Ca The air cooler is provided with a moisture trap MT On Full Feature compressors the air flows through air dryer DR before it is discharged through outlet valve AV Also see section Air dryer Reference Description A Intake air B Air oil mixture C Oil D Wet co...

Page 21: ...ypass valve BV When the oil temperature is below its setpoint bypass valve BV shuts off the supply to oil cooler Co and the oil cooler is bypassed Check valve CV prevents blow back of compressed air when the compressor is stopped Minimum pressurevalve Vp prevents the receiver pressure AR from dropping below a minimum pressure during unloadedoperation 2 3 Oil system Flow diagram References Descript...

Page 22: ...rts opening the supply from cooler Co when the oil temperature has increased to theset point At approx 15 C above the set point all the oil flows through the oil cooler Oil stop valve Vs prevents the compressor element from flooding with oil when the compressor is stopped The valve is opened by element outlet pressure when the compressor is started 2 4 Cooling system Flow diagram ...

Page 23: ...air E Condensate F Water flow Description The cooling system comprises air cooler Ca and oil cooler Co On air cooled compressors the cooling air flow is generated by fan FN Water cooled compressors are connected to a cooling water circuit The water flows through the inlet pipe the coolers and the outlet pipe ...

Page 24: ...mpressors an additional electronic water drain EWD1 is provided The condensate trapof the heat exchanger is drained by EWD1 and discharged through automatic drain outlet Da1 Also see section Air flow Testing the electronic water drain can be done by briefly pressing the test button 1 on top of the drain 2 5 Condensate system Water drains Reference Designation Da Automatic drain connection Da1 Auto...

Page 25: ...of the compressor the net pressure increases When the netpressure reaches the unloading pressure solenoid valve Y1 is de energised Results The pressure above unloading valve blow off valve UV is released to atmosphere and the space abovevalve UV is no longer in connection with the oil separator tank pressure 1 Unloading valve blow off valve UV moves upwards connecting the oil separator tank pressu...

Page 26: ...cal system comprises following components Reference Designation F1 2 3 Control circuit fuses F3 is only provided in case a phase sequence relay is provided F15 Overload relay fan motor F16 F17 F18 For fane fuses F21 Overload relay compressor motor K21 Line contactor K22 Star contactor K23 Delta contactor K25 Phase Sequence relay S3 Emergency stop Electric cubicle ...

Page 27: ...27 Instruction book 9096331300 Reference Designation T1 Transformer 1X0 Terminal strip voltage supply 1X2 For dryer connection X103 X108 X108A X117 Connectors PE Earth terminal ...

Page 28: ...28 Instruction book 9096331300 2 8 Electrical diagrams Service diagram for GA55 up to GA 90 1 2 3 4 5 6 7 8 9 16 10 11 12 13 14 15 9096 9038 03 ...

Page 29: ... sensing 6 Remote load unload closed load 7 Pressure drop over DD filter 8 Pressure drop over PD filter 9 Remote pressure set selection 10 ES 100 if installed 11 Remote emergency stop 12 Auxiliary contacts 13 Manual automatic operation 14 General warning 15 General shut down 16 OSCi overflow contact level switch Reference Sensors solenoid valves electronic water drain A1 Dryer units with integrate...

Page 30: ...refrigeration dryer Y1 Loading solenoid valve Reference Motors M1 Compressor motor M2 Fan motor on air cooled compressors M3 Fan motor cubicle on water cooled compressors Reference Electric cabinet F1 18 Fuses F15 Overload relay fan motor F21 Overload relay drive motor K21 Line contactor K22 Star contactor K23 Delta contactor Q15 Circuit breaker fan motor T1 Transformers 1X0 1X7 Terminal strips X1...

Page 31: ...rive motor thermistor protection shut down R2 K35 Drive motor thermistor protection warning R96 97 Anti condensation heaters S10 Main power isolating switch Y51 Water shut off valve water cooled compressors Y5 Solenoid valve OSCi S4 Level switch OSCi PM1 potentiometer OSCi Reference Electric cabinet S Remote pressure sensing S1 Remote START Pr STOP S3 Emergency stop S3 Emergency stop remote S4 Rem...

Page 32: ...control Compressed air circuit Compressed air enters heat exchanger 1 and is cooled by the outgoing cold dried air Water in the incomingair starts to condense The air then flows through heat exchanger evaporator 2 where the refrigerantevaporates causing the air to be cooled further to close to the evaporating temperature of the refrigerant Morewater in the air condenses The cold air then flows thr...

Page 33: ...rigerant enters evaporator 2 where it withdraws heat from the compressed air by further evaporationat constant pressure The heated refrigerant leaves the evaporator and is sucked in by the compressor 5 By pass valve 9 regulates the refrigerant flow Fan 10 is switched on or off by switch 11 depending onthe loading degree of the refrigerant circuit The refrigerant compressor motor has a built in the...

Page 34: ...dingthe compressor A number of programmable settings e g the unloading and loading pressures the minimumstop time and the maximum number of motor starts are taken into account The regulator stops the compressor whenever possible to reduce the power consumption and restarts itautomatically when the net pressure decreases In case the expected unloading period is too short thecompressor is kept runni...

Page 35: ...as the warning condition disappears Warning A warning message will appear if on full Feature compressors the Dewpoint temperature is too high inrelation to the ambient temperature Service warning A number of service operations are grouped called Service Plans Each Service Plan has a programmed timeinterval If a time interval is exceeded a message will appear on display 1 to warn the operator to ca...

Page 36: ...ed 7 Automatic operation LED Indicates that the regulator is automatically controlling the compressor 8 Voltage on LED Indicates that the voltage is switched on 9 Pictograph Voltage on 10 Enter key Key to select the parameter indicated by the horizontal arrow Only the parameters followed by an arrow pointing to the right can be modified 11 Escape key To go to previous screen or to end the current ...

Page 37: ...s running the icon is rotating Compressor status Motor stopped Running unloaded Running loaded Machine control mode Local start stop Remote start stop Network control Automatic restart after voltage failure Automatic restart after voltage failure is active Week timer Week timer is active Active protection functions Emergency stop Shutdown Warning Service Service required ...

Page 38: ...t icons Icon Description Pressure temperature Digital input Special protection Icon Description Compressor element LP HP Dryer Fan Frequency converter Drain Filter Motor Failure expansion module Network problem General alarm System icons ...

Page 39: ...on book 9096331300 Menu icons Icon Description Inputs Outputs Alarms Warnings shutdowns Counters Test Settings Service Saved data Access key User password Network Setpoint Icon Description Up Down Navigation arrows ...

Page 40: ... g the outlet pressure the temperature at the compressoroutlet A Status icons B following icon types can be shown in this field Fixed icons these icons are always shown in the main screen the cursor will not highlight these icons e g Compressor stopped or running Compressor status running running unloaded or motor stopped Optional icons these icons are only shown if their corresponding function is...

Page 41: ... access to all data collected by the regulator The function of the buttons depends on the displayed menu The most common functions are To activate an action button highlight the button by using the scroll keys and press the enter key Designation Function Back To return to the previous screen Mainscreen To return to the main screen Menu To go to the menu Modify To modify programmable settings Reset...

Page 42: ...ling up menus Control panel Control panel Description When the voltage is switched on the main screen is shown automatically Highlight the menu button using the scroll keys 1 Press the enter key 2 to select the menu following screen appears ...

Page 43: ... selected icon Usethe scroll keys 1 to jump from one icon to another The action bar shows the action button main screen Back Use the scroll keys to highlight the mainscreen button and press the Escape key 2 to return to the main screen 3 6 Inputs menu Control panel Menu icon inputs Function To call up information regarding the actually measured data and the status of some inputs such as the motoro...

Page 44: ...e inputs icon see above section Menu icon Press the enter key 2 a screen similar to the one below appears 1 Configuration 2 Pressure Settings 3 Mainscreen 1 Analog Digital I O 2 Element outlet 3 Dryer PDP 4 Compressor outlet 5 Emergency stop 6 Back The screen shows a list of all inputs with their corresponding icons and readings If an input is in warning or shutdown the original icon is replaced b...

Page 45: ...unction To call up information regarding the actually measured data and the status of some inputs such as the motor overload protection Function Starting from the Main screen see Main screen Move the cursor to the action button Menu and press the enter key 2 following screen appears ...

Page 46: ...milar to the one below appears 1 Configuration 2 Pressure Settings 3 Mainscreen 1 Analog Digital I O 2 Element outlet 3 Dryer PDP 4 Compressor outlet 5 Emergency stop 6 Back The screen shows a list of all outputs with their corresponding icons and readings If an input is in warning or shutdown the original icon is replaced by the warning or shutdown iconrespectively ...

Page 47: ...96331300 3 8 Counters Control panel Menu icon counters Function To call up The running hours The loaded hours The number of motor starts The number of hours that the regulator has been under tension The number of load cycles ...

Page 48: ...creen appears Text on figure 1 Configuration 2 Pressure Settings 3 Mainscreen Using the scroll keys 1 move the cursor to the counters icon see above section Menu icon Press the enter key 2 following screen appears Text on figure 1 Counters 2 Running hrs 3 Loaded hrs 4 Motor starts 5 Module hrs 6 Back The screen shows a list of all counters with their actual readings ...

Page 49: ...gs menu Control panel Menu icon settings Function To modify a number of parameters Procedure Starting from the Main screen see Main screen Move the cursor to the action button Menu and press the enter key 2 following screen appears Menu screen ...

Page 50: ...r to the one below appears Settings menu screen 3 10 Service menu Control panel Menu icon service Function To reset the service plans which are carried out To check when the next service plans are to be carried out To find out which service plans were carried out previously Procedure Starting from the Main screen see Main screen Move the cursor to the action button Menu and press the enter key 2 f...

Page 51: ...guration 2 Pressure Settings 3 Mainscreen Using the scroll keys 1 move the cursor to the service icon see above section Menu icon Press the enter key 2 following screen appears Scroll through the items to select the desired item and press the enter key 2 ...

Page 52: ...l Time hours Service plans A number of service operations are grouped called Level A Level B etc Each level stands for a number of service actions to be carried out at the time intervals programmed in the Elektronikon regulator When a service plan interval is reached a message will appear on the screen After carrying out the service actions related to the indicated levels the timers must be reset ...

Page 53: ...select the value to be modified Press the enter key 2 following screen appears Modify the value as required using the up or down scroll key 1 Running hours can be modified in steps of 100 hours real time hours can be modified in steps of 1 hour Next Service ...

Page 54: ...ed to be done at 7000 Running hours History The history screen shows a list of all service actions done in the past these actions are sorted by date The date at the top is the latest service action To see the details of a completed service action e g service level running hours or real time use the scroll keys 1 to select the desired action and press the enter key 2 3 11 Setpoint menu Control pane...

Page 55: ...reen see Main screen Move the cursor to the action button Menu and press the enter key 2 following screen appears Text on figure 1 Configuration 2 Pressure Settings 3 Mainscreen Move the cursor to the setpoint icon see above section menu icon using the scroll keys 1 Press the enter key 2 following screen appears Text on figure 1 Pressure setting 2 Unloading pressure 1 3 Loading pressure 1 ...

Page 56: ...ppears The first line of the screen Unloading Pressure 1 is highlighted in red Use the scroll keys 1 to highlight the setting to be modified and press the enter key 2 Following screen appears The upper and lower limit of the setting is shown in grey the actual settings is shown in black Use thearrow up or arrow down key of the scroll keys 1 to modify the settings as required and press the enter ke...

Page 57: ...istory Function To call up the last shut down and last emergency stop data Procedure Starting from the Main screen see Main screen Move the cursor to the action button Menu and press the enter key 2 following screen appears Text on figure 1 Configuration 2 Pressure Settings 3 Mainscreen ...

Page 58: ...p item Press the enter key 2 to find the date time and other data reflecting the status of the compressor whenthat shut down or emergency stop occurred 3 13 Modifying general settings Control panel Menu icon general settings Function To modify a number of general settings e g Time Date Date format Language units Procedure Starting from the Main screen see Main screen Move the cursor to the action ...

Page 59: ... Pressure Settings 3 Mainscreen Select the modify button using the scroll keys 1 and press the enter key 2 A screen similar to the one above is shown a red selection bar is covering the first item Language if necessary use the arrow down key of scroll keys 1 to select the general setting to be modified and pressthe enter key A pop up screen appears use the arrow up or arrow down key to select the ...

Page 60: ...Info menu Control panel Menu icon info Function To show the Atlas Copco internet address Procedure Starting from the Main screen see Main screen Move the cursor to the action button Menu and press the enter key 2 following screen appears ...

Page 61: ...rt stop commands for the compressor To program time based change over commands for the net pressure band Four different week schemes can be programmed A week cycle can be programmed a week cycle is a sequence of 10 weeks For each week in the cycle one of the four programmed week schemes can be chosen Procedure Starting from the Main screen see Main screen Move the cursor to the action button Menu ...

Page 62: ...con see above section Menu icon Press the enter key 2 following screen appears 1 Configuration 2 Pressure Settings 3 Mainscreen The screen shows two items week schemes and week cycle Programming week schemes Select week schemes using the scroll keys 1 and press the enter key 2 following screen appears ...

Page 63: ...to be programmed and press the enter key following screen appears Select the day to be programmed and press the enter key following screen appears Select the action to be programmed and press the enter key a pop up screen shows all possible actions ...

Page 64: ...tes Programming the week cycle A week cycle is a sequence of 10 weeks For each week in the cycle one of the for programmed week schemescan be chosen In the week timer menu select week cycle and press the enter key following screen appears A Blue rectangle cursor will highlight the first Week together with the corresponding Week Scheme defaultWeek Scheme 1 The rectangle can be moved to the right an...

Page 65: ... Menu icon test Function To carry out a display test i e to check whether the display and LEDs are still intact Procedure Starting from the Main screen see Main screen Move the cursor to the action button Menu and press the enter key 2 following screen appears ...

Page 66: ...bove section Menu icon Press the enter key 2 following screen appears The safety valve test can only be performed by authorized personnel and is protected by a security code Select the item display test and press the enter key A screen is shown to inspect the display at the sametime all LED s are lit 3 17 User password menu Control panel Menu icon password ...

Page 67: ...u icon Press the enter key 2 Select the modify button using the scroll keys 1 and press the enter key 2 modify the password as required 3 18 Programmable settings Parameters unloading loading pressures for compressors without built in refrigeration dryer 1 Configuration 2 Pressure Settings 3 Mainscreen Minimum setting Factory setting Maximum setting Unloading pressures Unloading pressure 7 5 bar c...

Page 68: ...e 4 1 10 3 10 8 Unloading pressure bar e 4 1 12 12 5 Loading pressures Loading pressure 7 5 bar compressors bar e 4 6 4 7 4 Loading pressure 8 bar compressors bar e 4 6 9 7 9 Loading pressure 10 bar compressors bar e 4 8 9 9 9 Loading pressure 13 bar compressors bar e 4 11 9 12 9 Loading pressure bar e 4 6 3 7 3 Loading pressure bar e 4 8 9 Loading pressure bar e 4 9 7 10 7 Loading pressure bar e ...

Page 69: ...tting has to be changed The intervals must not exceed the nominal intervals and must coincide logically See section Modifying general settings Terminology Term Explanation ARAVF Automatic Restart After Voltage Failure See section Elektronikon regulator Power recovery time Is the period within which the voltage must be restored to have an automatic restart Is accessible if the automatic restart is ...

Page 70: ...remain stopped for the minimum stop time approx 20 seconds whatever happens with the net air pressure Consult Atlas Copco if a setting lower than 20 seconds is required Unloading Loading pressure The regulator does not accept illogical settings e g if the unloading pressure is programmed at 7 0 bar e the maximum limit forthe loading pressure changes to 6 9 bar e The recommended minimum pressure di...

Page 71: ...to separate the major part of this oil from the condensate and to sorb it in its replaceable filters thus preventing contamination of the environment It is capable to breakand sorb most stable emulsions The OSCi is insensitive to shocks and vibrations because of the use of filtersand can be used with all types of drains The condensate meets the requirements of the environmental codes The OSCi is i...

Page 72: ...r lifetime without the need to openthe compressor canopy The outlet of the first vessel is situated at the bottom and is connected to the upper half of the second vessel In the second vessel the pre filtered condensate is brought in contact with a filter bag 6 filled with OleophilicGranular Clay OGC Through a connection 5 at the bottom of the second vessel air is injected into the condensate This ...

Page 73: ...through a pipe connecting both lower halves of the vessels An activated carbon filter 7 cleans the condensate further and the clean condensate flows out of connection 9 A test outlet 8 is positioned below the normal outlet Both outlets are connected to the compressor drainplate by their corresponding tubes At the bottom of the vessels drain tubes with valves 4 are provided for easy servicing In th...

Page 74: ...ping ring 2 Foam cover 3 Location of sample bottles and connection material during shipping only 4 Service drains with valve 5 Fixation bolts 6 Wire and tube clamp 7 Overflow switch 8 Filter position sensor and visual indication of the filter position ...

Page 75: ...75 Instruction book 9096331300 Detail views View of OSCi inlet 1 Filter position sensor 2 Condensate inlet connections View of OSCi outle ...

Page 76: ...76 Instruction book 9096331300 1 Condensate outlet 2 Condensate test outlet 1 Condensate outlet connection of the OSCi 2 Condensate sample valve Dm Manual drain connections of the EWD s ...

Page 77: ...the OSCi and take off the cover 2 3 Take out the CDROM and the box 3 with the test bottle and the reference bottle and keep them in a safe place nearby the compressor 4 Take the ISO 7 R connection and the G ball valve with seal and screw them into the corres ponding threads in the drain plate at the bottom left of the compressor front panel Drain plate Close the condensate sample valve ...

Page 78: ...el 1 2 and 3 If there is a leak proceed to Problem solving fault 3 8 Put the cover back on the first tower tighten the clamping ring and close the compressor bodywork 4 4 Pictographs 71 Automatic condensate outlet not pressurized 72 Periodically required manual test outlet 73 Manual condensate outlet 74 Consult manual before maintenance or repair 4 5 Elektronikon display and warnings Following imp...

Page 79: ...nd press enter to go into the Inputs submenu The remaining lifetime of the OSCi filters expressed as a percentage compared to new filters 100 is visible here Reference Description Reference Description 1 Compressor outlet 4 Unload 2 Element outlet 5 Menu 3 Load 6 Regulation Reference Description 1 OSCi remaining lifetime To take a look at the status of the OSCi overflow sensor press the down arrow...

Page 80: ...with new filters needs to be ordered The service LED will light up at the right side of the Elektronikon Graphic To consult the warning navigate the cursor to the warning icon as on the following screen Reference Description 1 Compressor outlet 2 Service After pressing enter the following screen with the remaining lifetime and the service minimum 10 will be displayed The text service 10 will be bl...

Page 81: ...ll be shown and the service warning will disappear Overflow warning This is a protection alarm indicating that the water level in the OSCi is too high The warning LED will light up at the right side of the Elektronikon Graphic In this case consult section Maintenance fault 2 If the problem is not solved in time water can escape from the OSCi and leak onto the compressor frame and outside of the co...

Page 82: ... material will be exposed to the condensate When the top of the filter reaches the surface of the condensate in the first vessel the filter is saturated and needs to be replaced This is automatically transmitted to the Elektronikon regulator via the level sensor 1 View of OSCi inlet but the customer can also check this visually through the sight glass Quality check of the condensate Every week a t...

Page 83: ...ched tubes and electrical wires are long enough to slide out the OSCi without disconnecting them but this should be done carefully paying attention not to obstruct the tubes and wires 5 Unscrew the clamping rings take off the covers and take out the 3 filter bags The buckets in which the new filters are supplied can be used to store the old filters 6 Clean out the OSCi with water and tissue Do not...

Page 84: ...ning condensate can leave the OSCi When placing new activated carbon filters the outgoing water may initially look black car bon dust The carbon water is not harmful All filters oil containing tissues and water must be disposed of in an environmentally friendly and safe manner and in line with the local recommendations and environmental legislation Each new filter is provided with a label The corr...

Page 85: ... sight glass A section of the outlet tube is higher than the corresponding outlet connection Reposition the outlet tube to below the outlet connection level View of OSCi outlet check inside and outside the compressor A filter is saturated Replace filters and clean the OSCi Injected airflow too high Replace strainer 4 OSCi air injection 4 10 Problem solving 4 9 Service kits Your Atlas Copco Custome...

Page 86: ...can run dry in the outlet circuit If the above requirements are met and the water level reaches the top of vessel 2 or if the water level in vessel 1 reaches at least the sight glass Remove all the filters clean the OSCi and order a filter service kit to replace the filters Verify the vessel separator and scavenge line flow and replace them in case of abnormalities If an overflow is to be avoided ...

Page 87: ...ine flow of the compressor and order the corresponding service kits in case these components are not working correctly OSCi air injection Automatic as well as manual safety devices to prevent overflow are present Besides the automatic overflow switch 7 View of OSCi which is mounted in a side chamber on the second vessel and gives an alarm when condensate level is too high the customer can check fo...

Page 88: ...ing it into warm or hot water without any adverse influence on the compressor performance The water can be used for diverse applications Components The energy recovery system is completely integrated and mainly comprises Stainless steel oil water heat exchanger Selector handle V1 to enable disable Energy Recovery Thermostatic by pass valve for energy recovery heat exchanger s BV2 Two temperature s...

Page 89: ...ting High temperature rise low water flow systems For this type of application a high water temperature rise in the energy recovery system is obtained which consequently brings on a low flow rate Example An open circuit where cold water from a main supply is heated by the energy recovery system for use in a factory e g pre heating of boiler feed water Recovery water flow For the references see sec...

Page 90: ...on recirculation water circuits the major problems usually encountered are related to deposit control corrosioncontrolandmicrobiologicalgrowthcontrol Tominimizetheseproblems thewatershouldmeet anumber of requirements See section Cooling water requirements If in any doubt consultAtlas Copco 5 3 Operation General The compressor oil flow is controlled by two thermostatic valves BV1 and BV2 ensuring r...

Page 91: ...pressors with a maximal pressure of 13 bar BV2 starts opening at 60 C and is completely open at 75 C The housing of BV2 is provided with a special handle V1 allowing to control the working of the energy recovery system As can be seen on the ER label the ER unit is integrated in the oil circuit and will recover energy when the handle is completely turned in clockwise When the handle is turned out a...

Page 92: ...the oil supply from the oil cooler Co to prevent the compressor oil from being cooled The oil flows from the oil separator vessel AR through the oil filter s OF back to compressor element E All energy input is used to rapidly warm up the compressor oil No energy is recovered Maximum energy recovery As soon the oil temperature reaches the set point opening temperature of bypass valve BV2 the valve ...

Page 93: ...ompressor Stopping the unit for a long period In case of an open water system and or if freezing temperatures can be expected isolate the compressor water system and blow it through with compressed air 5 4 Maintenance Compressor oil For references used consult section Energy recovery unit Oil change 1 Check if handle V1 is totally turned in clockwise energy recovery in use 2 Run the unit until war...

Page 94: ...energy recovery system The water outlet temperature of the energy recovery system The cooling water outlet temperature of the compressor Modifying settings If the programmed warning settings for the water temperatures are exceeded a warning indication is shown on theElektronikon To modify a setting consult section Settings menu Recoverable energy The recoverable energy can be calculated from RECOV...

Page 95: ...ystems Parameter Unit GA55 GA75 GA90 Recoverable energy kW 48 4 66 0 79 2 Water flow l min 69 3 94 5 113 4 Temperature at inlet C 50 50 50 Temperature at outlet C 60 60 60 Parameter Unit GA55 GA75 GA90 Recoverable energy kW 48 4 66 0 79 2 Water flow l min 9 8 13 3 16 0 Temperature at inlet C 20 20 20 Temperature at outlet C 91 91 91 ...

Page 96: ...96 Instruction book 9096331300 6 Installation 6 1 Dimension drawings Centre of gravity ...

Page 97: ...unit with dryer Weight unit without dryer GA55 kg 1580 1430 GA75 kg 1680 1530 GA90 kg 1730 1580 Reference Designation 1 Electric cable passage 2 Cooling water outlet 3 Cooling water inlet 4 Compressor cooling air outlet 5 Dryer cooling air outlet 6 Compressed air outlet 7 Cooling air inlet 8 Energy recovery outlet 9 Energy recovery inlet 10 Compressed air dryer bypass outlet 11 12 Automatic drain ...

Page 98: ...98 Instruction book 9096331300 6 2 Installation proposal Compressor room example ...

Page 99: ...acity should match the compressor fan capacity at a pressure head equal to the pressure drop over the air ducts For water cooled compressors the ventilation capacity required to limit the compressor room temperature can be calculated from Qv 0 13 N dT for GA Workplace compressors Qv 0 13 N 8 dT for GA Workplace Full Feature compressors Max allowable pressure drop in ducting before or after the com...

Page 100: ...stalled a safety device with set pressure according to the maximum cooling water inlet pressure see section Reference conditions and limitations has to be installed between the compressor water outlet pipe and shut off valve When operating the unit the operator must ensure that the cooling water system cannot be blocked The above mentioned applies also to the energy recovery cooling water system R...

Page 101: ...101 Instruction book 9096331300 Electrical connections for GA Reference Designation 1 Customer s installation 2 415V K21 K23 with 3 fuses type 1 3 Star connection 415 V 3 2 1 9820 3138 12 00 ...

Page 102: ...olantquality It is very important to make a distinction between a closed system or an open system In a closed system the same coolingwateriscirculatingthroughasystemwithoutcontactwithair Anopensystemisapassthroughsystem or a circulating system with a cooling tower In the latter case one has to consider the composition of the water as it enters the cooler and not rely on the composition of the make...

Page 103: ...2 3 18 22 0 9 0 36 0 44 1 3 14 17 2 2 23 27 1 0 0 46 0 54 1 4 18 21 2 1 28 34 1 1 0 56 0 70 1 5 22 27 2 0 35 42 1 2 0 72 0 88 1 6 28 31 1 9 44 55 1 3 0 90 1 10 1 7 32 37 1 8 56 69 1 4 1 12 1 38 1 8 38 44 1 7 70 87 1 5 1 40 1 76 1 9 45 50 1 6 88 110 1 6 1 78 2 20 2 0 51 56 1 5 111 138 1 7 2 22 2 78 2 1 57 63 1 4 139 174 1 8 2 80 3 54 2 2 64 71 1 3 175 220 1 9 3 54 4 40 2 3 72 80 1 2 230 270 2 0 4 6...

Page 104: ...limited Closed cooling system Chlorides 500 ppm Open cooling system Chlorides 150 ppm However if the water is scaling lower limits should be used See The Rysnar stability index RSI 5 Free chlorine Cl2 Continuously a level of 0 5 ppm should not be exceeded For shock treatments a maximum limit of 2 ppm for maximum 30 minutes day applies 6 Sulphates SO4 Closed cooling system Sulphates 400 ppm Open co...

Page 105: ...rculating systems with proper controls and treatment the sum of the squares may be up to 520000 Note that the sulphate value must include any sulphite present Cooling capacity will change If additives are used 6 5 Pictographs Description Reference Designation 1 Automatic condensate drain 2 Warning voltage 3 Warning switch off the voltage and depressurise compressor before repairing 4 Warning befor...

Page 106: ...t of oil filter screwit on and tighten by hand approx half a turn 7 Warning stop the compressor before repairing fans 8 Warning switch off the voltage before removing protecting cover inside electric cubicle 9 Consult the instruction book before carrying out maintenance 13 Cooling water outlet 14 Cooling water inlet ...

Page 107: ...on on compressors equipped with an Elektronikon Graphic controller The controller is provided with auxiliary contacts K05 K07 and K08 for remote indication of manual load unload or automatic operation K07 warning condition K08 shut downcondition K05 Maximum load for the contacts 10 A 250 VAC Stop the compressor and switch off the voltage before connecting external equipment Consult Atlas Copco Com...

Page 108: ...tched out of automatic load unload operation and remains running unloaded For remote loading unloading via external pressure switch Compressors with an Elektronikon Graphic controller can also be wired to load and unload depending from the status of a pressure switch Bridge terminals 1 and 3 of connector X1 08a DIO5 on the controller and connect a load unload pressure switch S4 between terminals 1...

Page 109: ...109 Instruction book 9096331300 ...

Page 110: ...f drive motor overload relay F21 Check that the motor overload relay is set for manual resetting On air cooled compressors check the setting of circuit breaker Q15 Also check that the switch on the circuit breaker is in position I Fit air outlet valve AV see section Introduction for the location of the valve Close the valve Connect the air net to the valve On compressors equipped with a dryer bypa...

Page 111: ...otation arrows visible through the grating in the roof are provided on the plate below the fan to indicate the correct rotation direction of the fan motor If the rotation direction of the fan motor is incorrect open the isolating switch and reverse two incoming electric connections at the terminals of circuit breaker Q15 Incorrect rotation direction of the drive motor may cause damage to the compr...

Page 112: ... plug If necessary empty the dust trap of the filter see section Air filter If the red part of the air filter service indicator shows full out replace the air filter element Reset the service indicator VI by pushing the knob in the extremity of the body and reset the service warning On compressors equipped with an Elektronikon Graphic controller see section Service menu On water cooled compressors...

Page 113: ...tor switches over from star to delta and the compressor starts running loaded On water cooled compressors regulate the cooling water flow during loaded running to obtain the most suitable temperature at the outlet of the compressor element i e between 2 o C and 7 o C above the relevant temperature in the figure below For optimum operation the cooling water outlet temperature must never exceed the ...

Page 114: ... approx 75 C at the outlet of the compressor element 7 5 During operation Warnings Checking the oil level Control panel Elektronikon Graphic The operator must apply all relevant Safety precautions Also consult section Problem solving Keep the doors closed during operation they may be opened for short periods only to carry out checks When the motors are stopped and LED 8 automatic operation is alig...

Page 115: ...wo water drains are provided on Full Feature compressors until the air system between oil separator air receiver vessel and outlet valve is fully depressurised See section Condensate system for location of the outlet valve and water drain Unscrew oil filler plug FC one turn to permit any pressure left in the system to escape Wait a few minutes Remove the plug and add oil until the level reaches th...

Page 116: ...ental and working conditions If an OSCi is installed also check the level in the oil collector see section Maintenance OSCi 7 6 Checking the display Procedure CompressorswithElektronikon Graphiccontroller Check the display 2 regularly for readings and messages The display normally shows the compressor outlet pressure while the status of the compressor is indicated by means of a number of icons Rem...

Page 117: ...s of unloaded operation To stop the compressor in the event of an emergency press emergency stop button 10 Alarm LED flashes 7 On compressors with an Elektronikon Graphic controller Remedy the fault and unlock the button by pulling it out Navigate to the Stop icon on the display by means of the navigation keys 3 4 and press the Select key Press reset Do not use emergency stop button 10 for normal ...

Page 118: ...ompressor from the mains Unscrew the oil filler plug only one turn to permit any pressure in the system to escape Consult section Oil and oil filter change to locate the filler plug Shut off and depressurise the part of the air net which is connected to the outlet valve Disconnect the compressor air outlet pipe from the air net On water cooled compressors Isolate and disconnect the water system fr...

Page 119: ...elieving you of all preventive maintenance work Consult your Atlas Copco Customer Centre General When servicing replace all removed gaskets O rings and washers Control panel Eledtronikon Graphic Before carrying out any maintenance repair work or adjustments proceed as follows Stop the compressor Close the air outlet valve and press the test button on top of the electronic water drain s until the a...

Page 120: ...see section Service menu After servicing the intervals must be reset see section Service menu Preventive maintenance schedule Check list 1 More frequently when operating in a dusty atmosphere Preventive Maintenance schedule Period Operation Daily Check oil level Check readings on display Check air filter service indicator Check that the condensate is discharged during operation Drain condensate Da...

Page 121: ...s Check pressure and temperature readings Carry out a LED display test Check for leakages Open the manual drain valve Dm to clean the filter of the automatic drain See section Condensate system 4000 1 On water cooled units Check for possible water leakage 8000 2 If Atlas Copco Roto Xtend Duty Fluid is used change oil and oil filter have the oil separator element replaced The oil separator element ...

Page 122: ...xidation stability Roto Xtend Duty Fluid can be used for compressors operating at ambient temperatures between 0 C and 46 C Roto Xtend Duty Fluid is the standard oil for compressors equipped with freeze protection Roto Foodgrade Fluid Special oil delivered as an option AtlasCopco sRoto Foodgradefluidisauniquehigh qualitysyntheticlubricant speciallycreatedforoil injected screw compressors that prov...

Page 123: ...123 Instruction book 9096331300 Procedure Oil system components Oil drain plugs ...

Page 124: ...he oil in a collector and deliver it to the local collection service Refit and tighten the drain and vent plugs after draining Close the drain valve Dm Unscrew the bolts of lid 2 and remove it Take the filter element out of the oil filter housing OF Fit a new oil filter Oil the new gasket Install the lid and screw the bolts of lid 2 on the oil filter housing Remove filler plug FC Fill the air rece...

Page 125: ...le Service kits comprise all parts required for servicing the component and offer the benefits of genuine Atlas Copco parts while keeping the maintenance budget low Also a full range of extensively tested lubricants suitable for your specific needs is available to keep the compressorinexcellentcondition Consult the Spare Parts List for part numbers ...

Page 126: ...icing procedures 9 1 Air filter Location of air filter Recommendations 1 Never remove the element while the compressor is running 2 For minimum downtime replace the dirty element by a new one 3 Discard the element when damaged Air filter Service indicator ...

Page 127: ...iency On air cooled compressors Stop the compressor close the air outlet valve and switch off the voltage Cover all parts under the coolers Remove the side baffle that encloses the fan compartment Remove any dirt from the coolers with a fibre brush Brush in the direction of the cooling fins Also remove any dirt from the fan with a fibre brush Then clean with an air jet in the reverse direction to ...

Page 128: ... or two turns and retighten it Testing Before removing the valve depressurise the compressor See sectionProblemsolving Valve SV can be tested on a separate air line If the valve does not open at the set pressure stamped on the valve it needs to be replaced Warning No adjustments are allowed Never run the compressor without safety valve ...

Page 129: ...ents see sections Introduction Condensate system Initial start up Open and lock the isolating switch The air outlet valve can be locked during maintenance or repair as follows Close the valve Remove the screw fixing the handle with the wrench delivered with the compressor Lift the handle and turn it until the slot of the handle fits over the blocking edge on the valve body Fit the screw The operat...

Page 130: ...oil stop valve jammed Replace defective parts Replace air filter element Condition Fault Remedy Safety valve blows after loading Inlet valve malfunctioning Have valve checked Minimum pressure valve malfunctioning Have valve checked Safety valve out of order Have valve replaced Compressor element out of order Consult Atlas Copco Oil separator element clogged Have element replaced Condition Fault Re...

Page 131: ...131 Instruction book 9096331300 Condition Fault Remedy Air cooler clogged Clean cooler Compressor element out of order Consult Atlas Copco Customer Centre ...

Page 132: ...tions Reference Reading Air outlet pressure Modulates between programmed unloading and loading pressures Compressor element outlet temperature For air cooled units approx 60 C above cooling air inlet temperature For water cooled units approx 60 C above cooling water inlet temperature Dewpoint temperature See section Compressor data Pressure difference over oil separator Below 1 bar Cooling water o...

Page 133: ... are done according to 60364 4 43 electrical installations of buildings part 4 protection for safety section 43 protection against overcurrent Fuse sizes are calculated in order to protect the cable against short circuit Fuse type aM is recommended but gG gL is also allowed The voltage on the compressor terminals must not deviate more than 10 of the nominal voltage It is however highly recommended...

Page 134: ... relay and fuses GA 55 and GA 75 GA90 Frequency Hz Voltage V Fan motor circuit breaker Q15 A Fan motor circuit breaker Q15 A IEC Star delta 50 415 5 0 7 7 GA55 GA75 GA90 Frequency Hz Voltage V Overload relay F21 A Overload relay F21 A Overload relay F21 A IEC Star delta 50 415 71 97 114 GA 90 W orkpla ce GA 90 W orkpla ce Full Fe a ture Frequency Hz V oltage V Cable size Cable size 50 415 7x35 7x5...

Page 135: ...nce conditions Limits m m e z i s e l b a C 2 A e s u f m u m i x a M 6 1 3 6 5 2 0 8 5 3 0 0 1 0 5 5 2 1 0 7 0 6 1 5 9 5 7 1 0 2 1 0 0 2 Air inlet pressure absolute bar 1 Air inlet temperature C 20 Relative humidity 0 Working pressure See section Compressor data On water cooled units also Cooling water inlet teperature C 20 Maximum working pressure See section Compressor data Minimum working pres...

Page 136: ...and limitations Units 7 5 bar 8 bar 10 bar Frequency Hz 50 50 5 Maximum unloading pressure units without dryer 5bar e 7 5 8 1 Maximum unloading pressure Full Feature units bar e 75 2 75 7 9 7 Reference working pressure units without dryer bar e 7 8 9 Reference working pressure Full Feature units bar e 7 75 7 9 Pressure drop over dryer Full Feature units bar e 3 2 3 2 0 2 Set point thermostatic val...

Page 137: ... 3 2 3 2 Power consumption dryer at full load Full Feature units 1 kW 2 0 1 6 1 6 Power consumption dryer at no load Full Feature units kW 3 4 2 4 2 4 Power consumption dryer at no load Full Feature units 1 kW 1 5 1 4 1 4 Refrigerant type Full Feature units R404a R404a R404a Refrigerant type Full Feature units 1 R410A R410A R410A Refrigerant quantity Full Feature units 8kg 1 8 1 4 1 4 Refrigerant ...

Page 138: ...ture units bar e 7 25 7 75 9 75 12 75 Reference working pressure units without dryer bar e 7 8 9 5 12 5 Reference working pressure Full Feature units bar e 7 7 75 9 5 12 5 Pressure drop over dryer Full Feature units bar e 0 23 0 23 0 23 0 23 Set point thermostatic valve C 40 40 40 60 Temperature of air leaving outlet valve approx units without dryer C 30 30 30 30 Temperature of air leaving outlet ...

Page 139: ...t type Full Feature units 1 R410A R410A R410A R410A Refrigerant quantity Full Feature units kg 18 14 1 1 25 Refrigerant quantity Full Feature units 1 kg 1 2 1 7 0 97 1 0 Cooling water consumption at water inlet temperature below 35 C and temperature rise of 15 C water cooled units l min 91 91 9 91 Cooling water consumption at water inlet temperature between 35 and 40 C and temperature rise of 10 C...

Page 140: ...hermostatic valve C 40 40 40 60 Temperature of air leaving outlet valve approx units without dryer C 30 30 30 30 Temperature of air leaving outlet valve approx Full Feature units C 25 25 25 25 Pressure dew point Full Feature units C 3 3 3 3 Drive motor SIEMENS 1LG6 259 2 1LG6 259 2 1LG6 259 2 1LG6 259 2 Motor shaft speed r min 2978 2978 2978 2978 Nominal motor rating kW 90 90 90 90 Power consumpti...

Page 141: ...ter cooled units l min 103 103 103 103 Cooling water consumption at water inlet temperature between 35 and 40 C and temperature rise of 10 C water cooled units l min 154 154 154 154 Oil capacity air cooled units I 30 30 30 30 Oil capacity water cooled units l 25 25 25 25 Sound pressure level according to ISO 2151 2004 dB A 73 73 73 73 Parameter Value Supply voltage 24 V AC 16 VA 50 60Hz 40 30 24 V...

Page 142: ... AC 10 A max Rated voltage DC 30 V DC 10 A max Parameter Value Number of inputs 10 Elektronikon Graphic controller p n 1900 5200 10 1900 5200 19 Supply by controller 24 VDC Supply protection Short circuit protected to ground Input protection Not isolated Parameter Value Pressure inputs 2 Elektronikon Graphic controller p n 1900 520010 1900 5200 19 Temperature inputs 5 Elektronikon Graphic controll...

Page 143: ... other mechanical methods without the written permission of the manufacturer 4 The pressure and temperature of this vessel must be clearly indicated 5 The safety valve must correspond with pressure surges of 1 1 times the maximum allowable operating pressure It should guarantee that the pressure will not permanently exceed the maximum allowable operating pressure of the vessel 6 Use only oil as sp...

Page 144: ...sed and or other standards that have been used for the design are shown and or referred to The Declaration of Conformity Declaration by the Manufacturer is part of the documentation that is supplied with this compressor Local legal requirements and or use outside the limits and or conditions as specified by the manufacturer may require other inspection periods as mentioned below ...

Page 145: ...145 Instruction book 9096331300 Notes ...

Page 146: ...146 Instruction book 9096331300 Notes ...

Page 147: ...147 Instruction book 9096331300 Notes ...

Page 148: ......

Page 149: ......

Page 150: ... the products and services that help to increase your business efficiency and profitability Atlas Copco s pursuit of innovation never ceases driven by our need for reliability and effeciency Always working with you we are committed to providing you the customized quality air solution that is the driving force behind your business www atlascopco com ...

Reviews: