background image

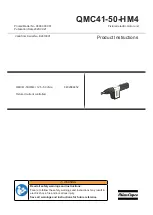
QMC41-50-HM4

EN

Operation

© Atlas Copco Industrial Technique AB - 9836 9800 01

9

Operation

Ergonomic Guidelines

Consider your workstation as you read through this list of general ergonomic guidelines to identify areas
for improvement in posture, component placement, or work environment.

Take frequent breaks and change work positions frequently.

Adapt the workstation area to your needs and the work task.

Adjust for a convenient reach range by determining where parts and tools need to be located to
avoid static load.

Use workstation equipment such as tables and chairs appropriate for the work task.

Avoid work positions above shoulder level or with static holding during assembly operations.

When working above shoulder level, reduce the load on the static muscles by lowering the weight
of the tool, using for example torque arms, hose reels or weight balancers. You can also reduce
the load on the static muscles by holding the tool close to the body.

Take frequent breaks.

Avoid extreme arm or wrist postures, particularly during operations requiring a degree of force.

Adjust for a convenient field of vision that requires minimal eye and head movements.

Use appropriate lighting for the work task.

Select the appropriate tool for the work task.

In noisy environments, use ear protection equipment.

Use high-quality inserted tools and consumables to minimize exposure to excessive levels of vibra-
tion.

Minimize exposure to reaction forces.

When cutting:

A cut-off wheel can get stuck if the cut-off wheel is bent or not guided properly. Use the correct
flange for the cut-off wheel and avoid bending the cut-off wheel during operation.

When drilling:

The drill might stall when the drill bit breaks through. Use support handles if the stall torque is high.
The safety standard ISO11148 part 3 recommends using a device to absorb a reaction torque
above 10 Nm for pistol grip tools and 4 Nm for straight tools.

When using direct-driven screwdrivers or nutrunners:

Reaction forces depend on the tool settings and joint characteristics. Strength and posture deter-
mine the amount of reaction force that an operator can tolerate. Adapt the torque setting to the op-
erator's strength and posture and use a torque arm or reaction bar if the torque is too high.

In dusty environments, use a dust extraction system or wear a mouth protection mask.

Summary of Contents for QMC41-50-HM4

Page 1: ...ial No B2410001 Product Instructions QMC41 50 HM4 12 5 50 cNm 8432084452 Fixtured current controlled WARNING Read all safety warnings and instructions Failure to follow the safety warnings and instructions may result in electric shock fire and or serious injury Save all warnings and instructions for future reference ...

Page 2: ...ta 4 Accessories 5 Bit grounding test 5 Bit run out test 5 Service Overview 5 Service Recommendations 5 Preventive maintenance 6 Installation 7 Installation Instructions 7 Installing the tool 7 Mechanical installation 7 Electrical installation 7 Operation 9 Ergonomic Guidelines 9 Operating Instructions 10 Mount bit 10 Service 11 Preventing ESD Problems 11 Maintenance Instructions 11 Service Recomm...

Page 3: ... not related to personal injury Warranty Product warranty will expire 12 months after the product is first taken into use but will in any case ex pire at the latest 13 months after delivery Normal wear and tear on parts is not included within the warranty Normal wear and tear is that which requires a part change or other adjustment overhaul during standard tools maintenance typical for that period...

Page 4: ...be found either in the Dimensional Drawings Archive or on ServAid Please visit http webbox atlascopco com webbox dimdrw or https servaid atlascopco com Overview Applications The MicroTorque screw fastening systems are ultra low torque applications Normal Environmental Conditions This product is designed to be safe under the following conditions Indoor use Altitude up to 2 000 m Operating temperatu...

Page 5: ...216 2194 00 and the outside of the tool connector and the resistance limit is 20 Ω Bit run out test Bit run out is measured with the tool securely fastened in a test rig and with the tool running at no load with a rotation speed of 200 rpm Measuring point is at 44 mm length of a standard bit out on a special bit 4216 2194 00 Bit run out limit is 0 15 mm Service Overview Service Recommendations Pre...

Page 6: ...orn parts Preventive maintenance Recommended interval between actions Valid at normal usage of the tool at a load up to 70 of maximum torque Service should only be carried out by trained technician following provided service instructions and using original Atlas Copco spare parts Interval Action 1 500 000 cycles or 1 year Calibrate the tool 1 500 000 cycles Exchange bit grounding 3 000 000 cycles ...

Page 7: ...tion Attach the tool to the fixture in one of the following ways A Using the threads at the front part accessible under the thread protection ring B Using the holes of the tool base Four holes are intended for screws and two holes are intended for guide pins Electrical installation Connect the tool to the drive using the supplied cable NOTICE Make sure the cable is not bent more than a radious of ...

Page 8: ...Installation EN QMC41 50 HM4 8 Atlas Copco Industrial Technique AB 9836 9800 01 ...

Page 9: ...rce Adjust for a convenient field of vision that requires minimal eye and head movements Use appropriate lighting for the work task Select the appropriate tool for the work task In noisy environments use ear protection equipment Use high quality inserted tools and consumables to minimize exposure to excessive levels of vibra tion Minimize exposure to reaction forces When cutting A cut off wheel ca...

Page 10: ...Operation EN QMC41 50 HM4 10 Atlas Copco Industrial Technique AB 9836 9800 01 Operating Instructions Mount bit 1 Pull the chuck ring outwards 2 Insert the bit 3 Turn the bit if not seated properly ...

Page 11: ...ailed information about preventive maintenance is included follow these general guide lines Clean appropriate parts accurately Replace any defective or worn parts Preventive maintenance Recommended interval between actions Valid at normal usage of the tool at a load up to 70 of maximum torque Service should only be carried out by trained technician following provided service instructions and using...

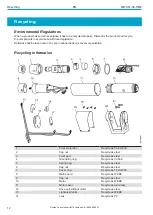
Page 12: ...your national battery recovery organization Recycling information 1 Front protection Recycle as PA6 GF30 2 Cap nut Recycle as steel 3 Front part Recycle as steel 4 Grounding ring Recycle as CuSn6 5 Spring ring Recycle as steel 6 Cap nut Recycle as steel 7 Cover ring Recycle as TPU GF30 8 Main board Recycle as WEEE 9 Cap nut Recycle as steel 10 Motor Recycle as WEEE 11 Motor cover Recycle as alumin...

Page 13: ...800 01 13 15 Light module housing Recycle as aluminum 16 Reflector Recycle as POM 17 Part of light electronics Recycle as WEEE 18 Cover plate Recycle as stainless steel 19 Screws Recycle as stainless steel 20 Housing frame Recycle as aluminum 21 Screws Recycle as steel ...

Page 14: ......

Page 15: ......

Page 16: ...authorized use or copying of the contents or part thereof is prohibited This applies in particular to trademarks model denominations part numbers and drawings Use only authorized parts Any damage or malfunction caused by the use of unauthorized parts is not covered by Warranty or Product Liability Out of respect to wildlife and nature our technical literature is printed on environmentally friendly...

Reviews: