background image

19

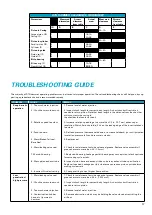
PROBLEM

CAUSE

REMEDY

Component 
failures

2. Piston struck end cupping

3. Cracked casing

4. Rolled over chuck

5. Cracked backhead-body

6. Cracked backhead

2a. Usually a sign of underfeeding. Increase feed or breaking. until rotation 
pressure pulses and then back down till smooth.

2b. Cavitation from excess water injection can cause small pits in piston face. 
These pits turn into cracks. Avoid excessive water injection.

3a. Hammering, welding and wrenching in wrong location can fail casings; avoid 
these practices and use sharp tong jaws to loosen connections.

3b. Corrosion from internal undercuts and threads;
use good quality (neutral pH) water and flush with oil when finished drilling. 
If possible, coat threaded areas undercuts and bore of casing with corrosion 
protector such as LPS Hardcoat.

3c. Look for beat in chuck which could allow the piston to stroke far enough to 
contact air distributor and overstress the casing. Replace chuck if worn more than 
specification.

3d. Look for leaking or loose fitting large diameter valve seal which could make 
piston stroke too far and contact distributor. Replace the valve assembly.

3e. Casing has worn beyond discard point. Measure casing OD about 2 in. (50.8 
mm) from chuck end. Compare to specification and replace if needed.

3f. Backhead or chuck thread loose. Be sure threaded joints are tight. Do not 
reverse rotate or allow hammer to cycle without rotation.

4. Underfeeding can cause the bit to rebound into chuck shoulder. This will 
generate a rolled up edge. Increase feed force.

5. Fighting from hole and pulling backhead through caved-in materials creates 
frictional heat. Rotate slowly and/or flood with water when stuck.

6. Look for evidence of connection moving on threaded
shoulders. Connection shoulder may be worn allowing movement. Replace/repair 
adapter sub or rod.

Breaking 
exhaust tubes

1. Erosion

2. Damage

3. Bit tube bore small

1a. Water jetting erodes base of bit tube at striking surface. Reduce level of water 
injection.

1b. Contaminants in water mix and cause abrasive blast at base of exhaust tube. 
Use clean water.

2a. Damaging tubes when changing bits. Be careful to thread casing onto chuck 
while vertical and in alignment.

2b. Use care when transporting bits to avoid damage to tube. 
Keep bit in box until needed.

3. The tube bore of a bit can become deformed and pinch the tube. Look for a 
rolled over edge or deformation at the top of the bit bore. Remove by grinding 
away lip.

Chuck 
loosening in 
hole

1. Running loose

2. Improper make up torque

1a. Refer to proper feed settings (Section 1)

1b. Avoid feathering feed in loose ground or at end of rod.

2. Tong chuck tight before drilling.

Cylinder 
Tangs broken

1. Tail Seal failure 

2. Corrosion

1. Replace Tail Seal

2a. Be sure hammer parts have a good coating of oil.

2b. Clean and oil hammer after drilling with foam.

2c. Use non-acidic injection water.

Summary of Contents for Secoroc QLX 100

Page 1: ...Secoroc Rock DrillingTools SECOROC QLX DTH HAMMERS QLX 35 40 50 55 60 60OG 65 100 Operator s instructions Spare parts list...

Page 2: ...ction DRILL OPERATION 9 11 Drilling with foam Collaring Rotation speed Feed force hold down and hold back Rotation torque Hole cleaning flushing and dust suppression Dry drilling Wet drilling Bit chan...

Page 3: ...nits and are used to provide additional worldwide understanding Metric units are shown between parentheses Use only correct replacement parts and fasteners The instructions illustrations and specifica...

Page 4: ...re drilling check with qualified sources to properly locate all buried utilities in and around drill path Select a drill path that will not intersect buried utilities Never launch a drill bit on a pat...

Page 5: ...he first time become familiar with the operation of the machine and the hammer Learn how to operate the machine and how to use the controls properly Do not let anyone operate this machine without prop...

Page 6: ...drilling rate The Airselect system has been designed to eliminate this disadvantage by allowing a QLX hammer to be adjusted to utilize any excess air volume in the operating chambers of the drill insu...

Page 7: ...hen computing bailing velocity For conventional hole cleaning no soaps or foams bailing velocity should exceed 3000 ft min 914 4 m min However if possible bailing velocity should not exceed 7000 ft mi...

Page 8: ...oil is developed on the bit blow hole Placing a piece of cardboard or wood beneath the blow holes gives a good indication when oil is passing through the drill DTH HAMMER SETUP For higher air flow th...

Page 9: ...foam can suspend drilled cuttings and allow them to be removed from the bore hole at bailing velocities much lower than when depending on air flow alone Foam can also entrain and suspend formation wat...

Page 10: ...can catch up with the bit when a void or soft seam is encountered As with rotation speed QLX drills will typically need to be fed harder due to their higher output power level over valveless drills A...

Page 11: ...m bottom of chuck to bottom of jaw 5 5 in 139 mm Maximum distance from bottom of chuck to top of jaw 13 5 in 342 mm QLX 50 55 minimum distance from bottom of chuck to bottom of jaw 6 5 in 165 mm Maxim...

Page 12: ...load by the spring action of the cylinder when released the compression cone will be forcefully ejected from the casing Use caution when removing the cone to avoid personal injury Do not stand or plac...

Page 13: ...QLX100 casing is not reversible To ensure that the hammer is assembled properly mark the casing so you can note which end is the backhead side and which is the chuck side 2 Loosen the chuck along with...

Page 14: ...the valve cap distributor o ring is installed in the valve cap and that the distributor plugs are installed in the distributor Installing the valve in the valve cap 2 Lower the valve cap valve assemb...

Page 15: ...e casing reverse and discard dimensions to determine if the asing should be replaced or reversed Refer to the assembly instructions for the proper casing reversal procedure It is suggested that the ch...

Page 16: ...This is the most critical wear point on the drill as it has the great est influence on performance Always recommended to change tail seal when servicing hammer 10 Carefully remove any sharp edges bur...

Page 17: ...cts the casing to the shoulder that contacts the bit 3 Increase rotation speed to get no more than 1 2 in 12 7 mm advance per revolution Watch flat on carbide if it s on the leading edge of the insert...

Page 18: ...een chuck and bit spline 1 Inspect large diameter of piston for wear Leakage past the large diameter can cause the piston to cycle when off bottom 2 Try reducing water injection level Water inhibits t...

Page 19: ...s are tight Do not reverse rotate or allow hammer to cycle without rotation 4 Underfeeding can cause the bit to rebound into chuck shoulder This will generate a rolled up edge Increase feed force 5 Fi...

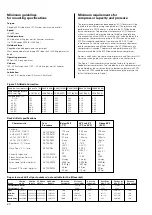
Page 20: ...sure the drill will hold referring to Figure 1 Altitude feet meters sea level 0 0 2 000 609 6 4 000 1219 2 6 000 1828 8 000 2438 4 10 000 3048 Atmospheric pressure PSIA mm Hg 14 70 760 2 13 66 706 4 1...

Page 21: ...ed not listed 3200 10 000 Biodegradability 90 Environmental ly persistant Environmental ly persistant Environmental ly persistant 99 PROD NO PROD CODE DESCRIPTION WEIGHT VOLUME 89010563 9900 Atlas Cop...

Page 22: ...NA NA Minimum chuck length 1 85 in 47 mm 1 85 in 47 mm Max worn piston to casing clearance 0 011 in 0 27 mm 0 011 in 0 27 mm Min new piston large OD 2 514 in 63 86 mm 2 514 in 63 86 mm Max new casing...

Page 23: ...s 200 psi bpm 288 136 1699 331 156 1419 250 psi 17 2 bar scfm L s 250 psi bpm 348 164 1858 441 208 1591 300 psi 20 7 bar scfm L s 300 psi bpm 400 189 1987 555 262 1759 350 psi 24 1 bar scfm L s 350 p...

Page 24: ...47 0 mm 2 15 in 54 6 mm 2 15 in 54 6 mm Max worn piston to casing clearance 0 001 in 0 25 mm 0 001 in 0 25 mm 0 009 in 0 23 mm 0 009 in 0 23 mm Min new piston large OD 3 942 in 100 11 mm 3 942 in 100...

Page 25: ...16 250 psi 17 2 bar scfm L s 250 psi bpm 508 240 1668 508 240 1668 655 309 1732 655 309 1732 300 psi 20 7 bar scfm L s 300 psi bpm 657 310 1788 657 310 1788 818 386 1847 818 386 1847 350 psi 24 1 bar...

Page 26: ...in 350 psi 24 1 bar 1 240 BPM 350 psi 3 427 scfm 24 1 bar 97 0 m3 min SERVICE SPECIFICATIONS Casing discard diameter 8 450 in 214 630 mm Casing reverse diameter NA NA Minimum chuck length 3 750 in 95...

Page 27: ...49 9703 QX 00 000 35 000 A22 6 Lock ring 89001350 9703 QX 00 000 00 000 006 7 Casing 89001567 9703 QX 00 000 00 000 004 8 Piston 52344843 9703 QX 00 10P 35 000 005 9 Inner cylinder 52312857 9703 QX 00...

Page 28: ...O ring backhead 12 Backhead assembly incl O ring 89010127 9704 QX 00 000 00 000 A20 13 Check valve spring 89010119 9704 QX 00 000 00 000 016 14 Check valve 89010118 9704 QX 00 000 00 000 017 15 Check...

Page 29: ...valve spring 89010065 9705 QX 00 000 00 000 016 19 Check valve 89010066 9705 QX 00 000 00 000 017 20 O ring check valve Wear limits Chuck Min length 1 85 47 0 mm Casing reverse diam QLX 50 Min OD 4 65...

Page 30: ...001 2 Chuck for QLX 65 52338498 9706 QX 00 000 26 H00 001 3 O ring Chuck 4 Bit retaining ring assembly 52327632 9706 QX 00 000 26 000 A02 5 O ring Bit retainer 6 Bit bearing 52324506 9706 QX 00 000 26...

Page 31: ...000 A22 6 Bit bearing vented 89010216 9706 QX DH 000 00 00V 059 7 Bearing retaining ring 52324514 9706 QX 00 000 00 000 058 8 Casing 52324415 9706 QX 00 000 00 000 004 9 Piston 52324423 9706 QX 00 00...

Page 32: ...010467 9710 QX 00 000 00 000 180 22 Choke plug 3 16 4 83mm Orifice 89010471 9710 QX 00 000 00 000 181 Ref Part Prod No Product code 22 Choke plug 5 16 7 9mm Orifice 89010472 9710 QX 00 000 00 000 182...

Page 33: ...33 NOTES...

Page 34: ...34 NOTES...

Page 35: ...35 NOTES...

Page 36: ...ed 2015 06 Atlas Copco Secoroc AB Box 521 737 25 Fagersta Sweden Phone 46 223 461 00 www atlascopco com secoroc We stand by our responsibilities towards our customers towards the environment and the p...

Reviews: