background image

- 6 -

Safety precautions for portable compressor

Introduction

The policy of Atlas Copco is to provide the users of their
equipment with safe, reliable and efficient products.

Factors taken into account are among others:

- the intended and predictable future use of the products, and

the environments in which they are expected to operate,

- applicable rules, codes and regulations,
- the expected useful product life, assuming proper service and

maintenance,

Before handling any product, take time to read the

relevant instruction manual. Besides giving detailed

operating instructions, it also gives specific information
about safety, preventive maintenance, etc.
These precautions are general and some statements will

therefore not always apply to a particular unit.
When handling, operating, overhauling and/or

performing maintenance or repair on Atlas Copco

equipment, the mechanics are expected to use safe
engineering practices and to observe all relevant local

safety requirements and ordinances. The following list is

a reminder of special safety directives and precautions
mainly applicable to Atlas Copco equipment.
This brochure applies to machinery processing or

consuming air. Processing of any other gas requires
additional safety precautions typical to the application

and are not included herein.
All responsibility for any damage or injury resulting from
neglecting these precautions or by non-observance of

ordinary caution and due care required in handling,

operating, maintenance or repair, also if not expressly
mentioned in this instruction manual, is disclaimed by

Atlas Copco.
If any statement does not comply with local legislation,
the stricter of the two shall be applied. Statements in this

manual should not be interpreted as suggestions,

recommendations or inducements that it should be used in
violation of any applicable laws or regulations.

General safety precautions

1 The owner is responsible for maintaining the unit in a

safe operating condition. Unit parts and accessories

must be replaced if missing or unsuitable for safe

operation.

2 Use only lubricating oils and greases recommended or

approved by Atlas Copco or the machine manufacturer.

Ascertain that the selected lubricants comply with all

applicable safety regulations, especially with regard to

explosion or fire risk and the possibility of

decomposition or generation of hazardous gases.

3 The supervisor, or the responsible person, shall at all

times make sure that all instructions regarding

machinery and equipment operation and maintenance

are strictly followed and that the machines with all

accessories and safety devices, as well as the

consuming devices, are in good repair, free of

abnormal wear or abuse, and are not tampered with.

4 Maintenance, overhaul and repair work shall only be

carried out by adequately trained personnel; if

required, under supervision of someone qualified for

the job.

5 Whenever there is an indication or any suspicion that

an internal part of a machine is overheated, the

machine shall be stopped but no inspection covers shall

be opened before sufficient cooling time has elapsed;

this to avoid the risk of spontaneous ignition of oil

vapour when air is admitted.

6 Maintenance work, other than routine attention, shall

only be undertaken when the machine is turned off.

7 Before dismantling any pressurized component, the

compressor or the equipment shall be effectively

isolated from all sources of pressure and be completely

vented to atmosphere. In addition, a warning sign

bearing a legend such as "work in progress; do not

open" shall be attached to each of the isolating valves.

8 Before a machine is being repaired, steps shall be taken

to prevent inadvertent starting. In addition, a warning

sign bearing a legend such as "work in progress; do not

start" shall be attached to the starting equipment. The

battery shall be disconnected and removed or the

terminals covered by insulating caps.

9 Normal ratings (pressures, temperatures, speeds, etc.)

shall be durably marked.

10 Never operate a machine or equipment beyond its rated

limits (pressure, temperature, speed, etc.).

11 Maintenance and repair work should be recorded in an

operator's logbook for all machinery. Frequency and

nature of repairs can reveal unsafe conditions.

12 The machinery and pneumatic equipment shall be kept

clean, i.e. as free as possible from oil, dust or other

deposits.

13 To prevent an increase in working temperature, inspect

and clean heat transfer surfaces (cooler fins,

intercoolers, water jackets, etc.) regularly. For every

machine establish a suitable time interval for cleaning

operations.

14 All regulating and safety devices shall be maintained

with due care to ensure that they function properly.

They may not be bypassed.

15 Care shall be taken to avoid damage to safety valves

and other pressure relief devices, especially to avoid

plugging by paint, oil coke or dirt accumulation, which

could interfere with the functioning of the device.

16 Pressure and temperature gauges shall be checked

regularly with regard to their accuracy. They shall be

replaced whenever outside acceptable tolerances.

17 Parts shall only be replaced by genuine Atlas Copco

replacement parts.

18 Safety devices shall be tested as described in the

maintenance schedule of the instruction book(s) to

determine that they are in good operating condition.

19 Never use flammable solvents or carbon tetrachloride

for cleaning parts. Take safety precautions against

toxic vapors when cleaning parts in or with cleaning

products.

20 Observe scrupulous cleanliness during maintenance

and repair. Keep away dirt by covering the parts and

exposed openings with clean cloth, paper or tape.

21 Protect the engine, alternator, air intake filter, electrical

and regulating components, etc. to prevent moisture

ingress, e.g. when steam-cleaning.

To be read attentively and acted accordingly before towing, lifting, operating, performing maintenance

or repairing the compressor.

Summary of Contents for XAS 185 KD7 IT4

Page 1: ...XAS 185 KD7 IT4 Instruction Manual for AC Compressors English Engine Kubota V2403 M DI E3B ...

Page 2: ......

Page 3: ...ATLAS COPCO PORTABLE ENERGY DIVISION www atlascopco com Printed matter Nr 1310 3013 95 10 2014 Instruction Manual for AC Compressor XAS 185 KD7 IT4 Original instructions ...

Page 4: ... the manufacturer s approval in writing Neglecting maintenance or making changes to the setup of the machine can result in major hazards including fire risk While every effort has been made to ensure that the information in this manual is correct Atlas Copco does not assume responsibility for possible errors Copyright 2014 Atlas Copco Any unauthorized use or copying of the contents or any part the...

Page 5: ...uctions 21 3 1 Parking Towing And Lifting Instructions 21 3 1 1 Drawbar Preparations For Towing 21 3 2 Starting stopping 22 3 2 1 Parking Instructions 23 3 2 2 Towing Instructions 23 3 2 3 Lifting Instructions 23 3 3 Before Starting 23 4 Maintenance 24 4 1 Use Of Service Paks 24 4 2 Preventive Maintenance Schedule For The Compressor 24 5 Technical Specifications 26 5 1 Reference Conditions 26 5 2 ...

Page 6: ...ne qualified for the job 5 Whenever there is an indication or any suspicion that an internal part of a machine is overheated the machine shall be stopped but no inspection covers shall be opened before sufficient cooling time has elapsed this to avoid the risk of spontaneous ignition of oil vapour when air is admitted 6 Maintenance work other than routine attention shall only be undertaken when th...

Page 7: ... coolers 8 Locate the unit away from walls Take all precautions to ensure that hot air exhausted from the engine and driven machine cooling systems cannot be recirculated If such hot air is taken in by the engine or driven machine cooling fan this may cause overheating of the unit if taken in for combustion the engine power will be reduced 9 No external force may be exerted on the air outlet valve...

Page 8: ... are available for specific jobs and should be used when recommended The use of these tools will save time and prevent damage to parts 1 Use only wrenches or sockets whose size fits the fastener 2 Apply an open end wrench only in the place of the fastener head square to the thread axis 3 Do not use a pipe or other improvised leverage extensions on handles 4 Do not hammer on wrenches or other tools...

Page 9: ...with the compressor supplying the air pressure and must be carried out on a proper test bench Injury Prevention 1 Stationary housing guards are provided on all rotating or reciprocating parts not otherwise protected and which may be hazardous to personnel Machinery shall never be put into operation when such guards have been removed operate only when guards are securely reinstalled 2 Do not open e...

Page 10: ... as well as for any bystander Do not apply compressed air or inert gas to your skin or direct an air or gas stream at people Never use it to clean dirt from your clothes 15 Before blowing compressed air or inert gas through a hose ensure that the open end is held securely so that it cannot whip and cause injury 16 When washing parts in or with a cleaning solvent provide the required ventilation an...

Page 11: ...ted in the unloader assembly The valve is closed during operation by outlet pressure of the compressor element and opens by air receiver pressure when the compressor is stopped When the air consumption increases the air receiver pressure will decrease and vice versa This receiver pressure variation is sensed by the regulating valve which by means of control air to the unloader and engine speed reg...

Page 12: ...and service operations The bodywork is internally lined with sound absorbing material Lifting eye A lifting eye is accessible through the roof panel at the top of the unit Control panel The control panel grouping the air pressure gauge control switch etc is placed at the right hand rear of air compressor Data plate The compressor is furnished with a data plate located on the front drivers side of ...

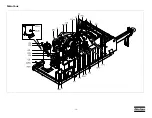
Page 13: ... 13 Main Parts ...

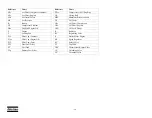
Page 14: ... Engine Oil FCf Filler Cap Fuel FFf Final Fuel Filter FT Fuel Tank FFp Primary Fuel Filter Reference Name FPco Compressor Oil Filling Plug LB Lifting Bale MPN Minimum Pressure Nozzle OC Oil Cooler OFc Oil Filter Compressor OFe Oil Filter Engine OLG Oil Level Gauge R Radiator RV Regulating Valve S Starter Motor Engine SR Speed Regulator SV Safety Valve TT Top Tank TBV Thermostatic Bypass Valve UV U...

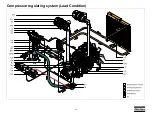
Page 15: ... 15 Compressor regulating system Load Condition ...

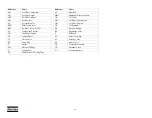
Page 16: ... CP Control Panel CV Check Valve DP Drain Plug E Engine EW Electrical Wiring F Cooling Fan FP Compressor Oil Filling Plug Reference Name M Manifold MPN Minimum Pressure Nozzle OC Oil Cooler OFc Oil Filter Compressor OFe Oil Filter Engine OS Oil Separator PS Pressure Sender RV Regulating Valve S Solenoid SC Safety Cartridge SL Scavenge Line SV Safety Valve TS Temperature Switch UV Unloader Valve Vi...

Page 17: ... because of a clogged filter The oil then by passes the filter without being filtered For this reason the oil filter must be replaced at regular intervals Continuous regulating system The system comprises The compressor is provided with a continuous regulating system This system is provided with a blow down valve BDV which is integrated in the unloader assembly UA The valve is closed during operat...

Page 18: ...d the speed regulator increases the engine speed The construction of the regulating valve is such that any increase decrease of the air receiver pressure above the pre set valve opening pressure results in a proportional increase decrease of the control pressure to the unloading valve Part of the control air is vented to atmosphere and any condensate discharged through the vent holes VH ...

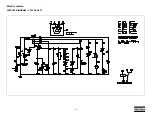
Page 19: ... 19 Electric system CIRCUIT DIAGRAM 1310 3200 71 ...

Page 20: ...ion relay K3 Engine safety relay K4 Start relay K5 Glow plug relay MO Starter Motor Solenoid M1 Starter Motor P1 Hour meter P2 Fuel level gauge S1 Contact switch off on overide start S2 Temperature switch Engine S3 Oil Pressure switch Engine S4 Preheat button test lamp S5 Temperature switch Compressor S6 Low fuel level switch optional S7 Fuel level sender Y1HC Fuel Solenoid hold coil Y1PC Fuel Sol...

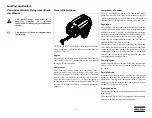
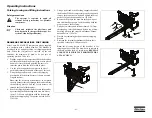
Page 21: ... to secure the drawbar by reinserting the bolt through both drawbar halves item 2 3 Secure and tighten with the locknut sup plied in the shipping bag Torque the nut and bolt to 130 ft lbs 5 Using a jack stand or by blocking support the end of the drawbar With the compressor properly supported remove the prop or nose wheel and tighten the pivot nut bolt Torque the nut and bolt to 130 ft lbs 6 Re at...

Page 22: ... must remain closed and can only be opened for short periods The control panel in addition indicates receiver pressure PG and accumulated operating hours P1 Fault situations and protective devices The starter motor is protected against attempts to start when the unit is already running A fault which occurs with the engine either engine oil pressure too low compressor oil temperature too high engin...

Page 23: ... the lifting bale provided to lift the unit Before Starting 1 Before initial start up prepare battery for operation if not already done 2 With the compressor standing level check the level of the engine oil Add oil if necessary to the upper mark on dipstick Consult the Engine Operation Manual for the type and viscosity grade of the engine oil 3 Check the level of the compressor oil The pointer of ...

Page 24: ...anual are registered as emission related critical parts by KUBOTA in the U S EPA nonroad emission regulation As the engine owner you are responsible for the performance of the required maintenance on the engine according to the above instruction Please see the warranty statement in detail The items listed above are not necessary to keep the emission related warranty valid MAINTENANCE SCHEDULE Dail...

Page 25: ...se prob lems that will significantly degrade the engine per formance Ambient temperature below 35 C 95 F When changing or inspecting be sure to level and stop the engine Changing interval of engine oil Models Interval V2403 M DI E3B Every 400 hours ...

Page 26: ...y 0 Air inlet temperature C 20 F 68 Normal effective working pressure bar e 7 psi 100 Designation XAS 185 KD7 Minimum effective receiver pressure bar e 4 psi 58 Maximum effective receiver pressure compressor unloaded bar e 8 4 8 7 psi 120 125 Maximum ambient temperature at sea level C 48 F 120 Minimum starting temperature C 7 7 F 18 Minimum starting temperature with coldstart equipment C NA F NA A...

Page 27: ... 27 ALTITUDE UNIT PERFORMANCE CURVE ...

Page 28: ...3 3 F 200 Noise level6 dB A 74 Designation All units Number of compression stages 1 Designation XAS 185 KD7 Make Kubota Type V2403 M DI E3B Coolant Ethylene glycol mix w SCA package Number of cylinders 4 Bore in 3 43 mm 87 12 Stroke in 4 03 mm 102 36 Swept volume cu in 148 50 l 2 43 Output at normal shaft speed5 hp 49 kW 36 53 Load factor 75 Capacity of oil sump qts 10 gal 2 5 Refill max 4 qts 11 ...

Page 29: ...responds to following national standards American ANSI PTC9 British BSI 1571 part 1 German DIN 1645 Part 1 Swedish SS ISO 1217 3 Air required for engine and compressor cooling combustion and for compression 4 with filter change 5 Gross power guaranteed within 5 at SAE J1668 and ISO 3046 conditions 77 F air inlet temperature 29 31 in Hg barometer 104 F fuel inlet temperature 0 853 fuel specific gra...

Page 30: ...gallon container 1630 0163 00 PAROIL EXTRA 5W40 Synthetic Order number 1 3 gallon 5 Liter Container 1630 0135 01 5 gallon 20 Liter Pail 1630 0136 01 PAROIL E 15W40 Order number 1 3 gallon 5 Liter Container 1615 5953 00 5 gallon 20 Liter Pail 1615 5954 00 55 gallon 209 Liter Drum 1615 5955 00 PARCOOL EG Order number 1 3 gallon container 1604 5308 01 5 gallon pail 1604 5307 02 55 gallon drum 1604 53...

Page 31: ...ermits any pressure in the system to escape 2 Drain the oil by removing all drain plugs Drain plugs are located at the oil tank discharge manifold and oil injection manifold vessel Catch the oil in a drain pan Screw out the filler plug to speed up drain ing Tighten the plugs after draining 3 Remove the oil filter OFc e g by means of a spe cial tool Catch the oil in a drain pan 4 Clean the filter s...

Page 32: ...NTENANCE Keep the battery clean and dry Keep the electrolyte level at 10 to 15 mm above the plates or at the indicated level top up with distilled water only Keep the terminals and clamps tight clean and lightly covered petroleum jelly Storage Run the compressor regularly e g twice a week until warm Load and unload the compressor a few times to operate the unloading and regulating components Close...

Page 33: ... 33 Adjustments and Servicing Procedures Adjustment of the Continuous Regulating System ...

Page 34: ...s recommended to install a safety cartridge A dirty safety cartridge 4 is an indication of a mal functioning air filter element Replace the element and the safety cartridge in this case Replace the safety cartridge together with the filter element The safety cartridge cannot be cleaned CLEANING THE DUST TRAP To remove dust from the dust trap pinch the vacuator valve 6 several times REPLACING THE A...

Page 35: ...m Replacing the filter element 1 Unscrew the final filter element from the adapter head 1 2 Clean the adapter head 1 sealing surface Lightly oil the gasket of the new element and screw the latter onto the header until the gasket is properly seated then tighten with both hands 3 Do not fill with fuel before assembling new filter Filling the fuel filter 2 introduces dirty unfiltered fuel to the inje...

Page 36: ...inspect elements Clean or replace if necessary Regulating valve RV defective Have regulating valve removed and inspected by an Atlas copco Service representative Blow down valve stuck in open position Check and correct as necessary Loading valve LV leaking past O ring With compressor running at max load speed disconnect hose leading to unloader If air leaks from the hose remove and inspect loading...

Page 37: ...ent fuel Fill fuel tank Low coolant level Top up cooling system Possible faults Corrective actions Check valve at element outlet Remove and inspect Replace if necessary Replace air filter elements and safety cartridges Check the oil level and add oil if necessary Run the compressor for a few minutes stop and recheck oil level Possible faults Corrective actions Insufficient compressor cooling Locat...

Page 38: ... 38 Maintenance Log Compressor Customer Serial number Service hours Maintenance action Date By initials ...

Page 39: ... 39 Maintenance Log Compressor Customer Serial number Service hours Maintenance action Date By initials ...

Page 40: ... 40 ...

Page 41: ......

Page 42: ...www atlascopco com ...

Reviews: