AP-S15HRIP / AP-S15IP / AP-S158IP
Owner’s Manual
– 14 –
AtlasIED.com
TELEPHONE: (800) 876-3333
SUPPORT@ATLASIED.COM
1601 JACK MCKAY BLVD.
ENNIS, TEXAS 75119 U.S.A.
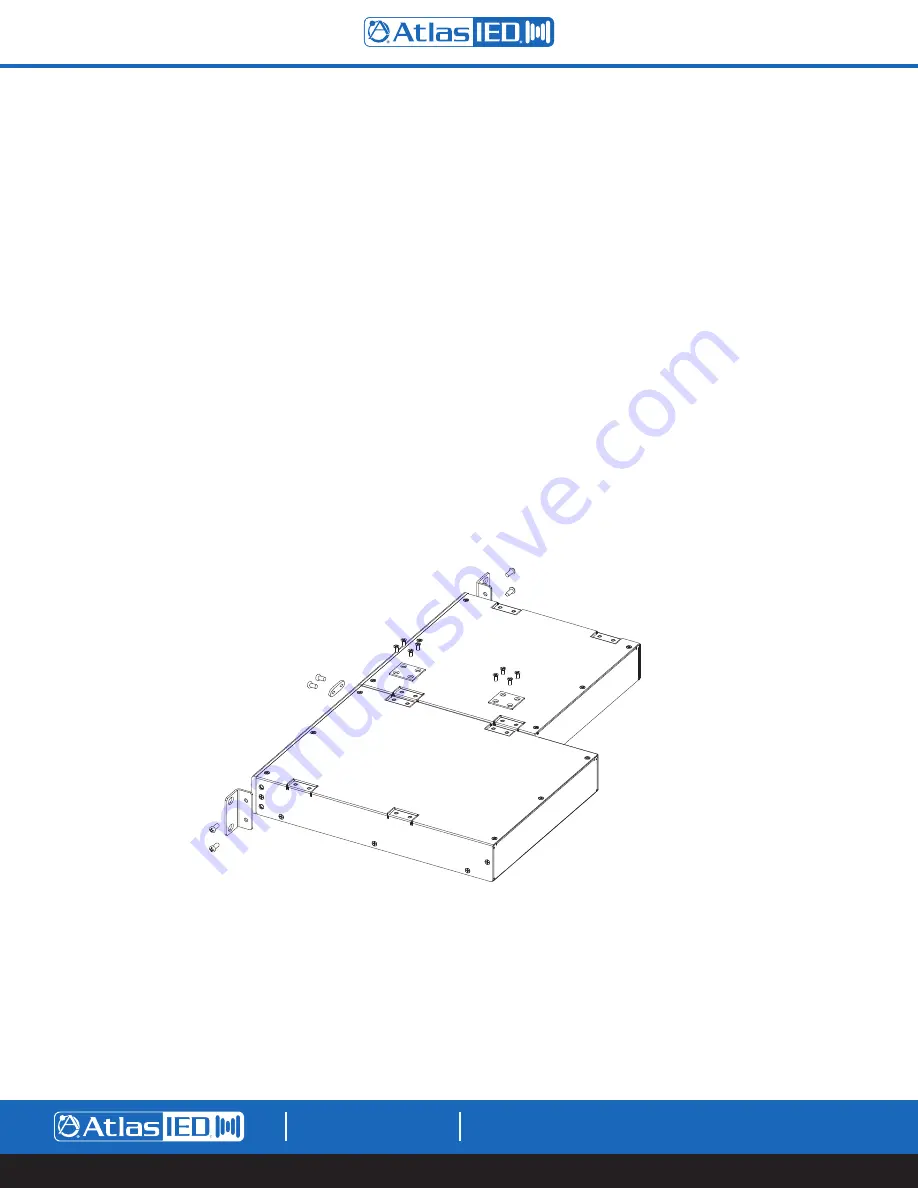
Configuration 2 - Mounting 2 1RU Models
Note:
Not all 1RU half rack models can be joined next to each other. The following combinations can be joined: ASP-MG2240, DPA102PM, MA40G,
MA60G, PA40G, PA60G, AP-S15HR, AP-S15RTHR, and AP-S15HRIP are interchangeable.
Note:
Two AP-S15HR units cannot be rack mounted together
side-by-side. Call AtlasIED for other models not listed.
1. Remove amplifier from electrical source.
2. Remove the four feet.
3. Align and secure two chassis joiner plates with the enclosed screws to the top of units.
Note:
Must install both plates, one towards the front and
one towards the back.
4. Locate the two open holes on each side of the amp located towards the front panel.
5. Align the enclosed rack mount ear to the chassis holes located in step 2.
6. Use the enclosed chassis screws to attach the rack ears to the chassis. Secure firmly, do not over tighten. Repeat step for opposite chassis side.
7. Install the front panel joiner plate using the two 4-40 x
3
/
8
flat head black screws.
Note:
The front panel joiner plate can be removed after the unit
is installed in the rack.
8. Disregard extra pieces.
9. Ready for rack installation.
Note:
It is important the amplifiers have the proper clearance around it for proper heat dissipation. Always allow at least
1.75" around the amplifier for to assure safe operation. Never mount an amplifier in an enclosed air tight rack. All racks must have air vents on all
sides or forced air cooling to assure proper heat dissipation.
Note:
Not all 1RU half rack models
can be joined next to each other.
Refer to the list above or call
AtlasIED Customer Service.
4-40 x
3
/
8
Flat Head Screw


