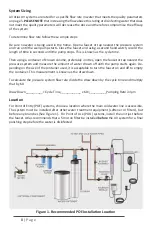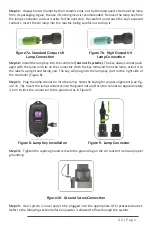
background image

9 |

P a g e

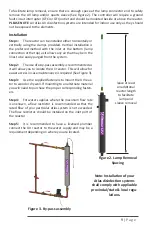
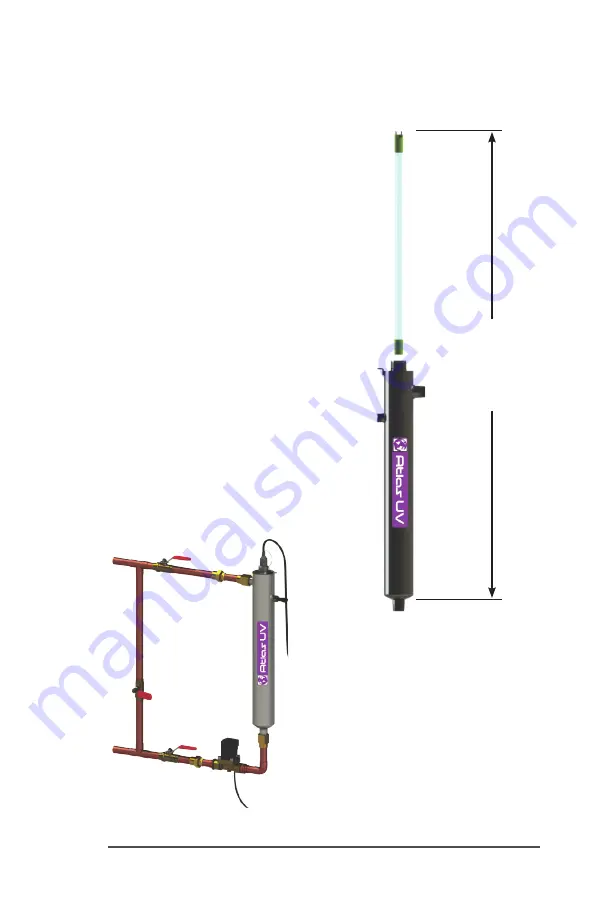
To facilitate lamp removal, ensure there is enough space at the lamp connector end to safely 

remove the UV lamp and/or quartz sleeve (See Figure 2). The controller will require a ground 

fault circuit interrupter (GFCI or GFI) outlet and should be mounted beside or above the reactor.

PLEASE NOTE: All Atlas UV disinfection systems are intended for indoor use only as they should 

not be exposed to the elements.

Installation 

Step 1:   The reactor can be installed either horizontally or 

vertically using the clamps provided. Vertical installation is 

the preferred method with the inlet at the bottom (lamp 

connection at the top) as it allows any air that may be in the 

lines to be easily purged from the system.

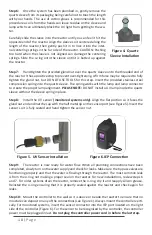
Step 2:  The use of a by-pass assembly is recommended as 

it will allow you to isolate the UV reactor. This will allow for 

easier access in case maintenance is required (See Figure 3).

Step 3:  Use the supplied fasteners to mount the UV reac-

tor to wood or drywall. If mounting to an alternate material 

you will need to purchase the proper corresponding fasten-

ers.

Step 4:   For water supplies where the maximum flow rate 

is unknown, a flow restrictor is recommended so that the 

rated flow of your particular Atlas system is not exceeded. 

The flow restrictor should be installed on the inlet port of 

the reactor.

Step 5:   It  is  recommended  to  have  a  licensed  plumber 

connect the UV reactor to the water supply and may be a 

requirement depending on where you are located. 


Figure 3.  By-pass assembly

Figure 2. Lamp Removal 

Spacing

leave at least 

an additonal 

reactor length 

to facilitate 

lamp and 

sleeve removal

Note: Installation of your 

Atlas disinfection systems 

shall comply with applicable 

provincial/state & local regu-

lations.

Summary of Contents for H Series

Page 1: ...ted Flow System Rated Flow L8E L8 8 lpm H15E H15 15 lpm L12E L12 12 lpm H38E H38 38 lpm L22E L22 22 lpm H15E H15 53 lpm L41E L41 41 lpm H95E H95 95 lpm L57E L57 57 lpm H151E H151 151 lpm L70E L79 79 lpm LE Series HE Series L Series H Series OWNERS MANUAL www atlasuv co uk ...

Page 2: ...iving not only a high quality product but also peace of mind Installing a UV system gives you reassurance that the water in your home will have an extra level of protection This process is simple in its concept and effective in its abilities to disinfect your water Simple maintenance and continuous disinfection Atlas makes it that easy ...

Page 3: ...s 14 L H Controllers 14 L HPower up Sequence 14 L H Operational Screens 15 Operational Screens optional UV intensity montor 16 Lamp Countdown Sequence 16 Lamp Replacement LE HE systems 17 Lamp Replacement L H systems 17 QR Codes 17 System Troubleshooting 18 Temperature Management Devices 20 Expansion Modules 20 Atlas Standard Output System Specifications 22 Atlas HO High Output System Specificatio...

Page 4: ...s if required 7 Do not use this system for any purpose other than what it was intended for Misuse of this system could potentially cause harm to the user or others 8 Your system is intended to be installed indoors and away from leaking plumbing DO NOT plug the unit in if the system or any of the components are wet 9 The disinfection system should be directly installed into a ground fault circuit i...

Page 5: ...nd on parameters being treated Hardness 7 gpg 120 mg L if hardness level is 7 gpg or slightly below the quartz sleeve must be cleaned periodically in order to ensure effi cient UV penetration if above the water should be softened Iron Fe 0 3 ppm 0 3 mg L Manganese Mn 0 05 ppm 0 05 mg L Turbidity 1 NTU Tannins organics 0 1 ppm 0 1 mg L UVT transmittance 85 Please contact Atlas if water has a UVT th...

Page 6: ...ean BS1363 systems 300016 Complete Assembly 310026 Teflon Plug 310040 O Ring 390007 Brass Nut AUVS L fits all but L79 series AUVS L79 fits L79 series Sensor 0 ring Part 310040 GLAND NUT O RING SLEEVE SPRING QUARTZ SLEEVE REACTOR UV LAMP 320006 310038 RL 8 fits L8 series RL 12 fits L12 series RL 22 fits L22 series RL 41 fits L41 series RL 57 fits L57 series RL 79 fits L79 series 310039 RQ 8 fits L8...

Page 7: ...ACH fits all units POWER CORD 300016 Complete Assembly 310026 Teflon Plug 310040 O Ring 390007 Brass Nut AUVS H fits all units 260008 British BS 1363 3 prong grounded 260005 European 2 pin CEE 7 7 Schuko 320006 310038 RL H38 fits H38 series RL H53 fits H53 series RL H95 fits H95 series RL H151 fits H151 series 310039 RQ H38 fits H38 series RQ H53 fits H53 series RQ H95 fits H95 series RQ H151 fits...

Page 8: ... tap nearest the pressure system and measure the amount of water drawn off until the pump starts again De pending on the size of the container used it is acceptable to turn the faucet on and off to empty the container This measurement is known as the draw down To calculate the pressure system flow rate divide the draw down by the cycle time and multiply that by 60 Draw Down__________ Cycle Time___...

Page 9: ...d as it will allow you to isolate the UV reactor This will allow for easier access in case maintenance is required See Figure 3 Step 3 Use the supplied fasteners to mount the UV reac tor to wood or drywall If mounting to an alternate material you will need to purchase the proper corresponding fasten ers Step 4 For water supplies where the maximum flow rate is unknown a flow restrictor is recommend...

Page 10: ...E NOTE DO NOT install a UV lamp inside the quartz sleeve without the sleeve spring in place Step 8 Install the UV sensor monitored systems only Align the flat portion so it faces the gland nut end and matches up with the half metal lip on the sensor port see Figure 5 Insert the sensor so it is fully seated and hand tighten the sensor nut Figure 5 UV Sensor Installation Figure 6 IEP Connection Step...

Page 11: ...ou The key will plug into the lamp key port on the right side of the controller Figure 8 Step 13 Plug the lamp connector into the lamp Note the keying for proper alignment see Fig ure 7a 7b Insert the lamp connector into the gland nut and turn the connector approximately turn to lock the connector to the gland nut as in Figure 9 Figure 8 Lamp Key Installation Figure 9 Lamp Connector Step 14 Tighte...

Page 12: ...tz sleeve should be cleaned on an annual basis The following steps outline a basic clean ing procedure Step 1 If a by pass assembly is installed shut the inlet valve off to prevent water flow through the system Otherwise turn off main water inlet valve and or turn off the water pump Step 2 Disconnect power cord of UV system from electrical outlet Step 3 Release water pressure by opening a downstre...

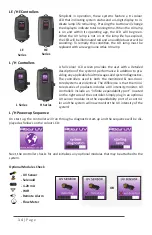
Page 13: ...ut of the sensor port Step 6 Holding the sensor in your hand wipe the flat portion sensor face of the sensor with isopropyl alcohol using a clean lint free cloth Step 7 Replace sensor following step 9 from the installation section of the manual Operation Atlas systems come with a feature laden controller that incorporates both the lamp driver bal last and control features in one water tight case F...

Page 14: ...on of the system s performance in addition to pro viding any applicable fault messages and system diagnostics The controllers used in both the monitored non moni tored systemsare identical The difference is that the moni tored series of products includes a UV intensity monitor All controllers include an infinite expandability port located on the right side of the controller Simply plug in an optio...

Page 15: ...ng the button located on the front of the controller Operational Screens optional UV intensity montor On systems with the UV monitor the system will display the same screens as on the standard systems except the UV Intensity replaces the home screen The UV Intensity screen displays the level of UV light detected by the sensor UV intensity can be affected by poor water quality scaling on the quartz...

Page 16: ...dible chirp Past the zero day threshold the LED or display screen changes to solid red with a continuous buzzer L H LE HE At any point during this sequence the audible chirp or alarm can be deferred for seven days by holding the controller button down for a period of five seconds The number of deferrals used will be displayed as below Once the deferral expires the alarm will sound once again The d...

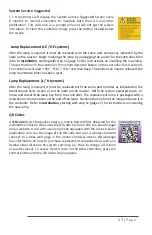
Page 17: ... lamp is expired it must be replaced with the same part number as indicated on the Maintenance Parts screen or on the label on the reactor With the system powered down re move and discard the lamp key from the controller The replacement lamp is packaged with a lamp key on the connector at the end of the lamp Remove the key from the lamp and place it in the controller Refer to Installation starting...

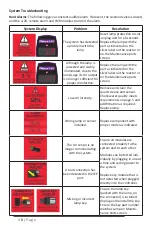
Page 18: ...l on the reactor or on the Maintenance parts screen Low UV Intensity Remove and clean the quartz sleeve and sensor Check water quality meets requirements on page 5 and add filtration as required Replace lamp Wrong lamp or sensor installed Replace component with proper model as indicated The UV sensor is no longer communicating with the system Ensure all modules are connected properly to the system...

Page 19: ...ce any module that is not detected when plugged directly into the controller Refer to flow meter manual for detailed troubleshooting Warning After any hard alarm the home or facility should be disinfected Follow the steps un der the System Disinfection heading Boil Water Advisory If any failure occurs on a Atlas UV system the water must not be used for human consumption until the system is returne...

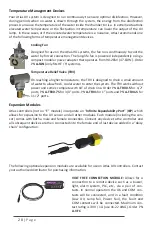
Page 20: ...ater to allow fresh cooler water to enter the system The TRV works without power and comes complete with 10 of drain line Order PN A TRV0 5 for 1 2 ports PN A TRV0 75 for 3 4 ports PN A TRV1 for 1 ports and PN A TRV1 5 for 1 1 2 ports Expansion Modules Atlas controllers not on E models incorporate an Infinite Expandability Port IEP which allows for expansion to the UV sensor and all other modules ...

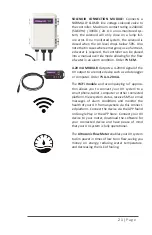
Page 21: ... output to a remote device such as a data logger or computer Order PN A 4 20mA The WiFi module and accompanying IoT applica tion allows you to connect your UV system to a smart phone tablet computer or other connected platform View system status receive SMS or email messages of alarm conditions and monitor the health of your UV from anywhere via this connect ed platform Connect the device via the ...

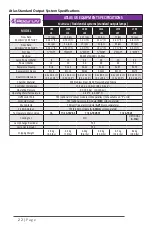
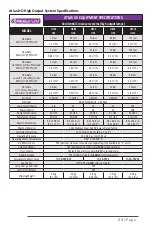
Page 22: ...Q 57 RQ 79 Reactor Dimensions 6 4 x 26 2 cm 2 5 x 10 3 6 4 x 36 4 cm 2 5 x 14 3 6 4 x 54 2 cm 2 5 x 21 3 6 4 x 89 5 cm 2 5 x 35 2 6 4 x 101 6 cm 2 5 x 40 0 8 9 x 91 7 cm 3 5 x 36 1 Chamber Material 304 Stainless Steel A249 Pressure Rated Tubing Controller Dimensions 17 2 x 9 2 x 10 2 cm 6 8 x 3 6 x 4 Operating Pressure 0 7 10 3 bar 10 150 psi Operating WaterTemperature 2 40 C 36 104 F UV Monitor P...

Page 23: ...rical 90 265V 50 60Hz 1 5A Max Lamp Power Watts 18 34 45 67 101 Power Watts 20 36 48 72 108 Replacement Lamp RL H15 RL H38 RL H53 RL H95 RL H151 Replacement Sleeve RQ H15 RQ H38 RQ H53 RQ H95 RQ H151 Reactor Dimensions 8 9 x 29 8 cm 3 5 x 11 7 8 9 x 41 8 cm 3 5 x 16 5 8 9 x 50 8 cm 3 5 x 20 0 8 9 x 68 3 cm 3 5 x 26 9 8 9 x 10³ 4 cm 3 5 x 40 7 Chamber Material 316L Stainless Steel A249 Pressure Rat...

Page 24: ...able for any costs of removal installation transportation or any other charges which may arise in connec tion with a warranty claim Products which are sold but not manufactured by Atlas are subject to the warranty provided by the manufacturer of said products and not by Atlas warranty Atlas will not be liable for damage or wear to products caused by abnormal operating conditions ac cident abuse mi...

Page 25: ...E BY ATLAS WITH RE SPECT TO THE PRODUCT AND IS GIVEN IN LIEU OF ANY OTHER WARRANTY TO THE EXTENT AL LOWED BY APPLICABLE LAW ANY AND ALL EXPRESS OR IMPLIED WARRANTIES NOT SET FORTH HEREIN ARE WAIVED AND DISCLAIMED INCLUDING ANY IMPLIED WARRANTY OF MERCHANT ABILITY OR FITNESS FOR A PARTICULAR USE ATLAS LIABILITY UNDER THIS LIMITED WARRANTY IS LIMITED SOLELY TO THOSE LIABILITIES SET FORTH ABOVE IN TH...

Page 26: ...2 6 P a g e ...

Page 27: ...2 7 P a g e ...

Page 28: ...www atlasuv co uk PN 910086 Version Date 06 2021 ...

Reviews: