background image

www.atlona.com | toll free: 

1-877-536-3976

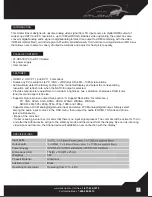
For International: 1-

408-962-0515

2

TABLE OF CONTENTS

1. Introduction 


..................................................  3

2. Package Contents 


..................................................  3

3. Features        

..................................................  3


..................................................  3

5. Panel Descriptions  


..................................................  4


5.1 Front Panel 


..................................................  4


5.2 Rear Panel 


..................................................  4

6. OSD Operation       

..................................................  5

7. Activating a VGA output on a Laptop   


..................................................  5

8. Connection Diagram 


..................................................  8

9. Support Resolution 


..................................................  8

10. Resetting the Unit 


..................................................  8

11. Safety Information 


..................................................  9

12. Warranty       

..................................................  10

13. Atlona Product Registration 


..................................................  11

Summary of Contents for AT-HD500

Page 1: ...www atlona com toll free 1 877 536 3976 For International 1 408 962 0515 User Manual AtlonA PC Laptop to HDMI Converter with built in Scaler up to 1080p AT HD500 ...

Page 2: ...uction 3 2 Package Contents 3 3 Features 3 3 5 Panel Descriptions 4 5 1 Front Panel 4 5 2 Rear Panel 4 6 OSD Operation 5 7 Activating a VGA output on a Laptop 5 8 Connection Diagram 8 9 Support Resolution 8 10 Resetting the Unit 8 11 Safety Information 9 12 Warranty 10 13 Atlona Product Registration 11 ...

Page 3: ...VGA WUXGA HD 480i 1080p resolutions Automatically detect the factory setting of the connected display and output the corresponding resolution and refresh rate when the NATIVE output is selected Provides output picture adjustment on contrast brightness hue saturation sharpness RGB color tone level and aspect ratio size Supports high resolution output See section 9 Support Resolution for reference P...

Page 4: ... Plug the 5VDC power supply into the unit and connect the adaptor to AC wall outlet 1 HDMI Output Connect the HDMI output port to the HDMI input port of your display such like HDTV 3 Audio Output Connect the PC 3 5mm phone jack output port to the analog audio input port of your equip ment 4 Menu Button Press the MENU button to bring up OSD operation menu See section 6 OSD Operation for reference 5...

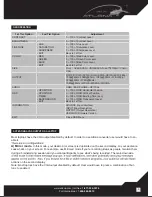
Page 5: ...100 of OSD Horizontal Position 0 100 of OSD Vertical Position 0 100 of OSD Existing Time sec 0 100 of OSD Transparent Level Back to 1st Tier INFORMATION SOURCE Input Interface INPUT Input Resolution OUTPUT Output Resolution VERSION Firmware Version EXIT Close OSD Menu ACTIVATING A VGA OUTPUT ON A LAPTOP OSD OPERATION Most laptops have the VGA output disabled by default In order to use Atlona conve...

Page 6: ... In the Display Properties dialog box on the Settings tab click the blue rectangle with the number 2 which represents the external monitor and then select the Extend my Windows desktop onto this monitor check box 3 Under Screen resolution drag the slider to the right to change the screen resolution of Monitor 2 to 1024 by 768 pixels and then click OK keyboard 2 Then search for a key that has eithe...

Page 7: ...lick Yes Adjust your screen settings mobile PC screen desktop space without icons appears on the external monitor the taskbar on the external monitor since it is usually the larger of the two screens 1 On your mobile PC screen right click an empty area of the taskbar and then click Lock the Taskbar 2 Drag the taskbar to the external desktop and drop it where you want it to appear You can now take ...

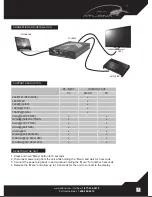
Page 8: ...A 60 75 85 v v UXGA 60 v v WXGA 60 1280x800 v v WSXGA 60 1680x1050 v v WUXGA 60 1920x1200 v v RESETTING THE UNIT 1 Press and hold Menu button for 5 seconds 2 Disconnect power plug from the unit while holding the Menu and wait for 5 seconds 3 Connect the power plug back in and continue holding the Menu for another 5 seconds 4 Release the Menu and allow up to 10 seconds for the unit to connect to th...

Page 9: ...c discharge this device may automatically turn off If this occurs unplug the device and plug it back in Protect and route power cords so they will not be stepped on or pinched by anything placed on or against them Be especially careful of plug ins or cord exit points from this product Avoid excessive humidity sudden temperature changes or temperature extremes Keep this product away from wet locati...

Page 10: ...ted for the remainder of the original warranty period or 3 year whichever is longer 3 NO OTHER WARRANTIES TO THE MAXIMUM EXTENT PERMITTED BY APPLICABLE LAW ATLONA TECHNOLOGIES AND ITS SUPPLIERS DISCLAIM ALL OTHER WARRANTIES EITHER EXPRESS OR IMPLIED INCLUDING BUT NOT LIMITED TO IM PLIED WARRANTIES OF MERCHANTABILITY AND FITNESS FOR A PARTICULAR PURPOSE WITH REGARD TO THE PRODUCT AND ANY RELATED WR...

Page 11: ... you ll take a few moments to register your new purchase Registration creates an ownership updates At Atlona we respect and protect your privacy and assure you that your registration information is completely secure Of course Atlona product registration is totally voluntary and failure to register will not diminish your limited war ranty rights To register go to www atlona com registration ...

Page 12: ...www atlona com toll free 1 877 536 3976 For International 1 408 962 0515 ...

Reviews: