background image

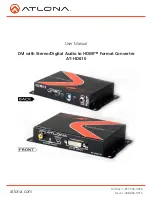
Atlona Technologies AT-HD610 DVI Stereo/Digital Audio to HDMI™ Format Converter provides an easy and instant 
approach for converting digital video (DVI-D) and either digital audio (S/PDIF) or analog stereo audio to digital HDMI™ 
signal. With this module, DVI based devices such as Computers (Mac/PC) with S/PDIF or analog stereo audio can readily 
connect to HDMI™ Display. The HD610 is not only a format converter but also an audio embedder, it will embed digital 
or analog audio into HDMI™ output and sync it with video.

•  1x AT-HD610 unit
•  1x 5V DC locking power supply unit (110/240v universal)
•  1x User’s manual

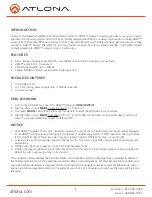
1.  Turn on the AT-HD610. Connect the HDMI™ display to 

HDMI OUTPUT

.

2.  Dial the rotary control 

MODE

 counterclockwise ( ) from 0 to 7.

3.  The green 

STATUS

 LED will be bright and then dark to indicate the EDID learning is complete.

4.  Dial the rotary control 

MODE

 clockwise ( ) from 7 to 0. DO NOT let the rotary control arrow pass 6, which will 

erase the just learned EDID and reset to default EDID.

1.  Only HDMI™ enabled TV sets with underscan/overscan* support, the full active video can be accurately displayed. 

Some HDMI™ HDTV sets may not support this feature. If underscan/overscan* is NOT supported, the top, bottom, 
left and right border of the active video may be screened, and the S/PDIF audio may not sound right.

2.  Analog stereo audio can merely support 2-channel audio. This version does NOT support 8-channel analog audio 

applications.

3.  S/PDIF audio input can support 2 out of the 8-channel audio input.
4.  S/PDIF only supports 48kHz audio sample rate. Other than this rate, the input digital audio should be adjusted to 

48kHz in order to get audio signal correctly sent. 

*The underscan mode displays the full video frame, which reveals content on the edge that is recorded. In overscan, 
the field monitor zooms in to the area that would be visible on most televisions. Set the field monitor to underscan if 
your video will be viewed on a computer monitor or shown with a projector and also to look for light stands, micro-
phones, and other unwanted objects on the edges of your shot. Set it to overscan to see how the video will look on a 
television.

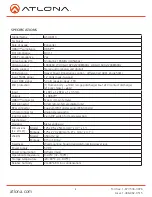
•  Silicon Image Chip-Sets allow 99.99% compatibility with all the AV gear (we only use Best)
•  HDMI™ and HDCP 2.0 compliant
•  DVI video bandwidth up to 165MHz
•  Coaxial S/PDIF and Stereo analog audio input supported

INTRODUCTION

PACKAGE CONTENTS

EDID LEARNING

NOTICE

FEATURES

atlona.com

Toll free: 1-877-536-3976

Local: 1-408-962-0515

Summary of Contents for AT-HD610

Page 1: ...User Manual DVI with Stereo Digital Audio to HDMI Format Converter AT HD610 atlona com Toll free 1 877 536 3976 Local 1 408 962 0515 ...

Page 2: ...2 4 EDID Learning 2 5 Notice 2 6 Specifications 3 7 Panel Description 4 8 Connection and Installation 5 9 Safety Information 6 10 Warranty 7 11 Atlona Product Registration 8 TABLE OF CONTENTS atlona com Toll free 1 877 536 3976 Local 1 408 962 0515 1 ...

Page 3: ...rt this feature If underscan overscan is NOT supported the top bottom left and right border of the active video may be screened and the S PDIF audio may not sound right 2 Analog stereo audio can merely support 2 channel audio This version does NOT support 8 channel analog audio applications 3 S PDIF audio input can support 2 out of the 8 channel audio input 4 S PDIF only supports 48kHz audio sampl...

Page 4: ... 1x RCA 1x 3 5mm Output 1x HDMI HDMI connector Type A 19 pin female DVI connector DVI D 29 pin female digital only RCA connector Coaxial S PDIF digital audio PCM 48kHz 3 5mm connector Analog stereo audio Control switch 2 pin DIP switch for mode selection Mechanical Housing Metal enclosure Dimensions L x W x H Model 125 x 95 x 25mm 4 9 x 3 7 x 1 Package 175 x 270 x 80mm 6 9 x 10 6 x 3 1 Weight Mode...

Page 5: ...ht in operation and connected to a HDMI display Blink in EDID learning process Dim either not in operation or in operation but connected to a DVI display 3 MODE 0 analog audio mode 1 S PDIF audio mode 2 5 not in use 6 use default EDID 7 learn EDID from connected HDMI display 4 POWER Power on off indicator 5 5V DC Connect to a 5V DC power supply unit PANEL DESCRIPTION 1 2 3 1 2 3 4 5 atlona com Tol...

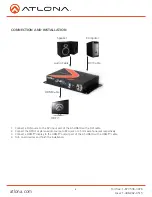
Page 6: ...t port of the AT HD610 with a DVI cable 2 Connect the S PDIF or stereo audio source to RCA jack or 3 5mm earphone jack respectively 3 Connect a HDMI display to the HDMI output port of the AT HD610 with a HDMI cable 4 Turn on all devices and finish the installation atlona com Toll free 1 877 536 3976 Local 1 408 962 0515 5 ...

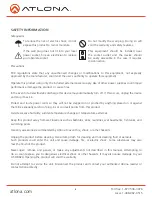
Page 7: ...fire shock or other hazards Unplug the product before cleaning Use a damp cloth for cleaning and not cleaning fluid or aerosols Such products could enter the unit and cause damage fire or electric shock Some substances may also mar the finish of the product Never open remove unit panels or make any adjustments not described in this manual Attempting to do so could expose you to dangerous electrica...

Page 8: ...rbished B Stock Products 3 years from proof of purchase date for all Refurbished B Stock hardware and electronic products purchased on or after June 1 2013 Remedy Atlona recommends that end purchasers contact their authorized Atlona dealer or reseller from whom they purchased their products Atlona can also be contacted directly Visit www atlona com for Atlona s contact information and hours of ope...

Page 9: ... do not allow the exclusion or limitation of relief special incidental consequential or indirect damages or the limitation of liability to specified amounts so the above limitations or exclusions may not apply to you Exclusive Remedy To the maximum extent permitted by law this limited product warranty and the remedies set forth above are exclusive and in lieu of all other warranties remedies and c...

Reviews: