background image

AT-HDR-M2C-QUAD

6

FCC Statement

FCC Compliance and Advisory Statement: This hardware device complies with 

Part 15 of the FCC rules. Operation is subject to the following two conditions: 1) 

this device may not cause harmful interference, and 2) this device must accept any 

interference received including interference that may cause undesired operation. This 

equipment has been tested and found to comply with the limits for a Class A digital 

device, pursuant to Part 15 of the FCC Rules. These limits are designed to provide 

reasonable protection against harmful interference in a commercial installation. 

This equipment generates, uses, and can radiate radio frequency energy and, if not 

installed or used in accordance with the instructions, may cause harmful interference 

to radio communications. However there is no guarantee that interference will not occur in a particular installation. If 

this equipment does cause harmful interference to radio or television reception, which can be determined by turning 

the equipment off and on, the user is encouraged to try to correct the interference by one or more of the following 

measures: 1) reorient or relocate the receiving antenna; 2) increase the separation between the equipment and the 

receiver; 3) connect the equipment to an outlet on a circuit different from that to which the receiver is connected; 

4) consult the dealer or an experienced radio/TV technician for help. Any changes or modifications not expressly 

approved by the party responsible for compliance could void the user’s authority to operate the equipment. Where 

shielded interface cables have been provided with the product or specified additional components or accessories 

elsewhere defined to be used with the installation of the product, they must be used in order to ensure compliance 

with FCC regulations.

1.  Read these instructions.

2.  Keep these instructions.

3.  Heed all warnings.

4.  Follow all instructions.

5.  Do not use this product near water.

6. 

Clean only with a dry cloth.

7.  Do not block any ventilation openings. Install in 

accordance with the manufacturer’s instructions.

8.  Do not install or place this product near any heat 

sources such as radiators, heat registers, stoves, or 

other apparatus (including amplifiers) that produce 

heat.

9.  Do not defeat the safety purpose of a polarized 

or grounding-type plug. A polarized plug has two 

blades with one wider than the other. A grounding 

type plug has two blades and a third grounding 

prong. The wide blade or the third prong are 

provided for your safety. If the provided plug does 

not fit into your outlet, consult an electrician for 

replacement of the obsolete outlet.

10. 

Protect the power cord from being walked on 

or pinched particularly at plugs, convenience 

receptacles, and the point where they exit from the 

product.

11. 

Only use attachments/accessories specified by 

Atlona.

12.  To reduce the risk of electric shock and/or damage 

to this product, never handle or touch this unit or 

power cord if your hands are wet or damp. Do not 

expose this product to rain or moisture.

13.  Unplug this product during lightning storms or when 

unused for long periods of time.

14. 

Refer all servicing to qualified service personnel. 

Servicing is required when the product has been 

damaged in any way, such as power-supply cord or 

plug is damaged, liquid has been spilled or objects 

have fallen into the product, the product has been 

exposed to rain or moisture, does not operate 

normally, or has been dropped.

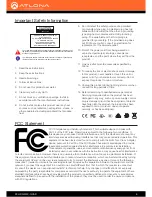
CAUTION: TO REDUCT THE RISK OF

ELECTRIC SHOCK

DO NOT OPEN ENCLOSURE OR EXPOSE

TO RAIN OR MOISTURE.

NO USER-SERVICEABLE PARTS

INSIDE REFER SERVICING TO

QUALIFIED SERVICE PERSONNEL.

CAUTION

RISK OF ELECTRIC SHOCK

DO NOT OPEN

The exclamation point within an equilateral triangle is intended to alert the user to 

the presence of important operating and maintenance instructions in the literature 

accompanying the product.

The information bubble is intended to alert the user to helpful or optional opera-

tional instructions in the literature accompanying the product.

Important Safety Information

Summary of Contents for AT-HDR-M2C-QUAD

Page 1: ...AtlonaManuals Audio AT HDR M2C QUAD Multichannel Digital to Two Channel Audio Converter 4K HDR ...

Page 2: ...AT HDR M2C QUAD 2 Version Release Date Notes 1 07 18 Initial release Version Information ...

Page 3: ...t go to http www atlona com registration As of this writing there are no firmware updates for this product When new firmware is released update instructions will be included with the firmware and will be appended to this manual Sales Marketing and Customer Support Welcome to Atlona Operating Notes IMPORTANT Visit http www atlona com product AT HDR M2C QUAD for the latest firmware updates and User ...

Page 4: ...roduct Warranty Terms New Products 10 years from proof of purchase date for hardware electronics products purchased on or after June 1 2013 3 years from proof of purchase date for hardware electronics products purchased before June 1 2013 Lifetime Limited Product Warranty for all cable products Limited Product Warranty Terms Refurbished B Stock Products 3 years from proof of purchase date for all ...

Page 5: ...icts or states do not allow the exclusion or limitation of relief special incidental consequential or indirect damages or the limitation of liability to specified amounts so the above limitations or exclusions may not apply to you Exclusive Remedy To the maximum extent permitted by law this limited product warranty and the remedies set forth above are exclusive and in lieu of all other warranties ...

Page 6: ...s 5 Do not use this product near water 6 Clean only with a dry cloth 7 Do not block any ventilation openings Install in accordance with the manufacturer s instructions 8 Do not install or place this product near any heat sources such as radiators heat registers stoves or other apparatus including amplifiers that produce heat 9 Do not defeat the safety purpose of a polarized or grounding type plug ...

Page 7: ...e IP Address using the Web GUI 13 The Web GUI 14 Introduction to the Web GUI 14 Menu Bar 15 Info page 16 System Info 16 Video Info 16 Video Info 17 Audio Info 17 Video page 18 Video 18 Audio page 19 I O 1 I O 4 19 Config page 20 Configuration 20 System page 21 Network 21 System 22 Appendix 23 Updating the Firmware 23 Using the Web GUI 23 Using USB 25 Mounting Instructions 26 Default Settings 27 Sp...

Page 8: ...o volume and bass treble controls for each converter all available via Ethernet through the Atlona Management System AMS the web GUI or a control system The HDR M2C QUAD is ideal for serving surround sound and or two channel audio systems from up to four HDMI sources while facilitating pass through to a matrix switcher 1 x AT HDR M2C QUAD 4 x 3 pin captive screw blocks 1 x Wall table mounting brac...

Page 9: ...ation 4 LAN Connect an Ethernet cable from this port to a Local Area Network LAN This port provides access to the web GUI 5 I O 1 I O 4 The AT HDR M2C QUAD provides four sets of audio and video input output ports 2 5 6 7 4 3 1 Front Rear Panel Description Analog Audio Connect the included 3 pin captive screw block from this port to a two channel audio output device Refer to Audio Connector page 3 ...

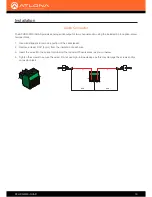
Page 10: ...ive screw terminal block 1 Use wire strippers to remove a portion of the cable jacket 2 Remove at least 3 16 5 mm from the insulation of each wire 3 Insert the wires into the correct terminal on the included Phoenix block as shown below 4 Tighten the screws to secure the wires Do not use high torque devices as this may damage the screws and or connector block ...

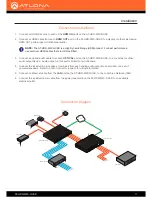
Page 11: ...nnection Diagram Connection Instructions NOTE The AT HDR M2C QUAD is a High Dynamic Range HDR product For best performance use premium HDMI cables that are HDR certified T w o C h a n n e l A u d i o E t h e r n e t V i d e o M u l t i c h a n n e l A u d i o E t h e r n e t T w o C h a n n e l A u d i o t o D i s p l a y s t o S p e a k e r Z o n e s V i d e o M u l t i c h a n n e l A u d i o V ...

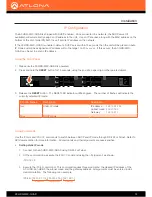
Page 12: ...selected IP mode AT HDR M2C QUAD FW LAN OPTICAL L R AUDIO OUT I O 4 I O 2 I O 3 I O 1 OPTICAL L R AUDIO OUT HDMI HDMI IN OPTICAL L R OUT IN OUT IN OUT IN OUT OPTICAL L R PWR 100 240VAC50 60Hz RESET AT HDR M2C QUAD PW LED flashes Description Description Two Static IP mode IP address 192 168 1 254 Subnet mask 255 255 0 0 Gateway 192 168 1 1 Four DHCP mode Use the IPStatic and IPDHCP commands to swit...

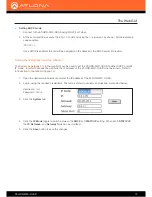
Page 13: ...CP or static IP mode In order to access the web GUI the IP address of the AT HDR M2C QUAD must be known Refer to Introduction to the Web GUI page 14 1 Open the desired web browser and enter the IP address of the AT HDR M2C QUAD 2 Log in using the required credentials The factory default username and password are listed below Username root Password Atlona 3 Click the System tab 4 Click the IP Mode ...

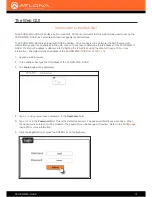
Page 14: ...to Setting the IP Address using the Web GUI page 13 for more information The default static IP address of the AT HDR M2C QUAD is 192 168 1 254 Introduction to the Web GUI 1 Launch a web browser 2 In the address bar type the IP address of the AT HDR M2C QUAD 3 The Login page will be displayed 4 Type root using lower case characters in the Username field 5 Type Atlona in the Password field This is t...

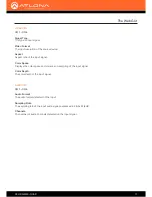
Page 15: ...creen is the menu bar When the mouse is moved over each menu element it will be highlighted in light orange Once the desired menu element is highlighted click the left mouse button to access the settings within the menu In this example clicking A V Settings in the menu bar will display the A V Settings page Menu bar ...

Page 16: ...e Audio Info section displays information about the audio format sampling rate and the number of audio channels Info page System Info Video Info Model Name The model SKU of this product Software Version The version of firmware that the AT HDR M2C is running Always make sure to check the AT HDR M2C product page on the Atlona web site for the latest version of firmware Boot Version The version of th...

Page 17: ...gnal Color Space Displays the color space and chroma sub sampling of the input signal Color Depth The color depth of the input signal I O 1 I O 4 Audio Format The audio format detected on the input Sampling Rate The sampling rate of the input audio signal expressed in kilohertz kHz Channels The number of audio channels detected on the input signal Audio Info Video Info ...

Page 18: ...ill send HDCP content if an HDCP compliant display is detected Setting this value to OFF will force the computer to ignore detection of HDCP compliant displays Disabling this feature will not decrypt HDCP content ON Reports to the source device that the AT HDR M2C is an HDCP compliant sink OFF Reports to the source device that the AT HDR M2C is a non HDCP compliant sink Video Available Resolutions...

Page 19: ...he OFF position to mute the analog and TOSLINK outputs HDMI outputs are not affected Volume Click and drag this slider bar to adjust the audio volume on the analog and TOSLINK outputs Range 80 to 6 Output Bass Click and drag this slider bar to adjust the bass on the analog and TOSLINK outputs Range 15 to 15 Output Treble Click and drag this slider bar to adjust the treble on the analog and TOSLINK...

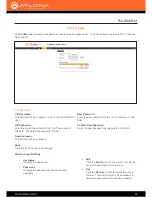
Page 20: ...d cannot be changed Save Click this button to save all changes New Password Enter the new password fro the root username in this field Confirm New Password Verify the new password by retyping it in this field Configuration All User Login Settings Username Displays the username Password Displays the password for the associated username Edit Click the Add button in this column to edit the username a...

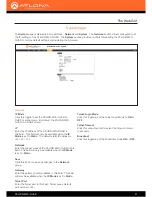
Page 21: ...lable when the IP Mode is set to Static The default static IP address is 192 168 1 254 Netmask Enter the subnet mask of the AT HDR M2C QUAD in this field This field will only be available when the IP Mode is set to Static Save Click this button to save all changes in the Network group Gateway Enter the gateway router address in this field This field will only be available when the IP Mode is set t...

Page 22: ... to reset the AT HDR M2C QUAD to factory default settings Choose File Click this button to select the firmware file Update Click this button to begin the firmware update procedure Refer to Updating the Firmware page 23 for more information on firmware updates System ...

Page 23: ... AT HDR M2C QUAD Firmware file bin file Computer 1 Connect an Ethernet cable from the computer containing the firmware to the same network where the AT HDR M2C QUAD is connected 2 Go to the System page page 21 in the web GUI 3 Click the Choose File button under the Firmware Update section 4 Browse to the location of the firmware file select it and click the Open button 5 Click the Update button 6 ...

Page 24: ...ick the Cancel button to abort the process 8 The update process will take approximately 60 seconds and will automatically reboot the AT HDR M2C QUAD During the update process the PWR LED indicator will flash 9 After the firmware update process is complete the Login screen will be displayed ...

Page 25: ...t the USB cable from both the computer and the AT HDR M2C QUAD 9 The firmware update process is complete Appendix Requirements AT HDR M2C QUAD Firmware file bin file Computer USB A to USB mini B cable 1 Power off the AT HDR M2C QUAD 2 Connect the USB A to USB mini B cable from the computer to the FW port on the rear panel of the AT HDR M2C QUAD 3 Power on the AT HDR M2C QUAD After a few moments a ...

Page 26: ...screws from the left side of the enclosure 2 Position one of the rack ears as shown below aligning the holes on the side of the enclosure with one set of holes on the rack ear 3 Use the screws from Step 1 to attach the rack ear 4 Repeat Steps 1 through 3 to attach the second rack ear to the opposite side of the unit 5 Install the assembly into a rack Secure the unit to the rack using the oval shap...

Page 27: ...ion Username cannot be changed Password root Atlona System Network IP Mode IP Netmask Gateway Telnet Port Telnet Login Mode Telnet Timeout seconds Broadcast DHCP 23 OFF 120 ON The following tables list the factory default settings for the AT HDR M2C QUAD NOTE When the AT HDR M2C QUAD is set to static IP mode then the IP Netmask and Gateway settings will be used by default Appendix ...

Page 28: ... 1680x1050 1600x1200 1440x900 1400x1050 1366x768 1360x768 1280x1024 1280x800 1152x768 1024x768 800x600 640x480 Color Space YUV RGB Chroma Subsampling 4 4 4 4 2 2 4 2 0 Color Depth 8 bit 10 bit 12 bit HDR HDR10 and Dolby Vision 60 Hz Audio HDMI IN HDBaseT IN PCM 2Ch LPCM 5 1 LPCM 7 1 Dolby Digital DTS 5 1 Dolby Digital Plus Dolby TrueHD DTS HD Master Audio Dolby Atmos DTS X Sample Rate 32 kHz 44 1 ...

Page 29: ...0 60 Hz Dimensions Inches Millimeters H x W x D 1 73 x 17 24 x 10 00 44 00 x 438 00 x 254 00 H x W x D w ears 2 18 x 18 93 x 10 23 55 50 x 481 00 x 260 00 Weight Pounds Kilograms Device 7 15 3 24 Certification Power Supply CE FCC cULus RoHS CCC RCM Product CE FCC Appendix ...

Page 30: ...allation 10 IP configuration 12 IP address default 21 setting 21 IP settings default 27 M Mounting instructions 26 Muting audio 19 O Operating notes 3 P Panel descriptions 9 Password default 14 setting 20 R Reset factory default 22 Resolution setting 18 S Safety information 6 Specifications 28 Subnet mask setting 21 T Telnet port default 21 setting 21 Treble adjusting 19 U Users adding 20 editing ...

Page 31: ...al products product images and online product images may vary from images shown here Manufactured under license from Dolby Laboratories Dolby and the double D symbol are registered trademarks of Dolby Laboratories For DTS patents see http patents dts com Manufactured under license from DTS Inc DTS the Symbol DTS and the Symbol together Digital Surround and the DTS 2 0 Digital Out logo are register...

Reviews: