background image

www.atlona.com | toll free: 

1-877-536-3976

For International: 1-

408-962-0515

5

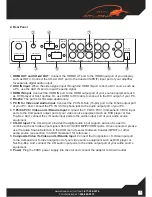
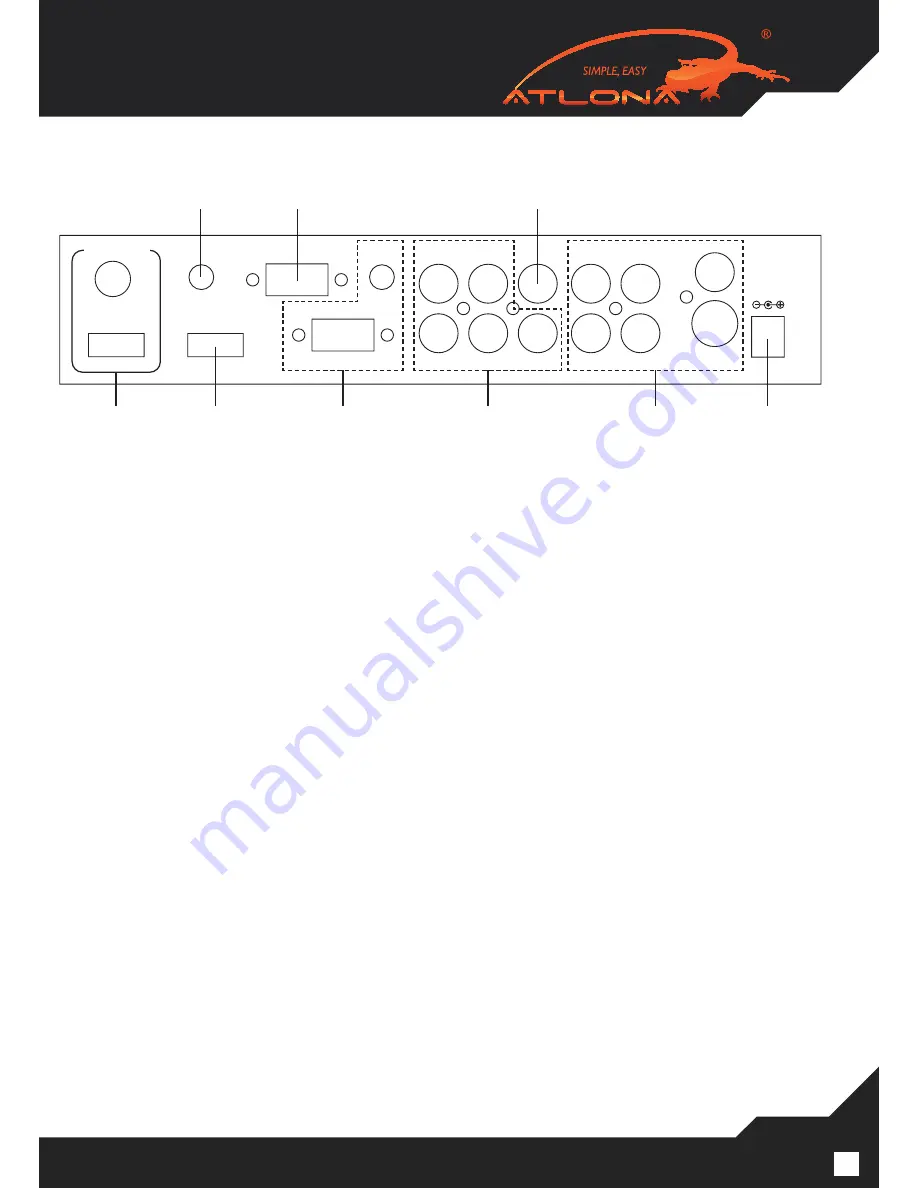
2. Rear Panel

1. 

HDMI OUT and CO-AX OUT

: Connect the HDMI OUT port to the HDMI input port of your display 

    such as HDTV. Connect the CO-AX OUT port to the Coaxial (S/PDIF) input port of your amplifier  

    for separate digital audio output. 

2. 

AUX IN Input

: When the video signal input through the HDMI IN port is from a DVI source such as 

    a PC, use the AUX IN port to input the audio signal. 

3. 

HDMI IN Input

: Connect the HDMI IN port to the HDMI output port of your source equipment such 

    as DVD player or Set-Top-Box. Or, use HDMI to DVI cable to connect to the DVI output of your PC. 

4.

 RS-232

: The port is for firmware update only.

5. 

PC IN for Video and Audio Input

: Connect the PC IN D-Sub (15-pin) port to the D-Sub output port 

    of your PC. And, connect the PC IN 3.5mm phone jack to the audio output port of your PC. 

6. 

Y Pb/Cb Pr/Cr Video and L/R Audio Input

: Connect the Y Pb/Cb Pr/Cr (Component) 3 RCA input 

    ports to the Component output port of your video source equipment such as DVD player or Set- 

    Top-Box. And, connect the L/R audio input ports to the audio output port of your audio source  

    equipment. 

7. 

CO-AX Input

: The CO-AX port provides the digital audio input support, and can be used to 

    combine with each video input signals from CV/SV/COMP/PC/HDMI ports. Once connected, please  

    use the Audio Source Selection in the OSD menu to select between Coaxial (S/PDIF) or other  

    audio source (see section “4.3 OSD Operation” for reference.) 

8. 

Composite Video / S-Video and L/R Audio Input

: Connect the Composite or S-Video input port 

    to the Composite or S-Video output port of your video source equipment such as DVD player or  

    Set-Top-Box. And, connect the L/R audio input ports to the audio output port of your audio source  

    equipment. 

9. 

Power

: Plug the 5VDC power supply into the unit and connect the adaptor to AC wall outlet

HDMI OUT

AUX IN

RS-232

PC IN

HDMI IN

PC IN

R

Cr/Pr

L

Cb/Pb

CO-AX

Y

R

R

L

CV

DC 5V

L

SV

CO-AX OUT

Summary of Contents for AT-LINE-PRO2

Page 1: ...www atlona com toll free 1 877 536 3976 For International 1 408 962 0515 User Manual AtlonA CV SV PC HD HDMI 1080p Scaler Box AT LINE PRO2 ...

Page 2: ...nts 3 3 Features 3 4 Specifications 3 4 1 General Specification 3 4 2 Support Resolution 4 5 Panel Description 4 5 1 Front Panel 4 5 2 Rear Panel 5 6 OSD Operation 6 7 Remote Control 7 8 RS 232 Remote Control Protocol 7 9 Connection and Installation 10 10 Safety Information 11 11 Warranty 12 12 Atlona Product Registration 13 ...

Page 3: ...and output the corresponding resolution and refresh rate when the NATIVE output is selected Supports 50 60Hz frame rate conversion Supports 3 D motion video adaptive 3 D de interlacing and 3 2 2 2 pull down detection and recovery Provides output picture adjustment on contrast brightness hue saturation sharpness RGB color tone level and aspect ratio size Supports high resolution input output PC VGA...

Page 4: ...rresponding input is selected 4 MENU Button Press the MENU button to bring up OSD operation menu see section 4 3 OSD Operation for reference 5 Buttons a On the first tier of OSD menu use and buttons to move up down the highlight item for selection b Once the desired option is selected use and buttons to toggle between setting values 6 ENTER Button In OSD menu use the ENTER button to confirm the se...

Page 5: ...b Pr Cr Video and L R Audio Input Connect the Y Pb Cb Pr Cr Component 3 RCA input ports to the Component output port of your video source equipment such as DVD player or Set Top Box And connect the L R audio input ports to the audio output port of your audio source equipment 7 CO AX Input The CO AX port provides the digital audio input support and can be used to combine with each video input signa...

Page 6: ...OOL RED 0 100 of Red Color Level GREEN 0 100 of Green Color Level BLUE 0 100 of Blue Color Level EXIT Back to the 1st Tier OUTPUT NATIVE VGA SVGA XGA SXGA UXGA 480i 480p 720p 60Hz 1080i 30Hz 1080p 60Hz 576i 576p 720p 50Hz 1080i 25Hz 1080p 50Hz WXGA WSXGA WUXGA OSD HPOSITION 0 100 of OSD Horizontal Position VPOSITION 0 100 of OSD Vertical Position TIMER 0 100 of OSD Show Time sec TRANSP 0 100 of OS...

Page 7: ...d by these buttons please enter OSD Menu to select them 7 MENU Press the button to bring up OSD main menu page 8 Exit Press the button to exit from a sub menu or main menu 9 Up Down Left Right Press the Up Down button to move the highlight bar to your desired parameter during the OSD operation Press the Left Right button to increase decrease the setting value of a selected parameter 10 OK Enter Pr...

Page 8: ...OUTPUT S OUTPUT 5 OUTPUT UXGA UXGA RESOLUTION OUTPUT S OUTPUT 6 OUTPUT 480i 480i RESOLUTION OUTPUT S OUTPUT 7 OUTPUT 480p 480p RESOLUTION OUTPUT S OUTPUT 8 OUTPUT 720p 720p 60Hz RESOLUTION OUTPUT S OUTPUT 9 OUTPUT 1080i 1080i 60Hz RESOLUTION OUTPUT S OUTPUT 10 OUTPUT 1080p 1080p 60Hz RESOLUTION OUTPUT S OUTPUT 11 OUTPUT 576i 576i 60Hz RESOLUTION OUTPUT S OUTPUT 12 OUTPUT 576p 576p 60Hz RESOLUTION ...

Page 9: ...OMUTE 0 1 AUDIOMUTE OFF ON 0 OFF 1 ON AUDIO MUTE CONTROL S AUDIODELAY 0 3 AUDIODELAY OFF 150ms 0 OFF 1 40ms 2 110ms 3 150ms AUDIO DELAY SETTING S RESET 1 RESET ON RESET ACTION B Status Command Command Code Response Description R POWER POWER ON SHOW POWER STATUS R SOURCE SOURCE CV HDMI SHOW SOURCE STATUS R OUTPUT OUTPUT NATIVE WUXGA SHOW OUTPUT STATUS R SIZE SIZE FULL PANSCAN SHOW SIZE STATUS R PIC...

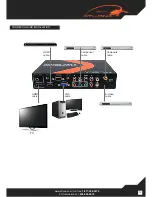
Page 10: ...www atlona com toll free 1 877 536 3976 For International 1 408 962 0515 10 CONNECTION AND INSTALLATION TV HDMI cable HDMI cable Composite cable Component cable VGA cable S Video cable ...

Page 11: ...tomatically turn off If this occurs unplug the device and plug it back in Protect and route power cords so they will not be stepped on or pinched by anything placed on or against them Be especially careful of plug ins or cord exit points from this product Avoid excessive humidity sudden temperature changes or temperature extremes Keep this product away from wet locations such as bathtubs sinks lau...

Page 12: ...ted for the remainder of the original warranty period or 3 year whichever is longer 3 NO OTHER WARRANTIES TO THE MAXIMUM EXTENT PERMITTED BY APPLICABLE LAW ATLONA TECHNOLOGIES AND ITS SUPPLIERS DISCLAIM ALL OTHER WARRANTIES EITHER EXPRESS OR IMPLIED INCLUDING BUT NOT LIMITED TO IM PLIED WARRANTIES OF MERCHANTABILITY AND FITNESS FOR A PARTICULAR PURPOSE WITH REGARD TO THE PRODUCT AND ANY RELATED WR...

Page 13: ...stration creates an ownership record if your product is lost or stolen and helps ensure you ll receive notification of performance issues and firmware updates At Atlona we respect and protect your privacy and assure you that your registration information is completely secure Of course Atlona product registration is totally voluntary and failure to register will not diminish your limited war ranty ...

Page 14: ...www atlona com toll free 1 877 536 3976 For International 1 408 962 0515 ...

Page 15: ...www atlona com toll free 1 877 536 3976 For International 1 408 962 0515 ...

Page 16: ...www atlona com toll free 1 877 536 3976 For International 1 408 962 0515 ...

Reviews: