background image

6

www.atlona.com

Toll free: 1-877-536-3976  

Local: 1-408-962-0515

PC OS: Windows 98/ME/2000/XP

Software installation:

1. Place installation CD on CD-ROM drive.
2. Execute setup.exe on installation CD.
3. OS maybe requires to update some files.Please re-start PC. After starting PC ready, execute setup. exe again.
4. Click taskbar menu (START)->(Programs)->(AT-PC-AVSCOMP) to execute software.
If RS-232 is not ready then software enters virtual mode.
After RS-232 connection being ready, start the software again and enters real mode.

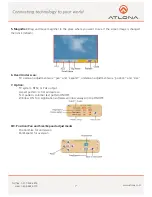
Main Panel

1.  Power: Power ON/Off.
2.  Mode indicator: 

Grey icon:Virtual mode operation. 
Colored icon: Real mode operation.

3.  System reset: Reset AT-PC-AVSCOMP unit.
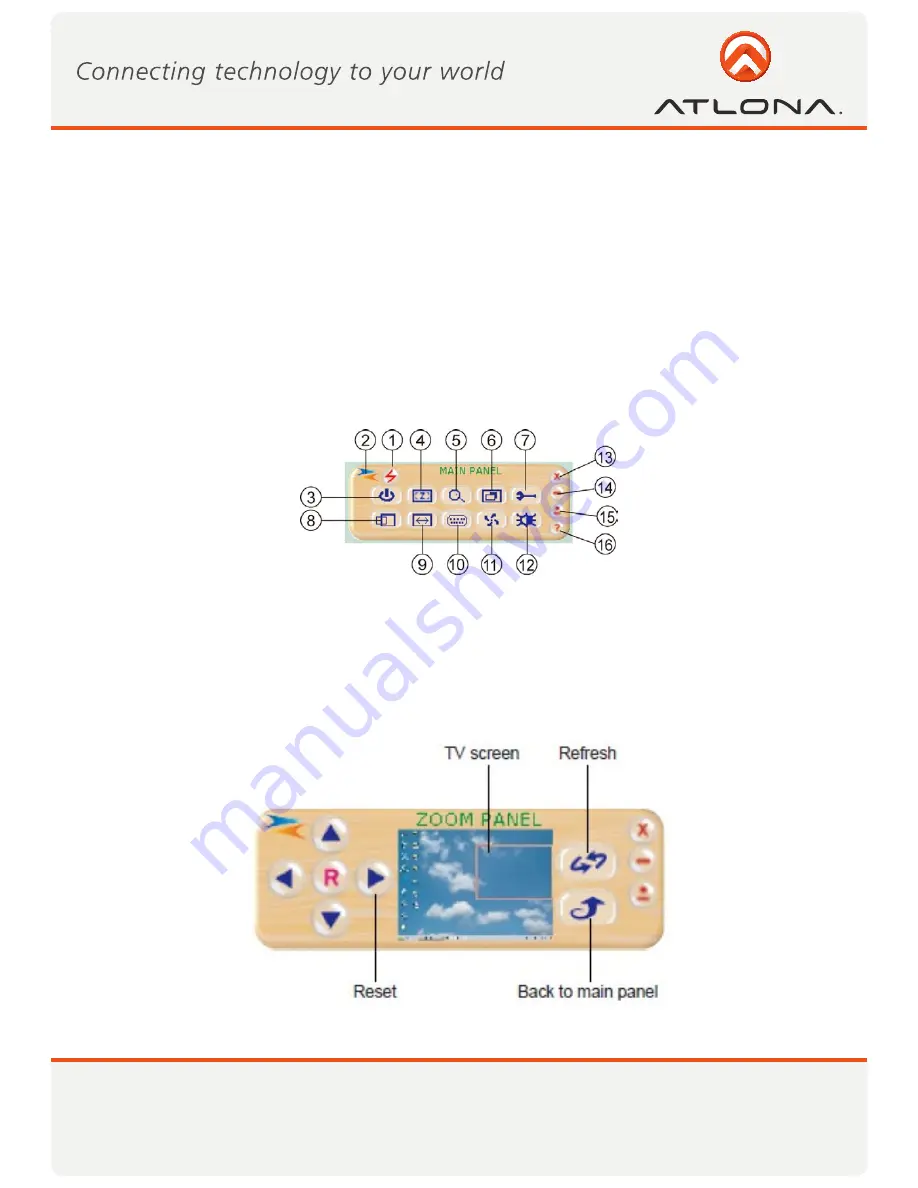
4.  Zoom: Drag and move (TV-screen) to the place where you want to see. If the PC screen image is changed, 

then click(refresh).

RS-232 SOFTWARE OPERATION

Summary of Contents for AT-PC-AVSCOMP

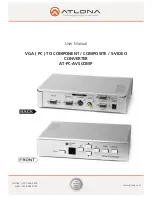
Page 1: ...www atlona com Toll free 1 877 536 3976 Local 1 408 962 0515 User Manual VGA PC TO COMPONENT COMPOSITE S VIDEO CONVERTER AT PC AVSCOMP ...

Page 2: ...peration Controls and Functions 3 3 1 Front Panel 3 3 2 Rear Panel 4 3 3 Remote Control 5 4 RS 232 Software Operation 6 6 Connection and Installation 9 7 Specifications 10 8 RS 232 Remote Control Protocol 11 8 Safety Information 14 9 Warranty 15 10 Atlona Product Registration 16 TABLE OF CONTENTS ...

Page 3: ...ically detects and down converts the incoming PC images to NTSC PAL RGB or YUV Support high resolution PC input up to UXGA 1600x1200 60Hz Output video format is selectable between composite S Video YUV and RGBS through a control button on the remote Support high input refresh rate up to 140Hz VGA Adjustable image scaling Pan Position and Zoom Advance 2 D flicker filter ensures flicker free picture...

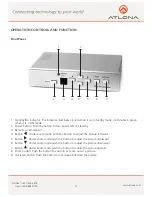
Page 4: ...tton Under zoom mode push the button to adjust the picture leftward 5 Button Under zoom mode push the button to adjust the picture rightward 6 Button Under zoom mode push the button to adjust the picture downward 7 Button Under zoom mode push the button to adjust the picture upward 8 Zoom button Push the button to zoom in or zoom out of a picture 9 Overscan button Push the button to overscan under...

Page 5: ...Local 1 408 962 0515 Rear Panel 1 DC power supply 12V 800mA 2 PC input VGA connector 3 PC loop through output connector 4 Composite video out RCA connector 5 S video out connector 6 RS 232 DB 9 connector 7 RGB or YUV out connector 6 7 5 4 2 1 3 ...

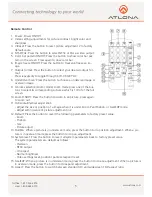
Page 6: ...l screen 10 Zoom ON Off Press the button to zoom in an picture press again to zoom out 11 Horizontal Vertical adjust knob Adjust the size or position of a image when it is under Zoom Pan Position or Size EXP mode Adjust setting value of picture adjustment in 2 12 Default Press the button to revert the following parameters to factory preset value Zoom Position Size Picture adjust 13 Pos Pan When a ...

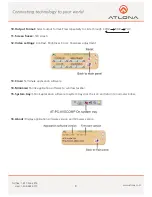
Page 7: ...lick taskbar menu START Programs AT PC AVSCOMP to execute software If RS 232 is not ready then software enters virtual mode After RS 232 connection being ready start the software again and enters real mode Main Panel 1 Power Power ON Off 2 Mode indicator Grey icon Virtual mode operation Colored icon Real mode operation 3 System reset Reset AT PC AVSCOMP unit 4 Zoom Drag and move TV screen to the p...

Page 8: ...esh 6 Over Under scan TV overscan adjustments are pan and expand underscan adjustments are position and size 7 Option TV system NTSC or PAL output Aspect pattern 4 3 or widescreen Test pattern colorbar test pattern ON OFF Window ON Top Application software window always on top ON OFF 8 9 Position Pan and Size Expand adjustments Position Size for underscan Pan Expand for overscan ...

Page 9: ...creen freeze Still screen 12 Video settings Contrast Brightness Color Sharpness adjustment 13 Close Terminate application software 14 Minimize Shrink application software to window taskbar 15 System tray Shrink application software to system tray click the icon and return to normal window 16 About Display application software version and firmware version ...

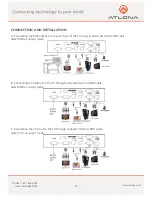
Page 10: ...art input of the TV using enclosed VGA to SCART cable Select RGB as output mode B Connecting the RGB out to the TV through enclosed VGA to 4 BNC cable Select RGB as output mode C Connecting the YUV out to the TV through enclosed VGA to 4 BNC cable Select YUV as output mode CONNECTION AND INSTALLATION ...

Page 11: ...ss through HD 15 PC In HD 15 RGB YUV Out HD 15 Output system NTSC or PAL TV system R G B H V PC pass through R G B Sync Fh 15 KHz Fv 50 60Hz Ys U V Fh 15KHz Fv 50 60Hz RGB YUV HD 15 pins definition a RBG out b YUV out The Sync pin is composite sync H V Controls Front panel control IR remote control RS 232 control Last memory Accessories HD 15 male to HD 15 male VGA cable x 1 1R to 1R video cable x...

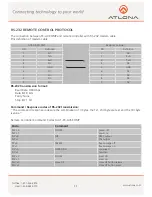
Page 12: ...ud Rate 9600 bps Data Bit 8 bits Parity None Stop Bit 1 bit Command Response codes of RS 232 transmission The command response codes are the combination of 3 bytes the 1st 2nd byte are text and the 3rd byte is value Remote Controller Command Codes to AT PC AVSCOMP Code Comment PW 0 PW 1 POWER power off power on NP 0 NP 1 N P NTSC output PAL output FZ 0 FZ 1 FREEZE freeze image off freeze image on ...

Page 13: ...ower width image button press SR 0 SR 1 size RIGHT wider width image button release wider width image button press RS 0 RS 1 RS 2 RS 3 RESET system reset reset image location reset image size reset video settings TP 0 TP 1 PATTERN test pattern off test pattern on 0F 0 0F 1 0F 2 Output Format CV SV output RGB output YUV output AR value zoom AREA AR 1 AR 9 zoom area1 area9 AS 0 AS 1 ASPECT aspect is...

Page 14: ...eeze image off freeze image on OV 0 OV 1 OVERSCAN underscan overscan ZM 0 ZM 1 ZOOM zoom off zoom on RS 0 RS 1 RS 2 RS 3 RESET system reset reset image location reset image size reset video settings TP 0 TP 1 PATTERN test pattern off test pattern on 0F 0 0F 1 0F 2 Output Format CV SV output RGB output YUV output AR value zoom AREA AR 1 AR 9 zoom area1 area9 AS 0 AS 1 ASPECT aspect is 4 3 aspect is...

Page 15: ... pools Use only accessories recommended by Atlona to avoid fire shock or other hazards Unplug the product before cleaning Use a damp cloth for cleaning and not cleaning fluid or aerosols Such products could enter the unit and cause damage fire or electric shock Some substances may also mar the finish of the product Never open remove unit panels or make any adjustments not described in this manual ...

Page 16: ...t or items on the product contact with fluids and physical misconduct i e kicking or punching Any replacement product will be warranted for the remainder of the original warranty period No other warranties To the maximum extent permitted by applicable law Atlona Technologies and its suppliers disclaim all other warranties either expressed or implied including but not limited to implied warranties ...

Page 17: ...creates an ownership record if your product is lost or stolen and helps ensure you ll receive notification of performance issues and firmware updates At Atlona we respect and protect your privacy assuring you that your registration information is completely secure Atlona product registration is completely voluntary and failure to register will not diminish your limited warranty rights To register ...

Reviews: