background image

AT-OMNI-521

79

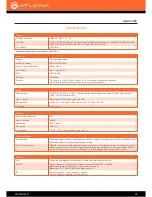
Environmental

Operating Temperature

+14 to +

122 °F 

-10 to +50 °C

Storage Temperature

-14 to +140 °F


-10 to +60 °C

Operating Humidity (RH)

20% to 95%, non-condensing

Power

PoE

IEEE 802.3af

Consumption

Up to 12 W

Safety

CE, FCC, cULus, RoHS, RCM

Chassis

Dimensions (H x W x D)

1.34 in x 8.19 in x 4.41 in 

34 mm x 208 mm x 112 mm

Weight

1.5 lbs / 0.7 kg

Safety

CE, RoHS, FCC

Indicators and controls

PWR

1 - LED, tricolor (red, amber, green)

LINK

1 - LED, bicolor (red, green)

ID

1 - momentary, tact-type, backlit (blue); sends an identification broadcast message over the network to 

any listening devices.

Reboot

1 - Momentary, tact-type

Connectors

HDMI

1 - Type A, 19-pin, female, locking

ETHERNET

1 - RJ45, 10/100/1000 Mbps

RS-232 / IR

1 - Euroblock, 6-pin (2 ports); RS-232 on port 1 and 2, IR on port 2 only

Maximum distance per hop 300 ft (100 m), depending upon network configuration.

Appendix

Summary of Contents for OmniStream R-Type

Page 1: ...AtlonaManuals NetworkedAV AT OMNI 521 Single Channel Networked AV Decoder OmniStream R Type ...

Page 2: ...AT OMNI 521 2 Version Information Version Release Date Notes 1 4 18 Initial release 2 7 18 Includes updates to 1 2 1 firmware AMS updates ...

Page 3: ...tomer Support Welcome to Atlona Operating Notes IMPORTANT Visit http www atlona com product AT OMNI 521 for the latest firmware updates and User Manual Main Office Atlona Incorporated 70 Daggett Drive San Jose CA 95134 United States Office 1 877 536 3976 US Toll free Office 1 408 962 0515 US International Sales and Customer Service Hours Monday Friday 6 00 a m 4 30 p m PST http www atlona com Inte...

Page 4: ...duct Warranty Terms New Products 10 years from proof of purchase date for hardware electronics products purchased on or after June 1 2013 3 years from proof of purchase date for hardware electronics products purchased before June 1 2013 Lifetime Limited Product Warranty for all cable products Limited Product Warranty Terms Refurbished B Stock Products 3 years from proof of purchase date for all Re...

Page 5: ...ts or states do not allow the exclusion or limitation of relief special incidental consequential or indirect damages or the limitation of liability to specified amounts so the above limitations or exclusions may not apply to you Exclusive Remedy To the maximum extent permitted by law this limited product warranty and the remedies set forth above are exclusive and in lieu of all other warranties re...

Page 6: ...5 Do not use this product near water 6 Clean only with a dry cloth 7 Do not block any ventilation openings Install in accordance with the manufacturer s instructions 8 Do not install or place this product near any heat sources such as radiators heat registers stoves or other apparatus including amplifiers that produce heat 9 Do not defeat the safety purpose of a polarized or grounding type plug A ...

Page 7: ... Rebooting OmniStream 21 Unicast Mode 22 Multicast Mode 24 AES67 Audio 26 IR Control 28 Downstream IR Control 28 Upstream IR Control 30 Descrambling 31 Standard Method 31 Using the Virtual Matrix 32 Slate Logo Insertion 34 Deleting Slates Logos 35 Text Insertion 36 Creating Video Walls 38 Bezel Compensation 44 Using Velocity 46 The AMS Interface 54 Device Info page 54 SAP page 57 IP Input page 58 ...

Page 8: ...AT OMNI 521 8 Table of Contents The Virtual Matrix 73 Accessing the Virtual Matrix 73 Layout and Operation 74 Appendix 76 Mounting Instructions 76 Rack Tray for OmniStream 77 Specifications 78 ...

Page 9: ...cal for demanding applications such as gaming This decoder includes an HDMI output high performance upscaling and downscaling aspect ratio control and video wall processing plus presentation enhancement features such as logo insertion and scrolling on screen text Introduction Features Package Contents 1 x AT OMNI 521 1 x Push spring connector 6 pin 1 x Wall table mounting brackets 4 x Rubber feet ...

Page 10: ...d a broadcast message to any network devices that are listening This button is also used to set the decoder to factory default settings Refer to ID Button page 21 for more information 4 Reboot button Press this button using a small pointed object to reboot the unit 5 HDMI OUT Connect an HDMI cable from this port to a UHD HD display 6 ETHERNET Connect an Ethernet cable from this port to the Local A...

Page 11: ...le jacket 2 Remove at least 3 16 5 mm from the insulation of the RX TX and GND wires 3 Insert the TX RX and GND wires into correct terminal on the included Phoenix block If using non tinned stranded wire press the orange tab above the terminal while inserting the exposed wire Repeat this step for the TX RX and GND connections Push tab to unlock GND RX TX RS 232 Connections NOTE Typical DB9 connect...

Page 12: ...ons The following components are required Note that other components may also be used However Atlona has tested and verified the following components for this application Xantech CB12 1 Zone Connecting Block Xantech 12 V PSU Atlona AT IR CS RX Atlona AT OMNI IR TX 1 Connect the SIGNAL GROUND and POWER leads from the Xantech CB12 to the AT IR SC RX 2 On the Xantech CB12 connect the SIGNAL and GROUN...

Page 13: ...CVR IMPORTANT The IR emitter must be placed no more than 1 from the IR sensor on the device in order to function properly For downstream IR control either multicast or unicast mode can be used However when controlling a source from the decoder viewing location unicast mode should be used Refer to Unicast Mode page 22 and Multicast Mode page 24 for more information Refer to IR Control page 28 for i...

Page 14: ...t the IR emitter to the TX and GND pins of the RS 232 2 port The IR emitter must be placed no more than 1 from the IR sensor on the device in order to function properly IR extender Connect the IR extender from the RX and GND pins of the RS 232 2 port to the associated pins on the control system 5 Once the unit is powered the PWR indicator on the front panel will turn red then amber then green IMPO...

Page 15: ... r o l Ethernet PoE Ethernet LAN 2 COM NC NO COM NC NO COM NC NO COM NC NO 12V SIG GND 12V SIG GND 12V SIG GND 12V SIG GND 1 COM PON ENT HDM I 1 2 3 4 5 6 SER IAL 1 IR OUT SER IAL 2 L R DIG ITAL COA X OUT AUD IO OUT AUD IO IN ETH ERN ET 2 3 4 VIDE O OUT 48V DC FAC TOR Y RES ET HDM I PW R LIN K TM OMN ISTRE AM ID 1 2 1 2 R TYPE TM OMN ISTRE AM LIN K PW R R TYPE ID ...

Page 16: ... set to DHCP mode allowing a DHCP server if present to assign the decoder an IP address Once an IP address has been assigned the Atlona Management System AMS can be used to manage the product on the network Note that AMS will only be able to discover decoders if they are on the same VLAN Accessing Decoders in AMS 1 Launch a web browser and enter the IP address of AMS in the address bar 2 Enter the...

Page 17: ... in Auto IP mode and assigned an IP address within the range of 169 254 xxx xxx If this occurs configure the network interface of the computer that is running AMS located on the same subnet 169 254 xxx xxx subnet mask 255 255 0 0 Refer to Configuring a Static IP Address page 14 for more information on configuring an decoder in Auto IP mode If no AT OMNI 521 decoders are found then verify the follo...

Page 18: ...AT OMNI 521 18 Configuration 8 Click the desired AT OMNI 521 from the Unassigned device list Once the unit is selected the control interface for the AT OMNI 521 will be displayed ...

Page 19: ...ne of the Ethernet ports on the switch Make sure that the computer being used has AMS installed 3 Configure the PC to a static IP address that is on the same subnet as the decoder 4 Login to AMS Refer to Accessing Decoders in AMS page 16 for information on the login process 5 Locate the AT OMNI 521 decoder under the Unassigned section within AMS 6 Click on the device 7 Under AMS click NETWORK in t...

Page 20: ...d using PoE the PWR indicator will be green Check the Ethernet cable for possible damage or loose connections If a PoE switch is not being used then a PoE injector not included will need to be connected to the decoder Red The decoder is booting Green The decoder is ready LINK Red The decoder is powered but no Ethernet cables are connected between the switch and the ETHERNET port Check the Ethernet...

Page 21: ...evices that may be listening 1 Press and hold the ID button for approximately 30 seconds 2 The LED indicators on the front panel will flash then turn off 3 The decoder is now reset and will need to be reconfigured Broadcast Messaging Reset to Factory Default Settings WARNING Performing a factory default reset will erase all user programmed settings from the decoder IP settings are not preserved To...

Page 22: ...ecoder HD MI PW R LIN K TM OMN ISTRE AM VO LUM E DIS PLA Y INP UT ID 1 2 1 2 HD MI PW R LIN K TM OMN ISTRE AM VO LUM E DIS PLA Y INP UT ID 1 2 1 2 HD MI PW R LIN K TM OMN ISTRE AM VO LUM E DIS PLA Y INP UT ID 1 2 1 2 LAN 192 168 11 116 192 168 11 114 192 168 11 115 192 168 11 117 192 168 11 118 192 168 11 121 1 2 ID PW R LIN K TM OMN ISTRE AM 1 2 ID PW R LIN K TM OMN ISTRE AM 1 2 ID PW R LIN K TM ...

Page 23: ...u 7 Remove the IP address from the Multicast Address field 8 Click the SAVE button to commit changes Field should be blank 9 Unicast setup is complete The decoder unit will now receive streams exclusively from the encoder containing the IP address of this decoder Basic Operation ...

Page 24: ... displayed 3 Click the icon in the upper left corner of the AMS Dashboard 4 Click Virtual Matrix from the fly out menu Refer to The Virtual Matrix page 73 if necessary 5 Locate the desired encoder in the Virtual Matrix as shown on the next page 6 Create a cross connection to the desired decoder When a cross connection is created AMS will automatically assign a multicast IP address to both the enco...

Page 25: ...AT OMNI 521 25 Basic Operation ...

Page 26: ... to AMS Refer to Accessing Decoders in AMS page 16 if necessary 2 The AMS Dashboard will be displayed 3 Click the icon in the upper left corner of the AMS Dashboard 4 Click Devices All and select the desired encoder from the Device List 5 Go to the encoder interface and click SESSION in the menu bar Refer to the OmniStream R Type A V Encoder User Manual if necessary 6 Scroll down to the Audio sect...

Page 27: ...button within the Session section 9 Go to the decoder interface and click SAP from the menu bar at the top of the screen Under the SAP section click the Enable toggle switch and enable SAP When enabled the toggle switch will be green If the decoder is to receive AES67 audio this step is required 10 Click the SAVE button on the SAP page Basic Operation ...

Page 28: ...e encoder to the decoder endpoint 1 Login to AMS Refer to Accessing Decoders in AMS page 16 if necessary 2 The AMS Dashboard will be displayed 3 Click the icon in the upper left corner of the AMS Dashboard 4 Click Devices All and locate the desired encoder from the AMS Device List 5 Click SERIAL in the menu bar 6 Under the Serial Port 2 section make sure that the Mode drop down list is set infrare...

Page 29: ...r session If the input is already in used then an error message will be displayed If this occurs then select another input 11 Click the SAVE button to commit changes If IR signals need to be sent upstream to the encoder then follow the instructions under Upstream IR Control page 30 7 Scroll down and locate the Serial Configuration 2 section 8 Click the Port drop down list and select serial_port2 ...

Page 30: ...Enter the port number in the Destination UDP Port field 4 Click the Enabled toggle switch to enable bidirectional control When enabled the toggle switch will be green and will allow IR signals to be sent to the encoder In order to send IR data upstream from the decoder to the encoder a few additional simple steps are required Upstream IR Control 5 Click the SAVE button to commit changes ...

Page 31: ...deo and audio can be scrambled When scrambled information is received from an encoder it will need to be descrambled before it can be displayed When descrambling is enabled the descrambling key can be found under the HDMI OUTPUT page on the decoder Descrambling 1 Click HDMI OUTPUT in the menu bar 2 Under the desired Session click the Enabled toggle switch next to Descrambling to enable it Once ena...

Page 32: ...ing the Virtual Matrix 1 Access the Virtual Matrix Refer to The Virtual Matrix page 73 for more information 2 Locate the desired encoder or decoder Scrambling is handled on the encoder descrambling is handled on the decoder 3 Click the yellow key icon The Scrambling dialog box will be displayed If the key icon for a decoder is clicked then the Descrambling dialog box will be displayed 4 Click the ...

Page 33: ...the following methods Manual enter a user defined key in the Key field 6 Repeat the above process for each session 7 Click the Save button to commit the changes Click the icon to generate a random key using AMS Each time this icon is clicked a new scrambling key will be generated ...

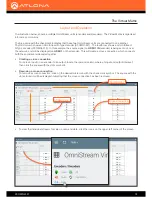
Page 34: ... subscribed When configuring on the decoder the presence of the image is specified on the individual HDMI output Refer to the OmniStream R Type A V Encoder User Manual for information on managing slate logo insertion on encoder units 1 Login to AMS Refer to Accessing Decoders in AMS page 16 if necessary 2 Click the LOGO tab in the menu bar Slate Logo Insertion Basic Operation 3 Under New logo clic...

Page 35: ...ource signal and will remain even if the source signal is lost Auto The image will only be displayed when the source signal is lost For example this mode is useful in conference room applications for displaying system instructions when no sources are connected 13 Click the Slate Logo drop down list and select the desired logo Note that if Slate Mode is set to Off then this field will not be visibl...

Page 36: ...ty 7 Click the Color drop down list to select the color of the text The Red Green and Blue fields can be changed to further modify the color of the text Adjust the Alpha field to control the transparency of the text A value of 255 is opaque and a value of 0 is transparent Numbers from 0 to 255 are valid for each of these fields 8 Specify the location of the text in the Horizontal and Vertical fiel...

Page 37: ... 37 9 Specify the size of the text in the Width and Height fields Each of these values is based on the horizontal and vertical resolution of the screen 10 Click the SAVE button to apply all changes Basic Operation ...

Page 38: ...he video source is 3840 x 2160 In order to create a single image using all four displays each source image will need to be cropped and scaled to one fourth of the total image resolution The crop and scale feature will be used to provide the correct output Also note that the top two displays are mounted upside down The rotate feature can be used to correct such a scenario Creating Video Walls Displ...

Page 39: ...cate the Resolution option and select 1920x1080 This will scale the output resolution from each decoder to 1920x1080 4 Click the Stretch Crop Mode drop down list and select Full Screen This guarantees that the image will fill the screen ...

Page 40: ...he Width and Height fields This is the size of the source to be used for this window of the video wall The table below lists width and height examples for a 2x2 video wall with the specified source resolution Since the example source is 3840 x 2160 the width and height for the Display 1 upper left corner needs to be set 1920 and 1080 respectively as shown below Source resolution Width Height 3840 ...

Page 41: ...solution Width Height 3840 x 2160 UHD 1920 1080 1920 x 1080 1080p 960 540 9 Enter the number of video wall rows in the Horizontal field and the number of columns in the Vertical field These values are the pixel start position upper left most pixel The table below lists left and right coordinates for a 2x2 video wall with the specified source resolution Source resolution Upper Left Upper Right Lowe...

Page 42: ...ote that in this example at Step 10 decoders 3 and 4 will not require any rotation In this case make sure the Rotation option is set to 0 Basic Operation Display Wall HDM I PWR LINK TM OMNI STREA M VOLU ME DISP LAY INPU T ID 1 2 1 2 1 2 ID PWR LINK TM OMNI STREA M 1 2 ID PWR LINK TM OMNI STREA M 1 2 ID PWR LINK TM OMNI STREA M 1 2 ID PWR LINK TM OMNI STREA M AV LAN Encoder Decoder Decoder Decoder ...

Page 43: ... AV LAN Encoder Decoder Decoder Decoder Decoder 1 3 2 4 1 3 2 4 Once all four decoders have been properly configured the video wall should appear similar to the following 13 Check the image on each display and make sure they are aligned correctly with the other images on the video wall Use the Edge Compensation drop down list to select the desired bevel compensation See the next page for more info...

Page 44: ...tion Note how the Atlona logo is stretched horizontally On the right bezel compensation is used to correct the distorted image 1 Locate the Bezel Compensation from the Edge Compensation drop down list 2 Adjust the Top Bottom Left and Right values as desired All entered values are applied to the physical displays in 1 pixel increments Refer to the examples below to properly calculate the amount of ...

Page 45: ...display area width in mm bezel width 1 in mm bezel width 2 in mm If two bezels need compensating e g on a 3x3 wall where the middle display has two bezels is in the way in each direction use the following formula 3 Click the SAVE button at the bottom of the screen to accept changes ...

Page 46: ...ddress bar 2 Enter the required login credentials 3 Click the Login button 4 The Velocity Dashboard will be displayed 5 Click the icon in the upper left corner to display the fly out menu Click to display fly out menu 6 Click Sites in the menu bar to expand the list of buildings and rooms 7 Click the desired room from the list In the example on the right a set of encoders and decoders have been se...

Page 47: ...ight corner of the screen This icon is represented by the sign 9 The Technology fly out menu will be display 10 In the fly out menu click Miscellaneous Atlona to expand the Atlona technology menu 11 Click the Quick Add button for Velocity Video Wall VELOCITY VIDEO WALL The video wall technology will be added to the room ...

Page 48: ...isplayed when the video wall driver is edited for the first time The default video wall dimensions are set to 3840 x 2160 To modify the video wall size follow steps 14a through 14e To continue with the default video wall dimensions click the CLOSE button and go to step 15 a Click the Lock Pixel Space toggle switch to disable it When disabled the toggle switch will turn gray b Under Pixel Space Dim...

Page 49: ...d Save the video wall dimensions by clicking the Lock Pixel Space toggle switch to enable it e Click the CLOSE button to dismiss the dialog 15 The Video Wall Configuration screen will be displayed and will automatically be set to edit mode In this mode the Edit Presets icon in the menu bar will be green Edit Presets icon 16 Under the Displays window on the left side of the screen drag and drop the...

Page 50: ...g to adjust the size of the video wall Click to commit the selection In this example a 2x2 video wall will be created Once Auto Arrange has been applied the Pixel Space window will appear similar to the following It should be noted that each display can be rearranged if necessary To reposition displays click and drag them to the appropriate places within the Pixel Space window Note that each displ...

Page 51: ...edure When locked this icon will turn red To unlock the displays for adjustment purposes click the Lock Displays icon again 19 Click the Save icon in the upper right corner of the Pixel Space window This will save the current layout 20 Click the Edit Presets icon to switch to live mode 21 Enter than name of the preset in the Preset Edit dialog 22 Click the CLOSE button to save the preset name and ...

Page 52: ...y 1 lower right corner Sources can also be re sized on the fly to achieve the desired presentation To re size a source click and drag the source window horizontally vertically or diagonally Release the mouse to commit the changes Refer to the Atlona Velocity User Manual for more information on manipulating source windows NOTE When source windows are resized they will snap to the nearest vertical o...

Page 53: ... Repeat steps 21 through 23 to create the preset Once the desired presets have been created click the preset name under the Presets section to recall it The video wall will be updated with the selected preset Refer to the Atlona Velocity User Manual for more information on using and recalling presets Basic Operation ...

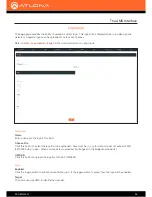
Page 54: ... interface Alias Enter a name for the unit in this field This is optional Model The mode number of the unit IP Address Displays the IP address of the ETHERNET port MAC Address Displays the MAC address of the ETHERNET port Firmware version The version of firmware that the unit is running Always make sure the latest version of firmware is installed ...

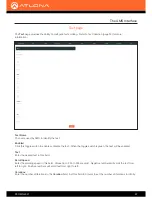
Page 55: ...ps for any logs and alarms Buttons Disabling this feature will lock the ID button on the front panel This is enabled by default LEDs Disabling this feature will turn off all LED indicators on the front panel This is enabled by default Export Configuration Click this button to export the current configuration settings of the AT OMNI 521 to a local file on the computer The configuration file will be...

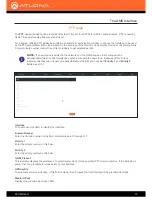
Page 56: ...fault settings and resets custom user information Reset Network Resets the decoder to factory default settings and resets network information Reset Defaults Resets the decoder to factory default settings In addition static multicast addresses are configured This option can be used to configure a single decoder to transmit to any number of decoders without using the Virtual Matrix within AMS NOTE T...

Page 57: ... for SAP messages from encoders on the network that are configured to send SAP Any messages that are discovered will be displayed here Enabled Click this toggle switch to enable or disable SAP If enabled the decoder will listen for SAP messages Click the SAVE button to commit any changes to this page IMPORTANT For a decoder to receive AES67 SAP must be enabled ...

Page 58: ...AT OMNI 521 58 The AMS Interface IP Input page The IP Input page provides configuration of each input the assigned multicast address es and ports ...

Page 59: ... list to select the mode Mode can be set to exclude or include and is specifically used when using Source Specific Multicast SSM SSM will only function if the network is properly set up to support it Mode Description exclude Multicast content coming from the source mentioned in the Addresses section will be excluded blocked include Multicast content coming from the source mentioned in the Addresse...

Page 60: ...ut Enabled Click this toggle switch to enable or disable de scrambling Key Enter the scrambling key in this field The scrambling key must be contain a minimum of eight characters Special characters and spaces are not permitted Encrypted Indicates if the HDCP handshake with the sink device was successful or not If this indicator is green then the handshake was successful ...

Page 61: ...r automatically choose whether to pass the input resolution to the output or to scale it depending on the capabilities reported by the EDID of the sink device The AMS Interface Mode Description Keep Aspect Ratio The output aspect ratio is the same as the source input Full Screen Scales the video source to fill the entire screen 16 9 The output is displayed as 16 9 which is the common HDTV format 1...

Page 62: ...7 streams It must be disabled to receive OmniStream pass through audio streams Mute This feature only applies to PCM audio For compressed audio signals this option is ignored Click this toggle switch to enable or disable audio muting Volume This feature only applies to PCM audio For compressed audio signals this option is ignored Click the speaker icon on the left to reduce the output volume Click...

Page 63: ...he AMS Interface Serial page The Serial page provides serial port configuration when using control signals Name The name used by AMS to identify the serial port Supported Modes Lists the supported protocols Serial Port ...

Page 64: ... the desired control mode Currently only cli command line interface is supported Command Each of these The Command blocks are used to enter the command string for the desired operation Display Off Display On Volume Down and Volume Up The AMS Interface Interpret on Click this drop down list to select where the command will be interpreted ASCII Enter the ASCII representation of the command string in...

Page 65: ...name for the logo in this field Choose File Click this button to select the logo file to be uploaded Files must be in png format and must not exceed 5 MB 5210000 bytes in size When an image file is uploaded it will appear in the Logo drop down list UPLOAD Click this button to upload the logo file to the AT OMNI 521 New Logo Logo Enabled Click the toggle switch to enable or disable the logo If the ...

Page 66: ...s are uploaded then this will be set to Not Used Aspect Ratio Click this drop down list to select the type of aspect ratio to be applied to the logo Horizontal Enter the horizontal position of the logo on the screen Vertical Enter the vertical position of the logo on the screen Height Enter the horizontal resolution of the logo in pixels Width Enter the vertical resolution of the logo in pixels ...

Page 67: ...ble or disable the text When the toggle switch is green the text will be enabled Text Enter the desired text in this field Scroll Speed Enter the scrolling speed in this field Values from 255 to 255 are valid Negative numbers will scroll the text from left to right Positive numbers will scroll text from right to left Iterations Enter the number of iterations in the Iteration field Set this field t...

Page 68: ...55 is opaque and a value of 0 is transparent Numbers from 0 to 255 are valid for each of these fields Horizontal Vertical Specify the location of the text in the Horizontal and Vertical fields Each of these values is based on the horizontal and vertical resolution of the screen Width Height Specify the size of the text in the Width and Height fields Each of these values is based on the horizontal ...

Page 69: ...AT OMNI 521 69 The AMS Interface Alarms page The Alarms page lists any alarms that may have been triggered When OmniStream is functioning normally this page will be blank as shown below ...

Page 70: ...be red if no link exists DHCP Mode Click this drop down list to select the desired network mode Select DHCP to let the DHCP server if present assign the decoder the IP settings Subnet and Gateway fields will automatically be populated When Static mode is selected the information for the IP Address Subnet and Gateway fields must be entered IP Address Displays the IP address used by the channel This...

Page 71: ... Ethernet channel Telnet Authentication Click this toggle switch to enable or disable Telnet authentication If the toggle switch is green then login credentials will be required at the start of a Telnet session SAVE Click this button to commit all changes to this page ...

Page 72: ...s field Valid entries are 0 through 127 Priority 1 Enter the priority number in this field Priority 2 Enter the priority number in this field Is GM Present This indicator displays the existence of a grandmaster clock for the specified PTP domain number If the indicator is green then the grandmaster clock exists on this interface GM Identity The grandmaster clock identity If this field is blank the...

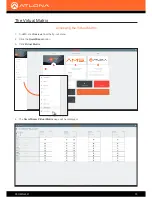
Page 73: ... 521 73 1 In AMS click Devices from the fly out menu 2 Click the OmniStream option 3 Click Virtual Matrix 4 The OmniStream Virtual Matrix page will be displayed The Virtual Matrix Accessing the Virtual Matrix ...

Page 74: ...yed on HDMI 1 on the decoder This will create a cross connection which connects both the encoder and decoder together Creating a cross connection To route an input on an encoder to an output locate the row and column where an input and output intersect then click the square with the dots around it Removing a cross connection To remove a cross connection click on the desired circle icon with the ch...

Page 75: ...h two arrows and three dots which is used for control is not being displayed as a dark blue circle with the letter D This is because the data stream is not currently being used For example if RS 232 were being transmitted then the data icon would be displayed The icons in the upper left corner can also act as a filter This allows for a clear breakdown of where signals are being routed and is usefu...

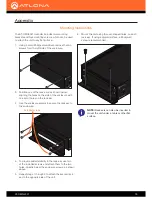
Page 76: ...ck ear to the enclosure 4 To provide added stability to the rack ear use two of the included screws and attach them to the two holes directly below the enclosure screws as shown above 5 Repeat steps 1 through 4 to attach the second rack ear to the opposite side of the unit 6 Mount the unit using the oval shaped holes on each rack ear If using a drywall surface a 6 drywall screw is recommended TM O...

Page 77: ...venient 1U rack tray The OmniStream rack tray can be purchased directly from Atlona 1 Position the OmniStream products as shown in the illustration below 2 Using the included screws secure each unit to the rack with a Philips screwdriver 3 Install the entire assembly into an empty 1U slot in the rack TM OMNISTREAM LINK PWR R TYPE ID TM OMNISTREAM LINK PWR R TYPE ID NOTE OmniStream units can be mou...

Page 78: ...cols Audio Video Streaming RTP Audio Transport AES67 Addressing DHCP static Decryption AES 128 Management HTTPS SSH SCP and WebSockets with TLS Graphics Features Text Insertion Adjustable height width scrolling speed direction or static iterations up to infinite positioning and adjustable color and alpha transparency channels Slate Logo Insertion PNG file format adjustable aspect ratio keep or str...

Page 79: ...Weight 1 5 lbs 0 7 kg Safety CE RoHS FCC Indicators and controls PWR 1 LED tricolor red amber green LINK 1 LED bicolor red green ID 1 momentary tact type backlit blue sends an identification broadcast message over the network to any listening devices Reboot 1 Momentary tact type Connectors HDMI 1 Type A 19 pin female locking ETHERNET 1 RJ45 10 100 1000 Mbps RS 232 IR 1 Euroblock 6 pin 2 ports RS 2...

Page 80: ... registered trademarks of Atlona Inc All other brand names and trademarks or registered trademarks are the property of their respective owners Pricing specifications and availability subject to change without notice Actual products product images and online product images may vary from images shown here ...

Reviews: