background image

Armadillo-J


Startup Guide ver.2.03


7.   Troubleshooting 


7.1.   Unable to boot the Armadillo-J   


Check to see that the power LED lights on.  If it doesn’t, make sure that the power cable is properly 
connected. 


7.2.   Unable find a Armadillo-J from Armadillo-J Configuration Tool 


Make sure that LANLinkLED lights on.    If it doesn’t, properly connect a LAN cable. 


Make sure that a router is not present between the PC using Armadillo-J Configuration Tool and the target 
Armadillo-J.    If a router is present between them, the Armadillo-J cannot be discovered. 


7.3.   Unable to configure Serial/GPIO with Armadillo-J Configuration Tool 


The Armadillo-J firmware may be an old version. 
Following the User’s Guide, Chapter 5 “Rewriting the Flash Memory”, replace the firmware with that 
contained in the supplied CD (image/recover.img). 


7.4.  IP address becomes 0.0.0.0 when DHCP is used with Armadillo-J 

Configuration Tool 


Make sure that a DHCP server is present within your network. 


There are cases when the IP address might be displayed as 0.0.0.0 during the time between choosing 
DHCP and the acquisition of an IP address.  Once around 10 seconds have passed after making the 
changes, try a search once more. 


7.5.   Unable to use serial communication function 


Make sure that the IP address of the Armadillo-J is correctly specified. 


Make sure that the port number of 21347 is correctly specified. 


Following the Hardware Manual, Chapter 5 “Interface Specifications”, make sure that all jumpers are 
properly set. 


Following section 

5.1. “Setting Serial Communication”

, make sure that serial communication settings are the 

same with those for the connected device. 


7.6.   Unable to monitor or set GPIO state 


Make sure that the IP address of the Armadillo-J is correctly specified. 


Following section 

6.1 “Setting GPIO”

, make sure that each port mode is properly set. 


7.7.   Unable to receive GPIO state change notification 


Following section 

6.1 “Setting GPIO”

, make sure that the port mode is set to “input”. 


Following section 

6.1 “Setting GPIO”

, make sure that trap time is set to a value other than “0”. 


Following section 

6.1 “Setting GPIO”

, make sure that manager IP address is properly set. 


16 


Summary of Contents for Armadillo-J

Page 1: ...AJ010 Startup Guide Version 2 03 December 20 2004 Atmark Techno Inc http www atmark techno com Armadillo Official Site http armadillo atmark techno com ...

Page 2: ...figuration Tool 7 5 Serial Communication 8 5 1 Configuring Serial Communication 9 5 2 Serial Communication Example 10 6 Controlling GPIO 12 6 1 Configuring GPIO 13 6 2 Example of GPIO Utilization 15 7 Troubleshooting 16 7 1 Unable to boot the Armadillo J 16 7 2 Unable find a Armadillo J from Armadillo J Configuration Tool 16 7 3 Unable to configure Serial GPIO with Armadillo J Configuration Tool 1...

Page 3: ...r Searching 7 Figure 4 3 Network Configuration Dialog 7 Figure 5 1 Image of Serial Communication 8 Figure 5 2 Serial Settings Dialog 9 Figure 5 3 Connection Description Screen 10 Figure 5 4 Connection Configuration 11 Figure 5 5 Serial Communication Example 11 Figure 6 1 Obtaining status of sensor input port 12 Figure 6 2 Setting the Output of a buzzer output port 12 Figure 6 3 State change notifi...

Page 4: ...rmadillo J has the following features Easily Configurable from Windows With the Windows compatible Armadillo J Configuration Tools you can easily configure the network serial communication and general purpose I O GPIO Serial Ethernet Conversion The Armadillo J allows the user to control serial devices via Ethernet and bridge serial devices to one another via Ethernet from a PC Remote Monitoring Co...

Page 5: ...ral circuits are supplied with power be sure not to connect or disconnect a GPIO connector Static Electricity Armadillo J incorporates CMOS devices Until the product is used store it safely in the provided antistatic package Latch up Due to excessive noise or surge from the power supply or I Os or rapid voltage fluctuations the CMOS devices incorporated in the product can cause a latch up Once lat...

Page 6: ...ernet is supported Note The Armadillo J LAN connector is somewhat deep compared to other generic products We therefore recommend the use of a long nailed LAN cable MAC Address Jumper Pins For detailed information on jumper pin setting refer to Chapter 5 Interface Specifications in the Hardware Manual Serial Connector A connector used to connect a serial cable Power Connector A connector used to co...

Page 7: ...e Dependent on the type of devices connecting to the Armadillo J a cross cable or straight cable is used For PC connection a cross cable is used LAN Cable Category 5 or higher straight cable AC Adapter 8 48V or PoE Power Over Ethernet compatible HUB 3 3 Setting the Armadillo J in its Case Set the Armadillo J in its case and fit it with the supplied screws as shown in Figure 3 2 Cover Armadillo J S...

Page 8: ...restart When the Armadillo J is powered on the power LED lights and it automatically starts its boot process When the boot process is completed the status LED turns on It takes approximately five seconds from power on to the completion of the boot process 3 6 Shutting down the Armadillo J Disconnecting the AC adapter causes the Armadillo J to shut down if PoE is being used disconnecting the LAN ca...

Page 9: ...he copied file 4 2 Searching for the Armadillo J Click the Search button on Armadillo J Configuration Tool to start searching for the Armadillo J Discoverable Armadillo Js are limited to those within the area where broadcast packets sent from the PC using Armadillo J Configuration Tool can reach Normally broadcast packets do not reach the area exceeding a router When Armadillo J Configuration Tool...

Page 10: ...e time is required to complete the changes to the settings after the OK button is clicked Be careful not to power off the Armadillo J before it has completed as the settings may not be saved Note2 If DHCP is selected the previous IP address of the Armadillo J will still be displayed This is because the assignment of the new IP address by the DHCP server has not yet been performed Wait for approxim...

Page 11: ...Conversion IP Packet Serial Data PC etc Modem etc Figure 5 1 Image of Serial Communication By preparing two Armadillo Js you can bridge two serial control devices over Ethernet or create a network communication program to control a remote device automatically When creating a program specify port number 21347 on the Armadillo J end Note1 When utilizing serial communication make sure that jumper pin...

Page 12: ...on settings are to be changed Connection Method This refers to the connection with the Armadillo J The following three types of connection methods are available 1 TCPSERVER This is a connection oriented communication method being always in standby mode Once a connection is established it will not accept other connection requests until disconnected Furthermore if the Connect IP address is specified...

Page 13: ...e Armadillo J refer to the mibs armadillo J mib file contained in the supplied CD 5 2 Serial Communication Example This section describes an example of issuing an AT command to a modem connected serially to the Armadillo J utilizing Hyper Terminal which is included in Windows as standard As sccording to Section 5 1 Setting Serial Communication set connection type to TCPSERVER and the various seria...

Page 14: ...igure 5 4 Connection Configuration The connection will be initiated and the cursor will begin to blink in the upper left of the window The modem will now respond to any commands that are entered Figure 5 5 Serial Communication Example 11 ...

Page 15: ... J PC etc Figure 6 1 Obtaining status of sensor input port GPIO LAN Buzzer ON OFF Output config Buzzer Armadillo J PC etc Figure 6 2 Setting the Output of a buzzer output port GPIO LAN Monitoring Sensor status Status change notification Sensor Armadillo J PC etc Figure 6 3 State change notification of a sensor input port Note1 When GPIO is used make sure that jumper pin s are properly set accordin...

Page 16: ...hen press the Set button The following describes each parameter in the GPIO Setting dialog IP Address This field is used to specify the IP address of the Armadillo J whose GPIO settings are to be changed Manager IP Address This field is used to the specify IP address of the device which is notified of the state change of the GPIO input port Notification of state transition is made with SNMP traps ...

Page 17: ...rted Initial This field is used to specify the initial state of each GPIO port when the Armadillo J is started However if GPIO mode at startup is not set to output the setting value will have no effect It also should be noted that the current GPIO state is not changed The initial state of GPIO is retained even when the Armadillo J is restarted The default setting is LOW Trap Time This field is use...

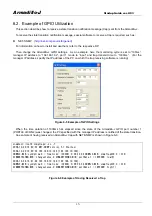
Page 18: ...are is running Figure 6 5 Example of GPIO Settings When the time duration of 1000ms has elapsed since the state of the Armadillo J GPIO port number 1 PORTA0 of CON2 was changed the PC specified with the manager IP address is notified of the state transition An example of having received an Armadillo J trap with NET SNMP is shown in Figure 6 6 snmphost root snmptrapd L o f 2004 12 20 14 40 52 NET S...

Page 19: ...ses when the IP address might be displayed as 0 0 0 0 during the time between choosing DHCP and the acquisition of an IP address Once around 10 seconds have passed after making the changes try a search once more 7 5 Unable to use serial communication function Make sure that the IP address of the Armadillo J is correctly specified Make sure that the port number of 21347 is correctly specified Follo...

Page 20: ...lo J are shown in Table A 1 Table A 0 1 Armadillo J SNMP Specifications Port Number for Agent 161 Trap Version SNMP v2c Destination Port Number for Trap 162 Trap Transmit MIB Data armadillo j parallel portTable portEntry portData 1 5 MIB Definition File Contained in the development kit CD mibs armadillo j mib 17 ...

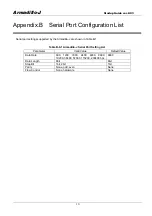
Page 21: ... the Armadillo J are shown in Table B 1 Table B 0 1 Armadillo J Serial Port Setting List Parameter Valid Value Default Value Data Rate 600 1200 1800 2400 4800 9600 19200 38400 57600 115200 230400 bps 9600 Data Length 8bit 8bit Stop Bit 1bit 2bit 1bit Parity None odd even None Flow Control None hardware None 18 ...

Page 22: ...Armadillo J Startup Guide ver 2 03 19 ...

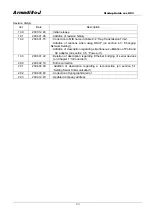
Page 23: ... Changing Network Setting Addition of description regarding simultaneous utilization of PoE and AC adapter on section 3 5 Power on 1 03 2004 01 22 Deletion of description regarding Ethernet bridging of serial devices on Chapter 1 Introduction 2 00 2004 02 19 Entire correction 2 01 2004 04 09 Addition of description regarding a reconnection on section 5 1 Setting Serial Communication 2 02 2004 09 0...

Page 24: ...Armadillo J AJ010 Startup Guide December 20 2004 ver 2 03 Atmark Techno Inc AFT Building 6F North 5 East 2 Chuo ku Sapporo Hokkaido 060 0035 TEL 011 207 6550 FAX 011 207 6570 ...

Reviews: