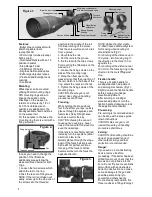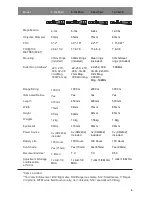
Features:
• Bullet drop compensator with
interchangeable cams
(except 5x33L)
• 30mm rings included (except
5x33 series)
• Illuminated Reticle with an 12
position rheostat
• Step Range Finder
• 1/8 MOA at 100 Yards
• All glass multi-coated optics
• Extra large objective lenses
• Prosheild and Everlight Lens
coatings
• Sun shade
Mounting:
Riflescopes can be mounted
utilizing 30mm mounting rings.
ATN mounting rings allow to
change the position of the
riflescope on the weapon in
relation to a shooter by 1/3 of
inch. Thus obtained, such
positions are additional to the
already available fixed positions
on the weaver rail.
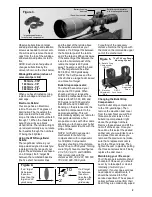
For this purpose in the base of a
mounting ring there is a rail with a
fixing projection.
In case you need to change the
position of the riflescope
additionally please follow the
steps mentioned below for both
rings:
1. Loosen the two screws, which
attach the rail to the ring.
2. Take the rail out of the groove.
NOTE: If the rail is not taken out
easily screw up to the stop one of
the screws into the threaded
aperture in the middle of the rail.
Continue rotating of the screw.
Thus the screw will push out a rail
from a groove.
3. About-face the rail.
4. Put the rail into the groove.
5. Fix the rail with the two screws.
For mounting the riflescope on the
weaver rail:
1. Loosen the fixing screws on the
sides of the mounting rings.
2. Place the riflescope on the
weaver rail so that the projection of
the rail, which is in the base of the
ring, enters the recess in the rail.
3. Tighten the fixing screws of the
mounting rings.
CAUTION: Be sure gun is not
loaded. Use safe gun handling
procedures at all times.
Focusing:
While holding the scope about
four inches from your eye, quickly
glance through the eyepiece at a
featureless, flatly lit bright area
such as a wall or the sky.
CAUTION: Viewing the sun can
cause serious eye injury, never
look at the sun with this product or
even the naked eye.
If the reticle is not sharply defined
instantly, turn the eyepiece (either
direction) a few turns.
Quickly glance through the scope
again. If the focus has improved,
but is still not perfect, continue
focusing. If the focus condition
become worse turn the focus the
opposite direction.
NOTE: Unlike the other sights,
12-36x80 have additional system
for focusing when shooting at
small distance (Fig.3).
For shooting at the distance up to
100 yards - turn focusing ring in
the direction to the mark 100 m
against stop.
For shooting at the distance over
100 m turn the focusing ring in the
direction to the mark
∞
against
stop.
Fixation handle:
There is a fixation handle for
windage/elevation adjustment
and zeroing mechanism (Fig.1).
Slightly loosen the fixation handle
before zeroing or windage/
elevation adjustment .
After zeroimg or windage/
elevation adjustment turn the
fixation handle clockwise, to lock
the adjustment mechanism.
Pre-zeroing:
Pre-zeroing is recommended and
can be done with a scope guide
orown instructions.
CAUTION: Be sure gun is not
loaded. Use safe gun handling
procedures at all times.
Zeroing:
CAUTION: All shooting should be
done at an approved range or
other safe area. Eye and ear
protection is recommended.
Danger:
If you used a o bore-obstructing
device, remove it before
proceeding. If the barrel has-been
drilled for a mount, check that the
screws do not protrude into the
bore. Do not fire live or even blank
ammunition with an obstructed
barrel. An obstruction can cause
serious damage to the gun and
possible personal injury to
yourself and others nearby.
From a steady rest position, fire
three rounds at a 100 yard target.
Figure 1.
Elevation dust cap
Mounting rings
12 position rheostat
Magnification
adjustment
Eyepiece
adjustment
1
Figure 3.
Windage dust cap
Fixation handle
Bullet drop compensator
with interchangeable cams
Fixing
screw
Draw-screws
Special tool for
draw-screws
Figure 2.
Rail
Fixing projection
Threaded aperture
Battery housing
dust cap
Summary of Contents for 12-36x80
Page 1: ......

