5
WARNINGS AND
CAUTIONS
• Always remember to turn off the Aries scope
when it is not in use. If you do not plan on
using your aries scope for a period of more
than 10 days, you should remove the batter-
ies.
• Keep lens cap/daylight filter on when not in
use.
• Avoid contact with dust, steam, and gas.
• The Aries scope are not harmful to the user or
the environment.
• Do not disassemble except to clean the front
lens and the eyepiece:
it will void your war-
ranty.
• Evaluate the scopes function by looking
through it in a lit environment with the day-
light filter lens cap on. Never use in daylight
without the daylight filter lens cap on. Do not
surpass ten minutes of testing.
• Never point the Aries scope at a bright light
source. If the scope shuts off automatically
after directing it at a bright light source, turn
the unit off and wait 1 - 2 minutes before turn-
ing the unit back on.
• Adverse atmospheric conditions such as fog,
smog, or haze and a lack of ambient light
(moon or starlight) may diminish the effec-
tive viewing distance. All technical data for
this unit was compiled in a controlled envi-
ronment.
TROUBLESHOOTING
Q:
Flashes, flickers, or clicking occur while
operating
S:
If it occurs within the first five minutes
of inserting new batteries, it is normal and
the device will resume normal operation soon
thereafter. If it occurs for more than 10 minutes,
contact your dealer or other authorized service
representative for service instructions.
Q:
Dark spots on screen.
S:
This may be dust on the lens, please clean
according to instrutions. They may also be Cos-
metic blemishes in the intensifier tube which
are a by-product of the manufacturing process.
This is normal and will not affect the life or per-
formance of the unit.
Q:
Image not clear.
S:
Adjust focus ring. If problem persists,
increase viewing distance
Q:
Fixed-pattern noise in a honeycomb shape.
S:
Usually a cosmetic blemish characterized by
a faint honeycomb-type pattern. This usually
occurs when viewing very bright lights. Adjust
the potentiometer, to reduce brightness.
Q:
A pattern of dark thin lines which look like
chicken wire.
S:
Turn on illuminator, if purchased. If illumi-
nator doesn’t brighten image, replace batter-
ies. If problem persists, contact ATN for serv-
ice instructions.
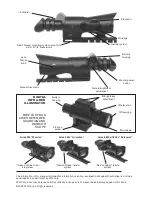
The vertical and horizontal adjust-
ments for the Aries can be achieved
by turning the elevation and windage
adjustment mechanisms (remove dust
caps first). Each click equals 1/8 inch at
100 yards for the 350 and 6800/7800.
1/4 inch for the 330. When reaching
the maximum range of rotation do not
use force.
Windage
Elevation
Aries 350c/6800c/7800c
Windage
Elevation
Aries 330
WINDAGE AND ELEVATION
You may need to clean the eyepiece of the rif-
lescope from time to time in order to guarantee
top performance. When you receive your rifle-
scope you should check for dust on the eye-
piece of the unit.
First you will need to remove the eyepiece.
To do that you will need to initially loosen the
2 set screws that can be found on the base.
Then unscrew the eyepiece counter-clockwise
to remove it.
NOTE:
You do not have to remove the set screws
completely, they are very small and easy to mis-
place.
CAUTION:
Use only Photographic lens clean-
ing tissue on these surfaces. Be careful not to
scratch or smudge any of these surfaces.
When using compressed air to blow dust away,
make sure to avoid inverting the can while
spraying. This can cause frozen propellant
to exit the can, which can cause serious prob-
lems with the glass and phosphor screen.
CLEANING THE EYEPIECE

