3
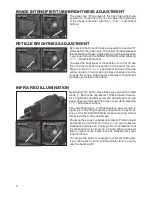
IMAGE INTENSIFIER TUBE BRIGHTNESS ADJUSTMENT
The green led “B” represents the light intensifier tube
power ratio. Once this is lit you can adjust the brightness
of the image intensifier with the “+” and “-” adjustment
buttons.
INFRA-RED ILLUMINATION
By pressing “SL” button three times you can switch to Red
diode “I”. Red diode represents 100M infra-red illumina-
tor’s brightness adjustment mode. Adjustments can be
easily observed through the Aries scope while pressing
”+” /” -” adjustment buttons.
Infra-red illuminators, or IR illuminators, are common to
night vision. The IR light greatly enhances to the perform-
ance of the NVSG1/NVSG2IA while remaining almost
totally invisible to the unaided eye.
Power up the scope in a dark environment. Find an object
and examine it with IR off, then on. You could observe
illumination difference. It is important to remember that
the IR illuminator is simply an infra-red light source and
like any light source it may loose its effectiveness over
long distances.
To change the field of coverage from the IR illuminator,
focus the beam by turning IR illuminator lens to slightly
alter the beam width.
RETICLE BRIGHTNESS ADJUSTMENT
By pressing the SL button twice you switch to a yellow “R”
diode next to the green one. The yellow diode represents
the reticle’s brightness. Adjustments could be easily seen
if you look through the NVSG1/NVSG2IA while pressing
“ +” /” -” adjustment buttons.
To adjust the brightness of the reticle or to turn it off use
the control box buttons located on the side of the unit.
Press and hold “+“ or ”-” adjustment buttons while the
yellow diode is on and see brightness changes looking
through the scope. After appropriate level of brightness
has been set release the button.
Green LED “B”
Red LED “I”
Green LED “B”
Red LED “I”
Green LED “B”
Green LED “B”
Yellow LED “R”
Yellow LED “R”
Yellow LED “R”
Yellow LED “R”
Red LED “I”
Red LED “I”
NVSG2IA
NVSG1
NVSG2IA
NVSG1
NVSG2IA
NVSG1


