background image

3

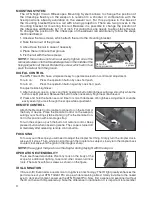
mounTIng sysTEm

The ATN Night Vision Riflescopes Mounting System allows to change the position of 

the riflescope flexibly on the weapon in relation to a shooter in combination with the 

fixed  positions  already  available  on  the  weaver  rail.  For  this  purpose  in  the  base  of 

the mounting bracket there is a rail with a fixing projection. There are two grooves in the 

mounting bracket for mounting this rail. Besides it is possible to change the position of 

the riflescope additionally by 1/3 of inch. For doing this one needs to about-face the rail.  

To change the position of the riflescope on the weaver rail additionally follow the steps 

mentioned below:
1. Unscrew the two screws, which attach the rail to the mounting bracket.
2. Take the rail out of the groove.
3. About-face the rail in case of necessity.
4. Place the rail into another groove.
5. Fix the rail with the two screws.

NOTE:

 If the rail does not come out easily, tighten one of the 

removed screws into the threaded aperture in the middle of the 

fixing projection of the rail. Rotate this screw, which will in turn 

push the rail out from the groove.

dIgITAl conTRol

The 

ATN Trident Pro

 has a simple and easy to operate one-button control and adjustment.

To turn on: 

Press the operation button by one short push

To turn off: 

Press the operation button again by one short  push

To adjust reticle brightness:
1) After turning scope on, press and hold operation button. Brightness will grow smoothly while the 

button is kept pressed. Release the button when necessary brightness is achieved.

2) Press and hold the button second time for smooth decrease of brightness. Adjustment could be 

easily seen if you look through the scope while adjustment. 

REmoTE conTRol

Attach the Remote Control cable to connector on the bottom of 

the body of device. Place the Remote Control on the weapon, 

suiting your shooting style best and grip. Fix the Remote Con-

trol in this position with a montage strap. 
To turn the scope on push the button of remote control. Keep 

pressed button when observing scene. The scope is turned off 

immediately after releasing remote control button.

FocusIng

To focus your riflescope you will need to adjust the diopter first thing. Simply turn the diopter clock-

wise until it stops. Then, while looking through the diopter at a subject, slowly turn the diopter back 

counter clockwise until the grain in the image is sharp.

NOTE:

 We suggest that you focus the diopter during daylight with the cap on.

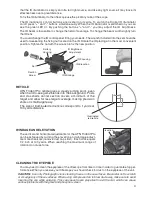
opERATIon ExTEndIbIlITy

There are three detachable Picatinny rails on the body of the 

scope for additional lighting, laser and other mission critical 

tools. The rails fix with two screws as shown on the figure.

IR IllumInATIon

Infra-red (IR) Illuminators are common for night vision technology. The IR light greatly enhances the 

performance of your 

ATN Trident Pro

 scope, while remaining almost totally invisible to the naked 

eye. In  dark environment, power up the 

ATN Trident Pro

. Now, find a scene and examine it without 

the IR on then with IR powered up. Note the difference in illumination. It is important to remember 

Grooves

Rail with a  

fixing projection

Screws

Mounting 

system

Summary of Contents for Trident Pro Series

Page 1: ...nlawful and strictly prohibited to export or attempt to export or otherwise transfer or sell any hardware or technical data or furnish any service to any foreign person whether abroad or in the United States for which a license or written ap proval of the U S Government is required without first obtaining the required license or written approval from the Department of the U S Government having jur...

Page 2: ...Operating button F1 1 2 lens Elevation Windage 5 Diopter Battery housing Back up iron sights Mounting system Picatinny rails Lens cap LIGHT AND COMPACT DESIGN TOP NOTCH PERFORMANCE WITH PRO ORIENTED DESIGN ALL EXTERNAL SURFACES ARE A NON REFLECTIVE MATTE BLACK FINISH EXCEPT FOR THE OPTICAL ELEMENTS BACK UP IRON SIGHTS RED ON GREEN RETICLE SYSTEM WITH 1 2 MOA ADJUSTMENT ILLUMINATED CENTER RED RETIC...

Page 3: ...ability of the scope to see in total darkness with the aid of the IR illuminator OPERATING MOUNTING 1 Slightly loosen the fixing screws on the 7 8 weaver mount built into the scope 2 Place the scope on the weaver rail of the fire arm 3 Tighten the fixing screws NOTE Fixing screws may need to be tightened after continuous shooting Battery installation ATN reserves the right to change the above spec...

Page 4: ... is kept pressed Release the button when necessary brightness is achieved 2 Press and hold the button second time for smooth decrease of brightness Adjustment could be easily seen if you look through the scope while adjustment REmote control Attach the Remote Control cable to connector on the bottom of the body of device Place the Remote Control on the weapon suiting your shooting style best and g...

Page 5: ... width slightly turn the IR lens You could change the IR control panel fitting your needs The wrench included into the set should be used for weakening the fixing nut located on the IR Rotate the IR placing at in the most convenient position Tighten the nut with the wrench to fix the new position WINDAGE AND ELEVATION The vertical and horizontal adjustments for the ATN Trident Pro can be achieved ...

Page 6: ...you use the rubber eyecaps for a long period of time you may suffer skin inflammation If you develop any symptoms consult a doctor immediately TROUBLEsHOOTING Q Flashes flickers or clicking occur while operating S If it occurs within the first five minutes of inserting new batteries it is normal and the device will resume normal operation soon thereafter If it occurs for more than 10 minutes conta...

Page 7: ...d and services performed by ATN to the Customer shall not be interpreted construed or regarded either expressly or implied as being for the benefit of or creating any obligation toward any third party of legal entity outside ATN and the Customer ATN s obligations under this Agreement extend solely to the Cus tomer ATN s liability hereunder for damages regardless of the form or action shall not exc...

Page 8: ...an Mateo Avenue South San Francisco CA 94080 phone 800 910 2862 650 989 5100 fax 650 875 0129 European Office phone 44 0 870 0111286 fax 44 0 845 3349142 The following countries can use our toll free number 00 800 9102 8620 Austria France Germany Holland Italy Spain Sweden Switzerland www atncorp com 2009 ATN Corporation ...

Reviews: