background image


4.


After moving the unit, place the unit for 30 minutes before switching it on. 
Running: close the door and connect the power, turn on the lamp switch on the control panel, the 
lamp  is  on.  Half  an  hour  later,  the  temperature  inside  the  case  lower  apparently,  it  indicates  the 
unit on be normally used 

5.


After connecting the power, the unit should be kept empty for one hour. 

--Setting and adjustment of temperature 

1.


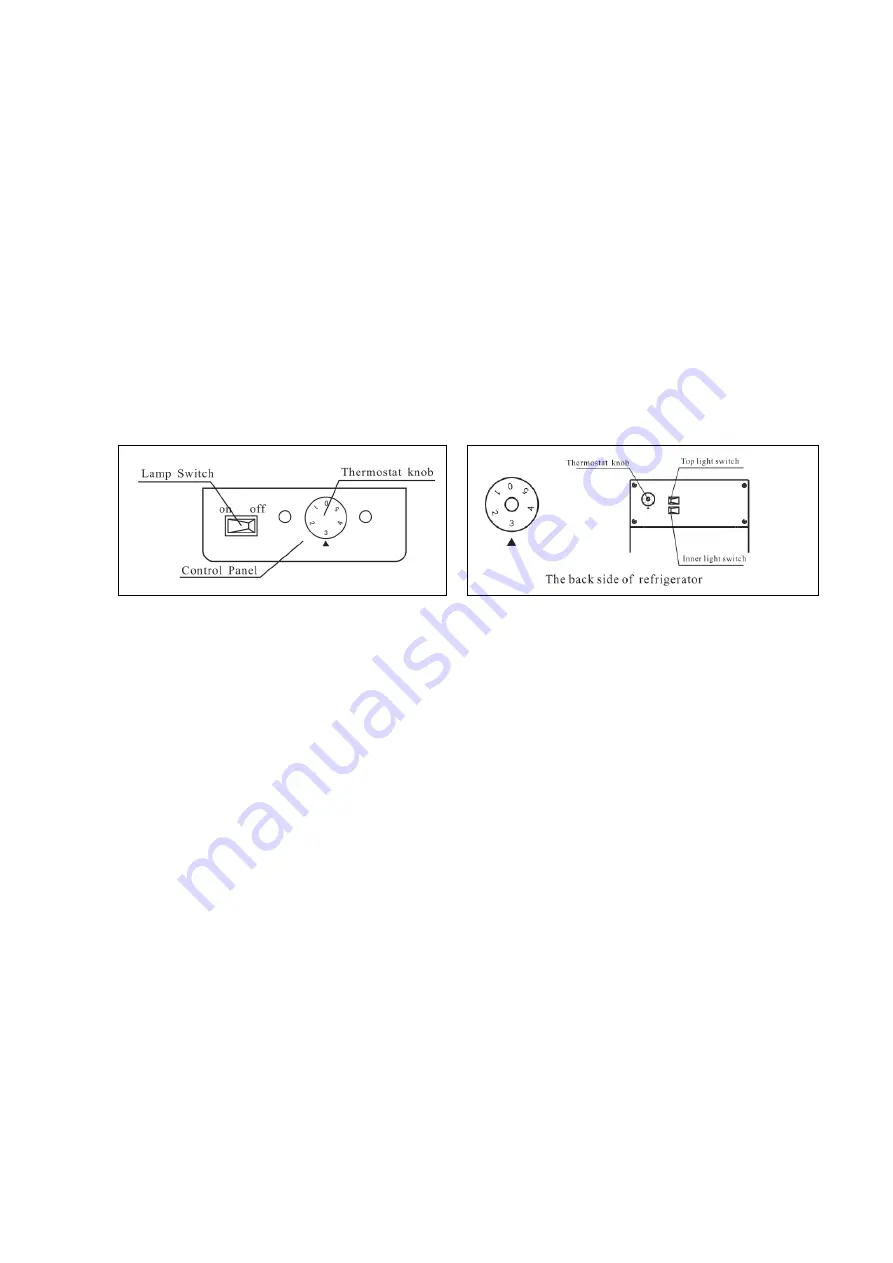
Adjust the  storage temperature  through  the  temperature  controller  located  in the  internal of  the 
case(see  the  picture),adjust  the  temperature  according  to  the  ambient  temperature  and  the 
foodstuff. 

2.


See  the  following  picture  about  the  knob  scale.  The  temperature  adjustable  capacity  is  from 
“1”-“5”,adjust the storage temperature by turning the temperature controller clockwise. The higher 
of the number shows the lower of the storage temperature. The knob can turn freely but can’t turn 
clockwise from “5”-“1”.    Factory setting position is on “3” 


3.


Check if the scale is on an appropriate position before using, summer, the ambient temperature 
is high, anti-clockwise turn the knob to “2”, while in winter, the ambient temperature is 
low, clockwise turn the knob to “4”. 

4.


Position “0” represent stop running. 


--Storage of articles 

1) Do not put large amount of articles into the unit at one time, you should leave some space around 

the foodstuff to let cold air inside the cabinet counter to flow. Keep bottled articles away from the 
walls of interior cabinet so as not to freeze it until broken. 

2) Do not put warm food into the unit directly until they are cooled under normal temperature, it will 

facilitate to lower its energy consumption and prolong service life of the compressor. 

--Maintenance


Disconnect the power supply before maintenance for the machine! 

1) Keep the door gasket clean, remove it from the door and wash it. Dry and seal it as before. Putting 

some talcum powder on the magnetic surface would prolong its service life. 

2)  Bulb  replacement

remove    the  lamp  shade,  take  out  the  bulb,  replace  with  a  new  bulb,  then 

mount it again. 

3)  If  there  is  heavy  frost  on  the  evaporator  after  long  usage,  take  out  the  stuff  inside  the  case, 

disconnect the power, the frost will melt automatically, clean up the water and connect the power 
again. 

4)  Use  a  soft  cloth  and  dip  some  water  or  soap  (Non-caustic,  neutral  detergent  is  also  available)  to 

clean the unit. Dry the unit after cleaning to avoid rust. 


Summary of Contents for CTD-3

Page 1: ...or Counter Top Merchandiser CTD 3 CTD 3S CTD 5 Email warranty atosausa com Toll Free 1 800 683 8660 USA 855 885 6518 Canada Please read this user s manual thoroughly before using Keep this manual handy for further reference ...

Page 2: ... replaced with a compressor or compressor parts of similar design and capacity according to Atosa sdiscretion The four 4 year extended compressor warranty applies only to sealed parts of the compressor and does not apply to any other parts or components This includes the cabinet paint finish temperature control refrigerant metering device motor starting equipment fan assembly and other electrical ...

Page 3: ...E EXCLUSIVE AND IN LIEU OF ALL OTHER WARRANTIES INCLUDING IMPLIED WARRANTY AND MERCHANTABILITY OR FITNESS FOR A PARTICULARPURPOSE THERE ARE NO WARRANTIES WHICH EXTEND BEYOND THE DESCRIPTION ON THE FACE HEREOF Outside U S and Canada This warranty does not apply to areas outside the continent of the United States Atosa is not responsible for any warranty claims made on products sold or used in such ...

Page 4: ...4 Product Information Structural diagram CTD 3 CTD 3S CTD 5 ...

Page 5: ...minutes 9 Do not leave the power cord under any heavy objects including the unit itself 10 Do not drill holes or install other objects on the casing 11 This cooler is not suitable for storage pharmaceutical products Portage and storage 1 Keep the unit vertical when carrying the unit the angle to the horizontal line should not be over 50 otherwise it will damage the compressor and affect normal ope...

Page 6: ...le in winter the ambient temperature is low clockwise turn the knob to 4 4 Position 0 represent stop running Storage of articles 1 Do not put large amount of articles into the unit at one time you should leave some space around the foodstuff to let cold air inside the cabinet counter to flow Keep bottled articles away from the walls of interior cabinet so as not to freeze it until broken 2 Do not ...

Page 7: ...g inside the pipe 2 the top and the two sides of the casing will be warm even too hot 3 In a humidity place there is dew on the casing or the door it can dry by dry cloth Troubleshooting guide Problems Possible cause Ways to solve problems The units does not work Bad connection of plug re connect the plug to power supply Abnormal operation of the compressor or has buzz sound The power voltage is o...

Page 8: ...mperature Too much warm food was put in at one time Take out some food Door open frequently and longtime door opening Decrease number and times of door opening Too high noise The unit is not level Adjust the adjustable foots The fastener of the unit is loose Fasten the loose fastener Pipes are touching the compressor Carefully separate the touching pipes Lamp is not on The lamp is burned out Repla...

Page 9: ...ntrol box 1 5 CTD005 Filter 16 30 1 6 CTD006 Constant current power supply 1 AC85v 265v 15D 7 CTD007 Water receiving plate 1 8 CTD008 Compressor UKN43YA 1 9 CTD009 Power line JT 3 1 10 CTD010 Base foot 4 11 CTD011 Hinge cover 1 12 CTD012 Hinge upper 1 13 CTD013 Led lamp 1 14 CTD014 Evaporimeter 1 15 CTD015 Door seal 1 16 CTD016 Door 1 17 CTD017 Hinge down 1 18 CTD018 Lock 1 19 CTD019 Shelf bottom ...

Page 10: ...r UKN60YA 1 5 CTD005 Filter 16 30 1 6 CTD023 Led lamp 1 7 CTD006 Constant current power supply 1 AC85v 265v 15D 8 CTD010 Base foot 4 9 CTD024 Condenser 1 10 CTD002 Thermostat WP1 1 11 CTD025 Lamp plate 1 12 CTD026 Lamp 1 13 CTD027 Door seal 1 14 CTD028 Hinge upper 1 15 CTD029 Door 1 16 CTD018 Lock 1 17 CTD030 Hinge down 1 18 CTD031 Shelf 3 19 CTD032 Water receiving plate 1 20 CTD033 Guide 2 ...

Page 11: ... 5 CTD009 Power line JT 3 1 6 CTD035 Water receiving plate 1 7 CTD022 Compressor UKN60YA 1 8 CTD010 Base foot 4 9 CTD002 Thermostat WP1 1 10 CTD003 ON OFF button 1 11 CTD036 Led lamp 1 12 CTD037 Evaporimeter 1 13 CTD038 Fan 1 14 CTD039 Fan cover 1 15 CTD011 Hinge cover 1 16 CTD041 Hinge upper 1 17 CTD042 Door 1 18 CTD043 Hinge down 1 19 CTD018 Lock 1 20 CTD044 Door seal 1 21 CTD045 Shelf bottom 1 ...

Page 12: ...12 Electric Connection Diagram CTD 3 Diagram CTD 3S Diagram CTD 5 Diagram ...

Reviews:

Related manuals for CTD-3