Setting Up Your m320
Positioning Your m320
12
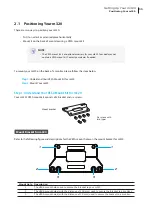
Mount Screws for m320
Screw Type
Number
Description
1
4
The screws used to secure the bracket to your m320 and to a monitor.
2
2
The longer screws used to secure the bracket to a monitor if the screws of type 1
cannot firmly secure the bracket and your m320 to the monitor.
Step 2: Mount Your m320
To mount your m320 on the back of the monitor, please do the following:
1. Place your m320 on a flat surface with the VESA mount hole side upward.
2. With the rear panel of the client facing downward, secure the VESA mount bracket to the client with two (2)
screws supplied.
3. With the bracket side marked with
Atrust
facing downward, align two mount holes on the bracket with two
mount holes on your m320 such that the bracket projects out and is closer to the rear panel than the front
one as shown below, and then secure the bracket to your m320 with two (2) screws of type
1
.
4. Align the bracket holes with the VESA holes on the back of the monitor. Ensure that the rear panel of the
client is facing downward.
5. Secure the VESA mount bracket to the monitor with two (2) screws supplied.
2
1
Summary of Contents for m320
Page 2: ...UM m320 WMS12 EN 14012810...
Page 10: ......
Page 16: ...Overview 8...
Page 18: ......
Page 24: ...Setting Up Your m320 16...
Page 26: ......
Page 36: ......
Page 48: ...40...
Page 49: ...UM m320 WMS12 EN 14012810...
Page 50: ......

