Setting Up Your t180L / t180LB
Positioning Your t180L / t180LB
14
Step 5: Mount Your t180L
To mount your t180L on the back of a monitor, please do the following:
1. Refer to
Step 2
and
Step 4
to prepare required screws for mounting your t180L.
•
You will need two (2) screws of type
2
to secure the bracket to your t180L.
•
You will need two (2) screws of type
1
or
2
to secure the bracket to the monitor.
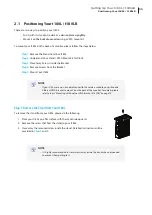
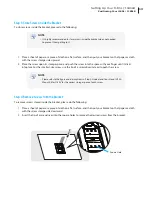
2. Place your t180L on a flat surface with the VESA mount hole side upward.
3. Refer to
Step 2
to choose two of the four VESA mount holes on the bracket to align with two mount holes
on your t180L such that the bracket projects out and is closer to the rear panel than the front one as shown
below, and then secure the bracket to your t180L with two (2) screws of type
2
.
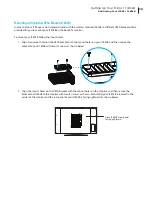
4. Align the mount holes on the bracket with the mount holes on the back of the monitor, and then secure the
bracket to the monitor with two (2) screws of type
2
or
1
. Ensure that your t180L is located in the center
of the monitor and the rear panel of your t180L is facing rightward as shown below.
Have t180L’s rear panel
facing rightward.
Summary of Contents for T180L
Page 2: ...UM t180L LB EN 16050510...
Page 8: ...vi...
Page 12: ......
Page 20: ......
Page 28: ......
Page 48: ......
Page 220: ...Configuring Client Settings 210...
Page 222: ......
Page 230: ...220...
Page 234: ...224...
Page 235: ...UM t180L LB EN 16050510...
Page 236: ......


