background image

5

Подготовка к работе

Установка проигрывателя

• 

Устанавливайте проигрыватель на горизонтальную поверхность.

• 

Звукосниматель воспринимает слабые звуковые колебания и вибрации от акустических 

систем, которые передаются через пол или через воздух, в результате чего может 

возникать паразитная обратная связь, поэтому не устанавливайте проигрыватель рядом с 

громкоговорителями.

• 

Если проигрыватель установлен рядом с радиопередающим устройством, он может быть 

подвержен наводкам радиопомех. Поэтому старайтесь устанавливать проигрыватель вдали 

от радиопередающих устройств.

• 

При приближении к проигрывателю оборудования, генерирующего сильное радиоизлучение 

(мобильный телефон и пр.), в звуковом канале может быть слышен шум.

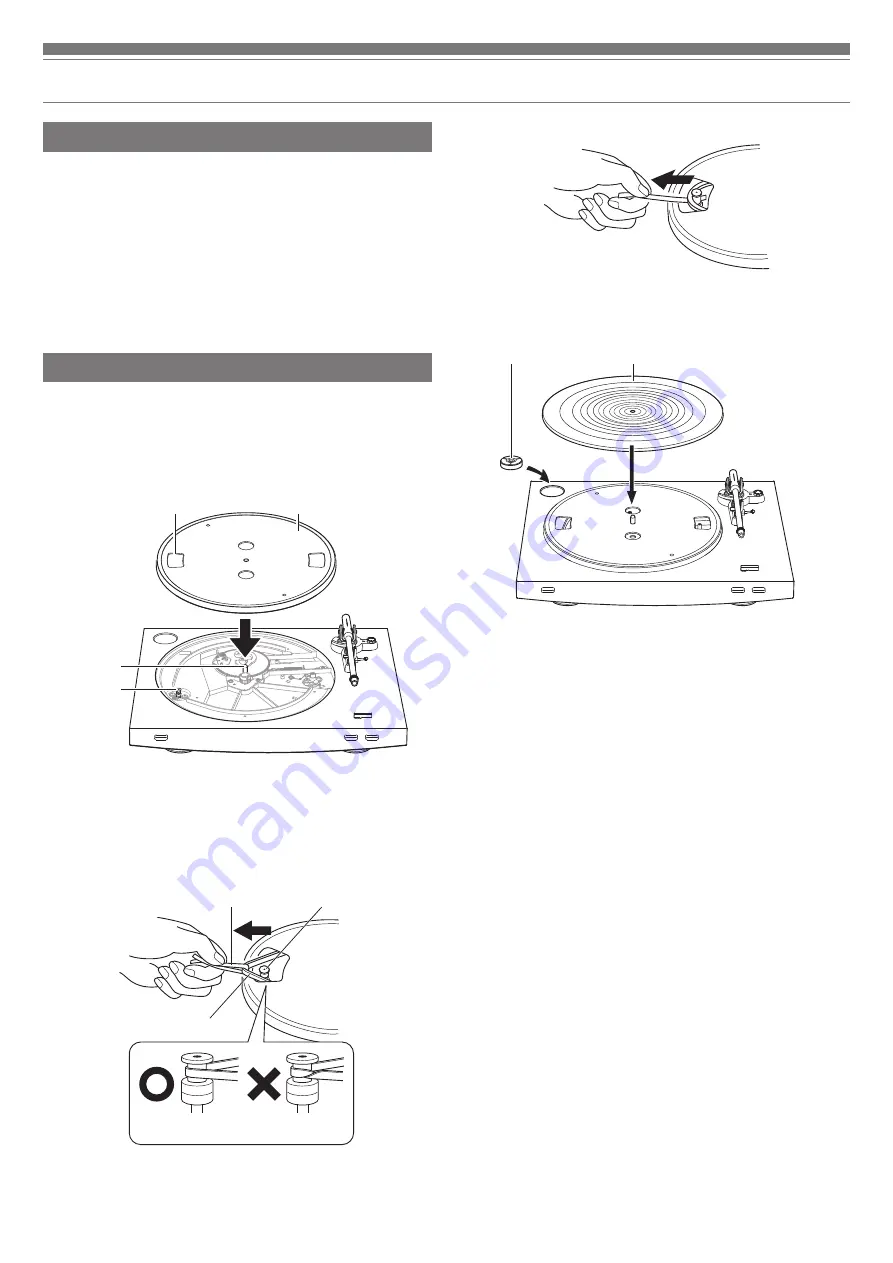
Установка диска и резинового мата

Перед первым использованием нужно подготовить проигрыватель к работе.

Не подключайте шнур питания, пока не будут выполнены все описанные ниже действия.

1.  Установите диск на шпиндель.

• 

Убедитесь, что диск занял нужное положение.

2.  Установите ремень на шкив электродвигателя (цвета латуни).

• 

Выровняйте отверстия в диске со шкивом электродвигателя (цвета латуни), и потянув за концы 
красной ленты, пропущенной через ремень, накиньте его на шкив электродвигателя, как показано 
на рисунке. Следите за тем, чтобы не перекрутить ремень.

Ремень

Шкив электродвигателя 

(цвета латуни)

Красная лента

Прямой

Перекрученный


3.  Вытяните красную ленту.

4.  Установите резиновый мат на диск.

• 

После этого установите адаптер для грампластинок на 45 об/мин на его место в левом дальнем 
углу.

Резиновый мат

Адаптер на 45 об/мин

Диск

Отверстие

Шкив 

электродвигателя 

(цвета латуни)

Шпиндель

Summary of Contents for AT-LP3

Page 1: ...cher riemenbetriebener Plattenspieler D E Manuale dell utente Giradischi con trasmissione a cinghia totalmente AUTOMATICO I T Manual de usuario Tocadiscos de transmisión por correa totalmente automático E S Manual do Usuário Toca discos acionado por correia totalmente automático P T Руководство пользователя Полностью автоматический проигрыватель виниловых пластинок с ре менным приводом R U ...

Page 2: ... live in Country list EU Russia Package contents Make sure that you have all the included items listed below before using this product If some items are missing or damaged contact your local Audio Technica dealer Turntable body Rubber mat Dust cover Platter with drive belt Counterweight Headshell AT HS3 with VM stereo cartridge AT91R Power cable Use the correct power cable for the country you live...

Page 3: ...ug of this apparatus quickly Do not place any objects filled with liquids such as vases on this apparatus To prevent fire do not place any naked flame sources such as lighted candles on this apparatus Do not install this apparatus in a confined space such as a bookcase or similar unit To install this apparatus only in the place where ventilation is good Notes on use Turntable body Do not set and u...

Page 4: ...e tonearm 10 STOP button Returns the tonearm to its original position and stops the platter 11 Dust cover 12 Pre amplifier selector switch If using an amplifier with a PHONO input jack set this switch to the PHONO position If connecting to the AUX jack of an amplifier set this switch to the LINE position 13 MM VM MC cartridge selector switch If using an MM VM cartridge set this switch to the MM po...

Page 5: ...arm rest 5 Anti skate control dial While the record is playing a force acts on the stylus tip to pull it inward This force can be counteracted by setting the same values for anti skate and the tracking force 6 Tonearm lift control lever Operates the tonearm lift 7 Tonearm 8 Locking ring Rotate the ring to the left counterclockwise to secure the headshell To remove the headshell rotate the ring to ...

Page 6: ... power cable until assembly is complete 1 Set the platter on the spindle Make certain that the platter is fully seated on the spindle 2 Place the belt on the motor pulley brass colored Align one of the platter openings with the brass motor pulley and while pulling both ends of the red ribbon that comes attached to the belt place the belt on the motor pulley as per the diagram When doing this be ca...

Page 7: ...g force must be adjusted to fit the specifications of the cartridge If the tonearm s balance and tracking force are not properly adjusted the record or the cartridge s stylus may become damaged Do not drag the cartridge s stylus across the record or rubber mat when adjusting the tonearm s balance or tracking force Doing so may damage the stylus Setting tonearm balance 1 Remove the cartridge s prot...

Page 8: ...ges of the dust cover into the two dust cover hinge holders on the back of the body When removing the dust cover slowly pull the dust cover out from the dust cover hinge holders Setting MM VM MC Cartridge Selector Switch If using a moving magnet MM or VM cartridge set this switch to the MM position If using a moving coil MC cartridge set this switch to the MC position This switch is set to the MM ...

Page 9: ...ing through the product even when it is not being used disconnect the power cable plug from the outlet when not using the product for a long period of time 1 Connect the power cable plug to the outlet For safety raise the tonearm by lifting the tonearm lift control lever to the UP position Connect the power cable plug to the outlet without removing the cartridge s protector If the platter has rota...

Page 10: ... 45 for a 45 RPM record 3 Press the START button Do not bump the product while the record is playing Do not switch the record size selection while the record is playing Doing either of these can cause the product to malfunction Manual operation Lower the volume of the amplifier speakers etc sufficiently 1 Raise the tonearm by lifting the tonearm lift control lever to the UP position Tonearm lift c...

Page 11: ...urntable body When the turntable body is dirty or dusty first disconnect the power cable plug and then wipe off the dirt and dust with a soft dry cloth Do not use benzenes thinners etc When storing the product for a long time disconnect the power cable plug from the outlet and wrap the equipment in plastic do not allow it to become damp Stylus tip If dirt and grime are stuck to the stylus tip clea...

Page 12: ... the overhang on p 12 After the adjustments are complete tighten the screws securely 7 Attach the headshell to the tone arm 8 Adjust the tonearm balance and tracking force Refer to Tonearm balance and tracking force on p 6 to perform the readjustments Replacing the belt The belt is a consumable part Replace the belt if the speed of playback slows down or irregular rotation occurs As a rule of thum...

Page 13: ... with the protector attached to the cartridge and then wrap the entire headshell assembly so that it does not get damaged Wrap the turntable body with paper or a soft cloth so that it does not get damaged Adjusting the overhang The position of the cartridge must be accurately determined adjusting the overhang when mounting a cartridge or headshell other than the one provided 1 Mount the cartridge ...

Page 14: ...ctable equipment is connected to the PHONO input Is the tracking force set too heavy Adjust the tracking force The stylus skips Is the tracking force set too light Adjust the tracking force Is the anti skate set improperly Verify anti skate is set for same value as cartridge tracking force Is the record warped Check the record Is the record scratched Check the record There is howling Is the produc...

Page 15: ...pecifications Cartridge Model AT91R Cartridge Type VM Dual Magnet Recommended load impedance 47 000 ohms Output voltage 3 5 mV mV at 1 kHz 5 cm sec Stylus 0 6 mil bonded conical Cantilever Aluminum pipe Tracking force range 1 5 to 2 5 g standard 2 0 g Cartridge weight 5 0 g Headshell model AT HS3 Headshell weight 11 1 g Headshell overhang adjustment 8 mm General specifications Power supply require...

Page 16: ...tenu de l emballage Assurez vous que tous les articles inclus répertoriés sur la liste ci dessous soient présents avant d utiliser le produit Si certains éléments sont manquants ou endommagés contactez votre distributeur local Audio Technica Corps du plateau de la platine Tapis amortissant en caoutchouc Couvercle anti poussière Plateau avec courroie d entraînement Contrepoids Porte cellule AT HS3 ...

Page 17: ... alimentation de l appareil Ne placez pas d objets remplis de liquides tels que des vases sur l appareil Pour éviter tout risque d incendie ne placez pas de flammes nues telles que des bougies allumées sur l appareil N installez pas cet appareil dans un espace confiné tel qu une étagère ou un endroit similaire Installez cet appareil uniquement dans des endroits avec une bonne ventilation Remarques...

Page 18: ...ateau et déplace le bras de lecture 10 Bouton STOP Replace le bras de lecture dans sa position d origine et arrête le plateau 11 Couvercle anti poussière 12 Sélecteur de préamplificateur Si vous utilisez un amplificateur avec une prise entrée PHONO placez le sélecteur en position PHONO En cas de connexion d un amplificateur à la prise AUX placez ce sélecteur sur la position LINE 13 Sélecteur de ce...

Page 19: ...ontrôle anti skating Pendant la lecture du disque une force agit sur la pointe de lecture pour la tirer vers l intérieur Cette force peut être contre balancée en réglant les mêmes valeurs pour la force anti skating et la force d appui 6 Levier de commande de levage du bras de lecture Soulève le bras de lecture 7 Bras de lecture 8 Bague de verrouillage Tournez la bague vers la gauche dans le sens a...

Page 20: ...u à ce que le montage soit terminé 1 Placez le plateau sur l axe Assurez vous que le plateau est correctement installé sur l axe 2 Placez la courroie sur la poulie du moteur laiton coloré Alignez une des ouvertures du plateau avec la poulie du moteur en laiton et tout en tirant les deux extrémités de la languette rouge qui est fixée sur la courroie placez la courroie sur la poulie du moteur selon ...

Page 21: ...e Si l équilibre du bras de lecture et la force d appui ne sont pas correctement ajustés le disque ou la pointe de lecture de la cellule peuvent s endommager Ne faites pas glisser la pointe de lecture de la cellule sur le disque ou le tapis amortissant en caoutchouc lors du réglage de l équilibre du bras de lecture ou de la force d appui Dans un tel cas la pointe de lecture peut s endommager Régla...

Page 22: ...érez les charnières du couvercle anti poussière dans les deux supports de charnière à l arrière du corps Lors du retrait du couvercle anti poussière tirez doucement le couvercle anti poussière hors des supports de charnière Réglage du sélecteur de cellule MM VM MC Si vous utilisez une cellule à aimant mobile MM ou VM placez ce sélecteur en position MM Si vous utilisez une cellule à bobine mobile M...

Page 23: ...qu il n est pas utilisé débranchez la fiche du câble d alimentation de la prise lorsque le produit n est pas utilisé pendant une longue période de temps 1 Branchez la fiche du câble d alimentation à la prise Pour une question de sécurité soulevez le bras de lecture en levant le levier jusqu à la position UP Branchez la fiche du câble d alimentation à la prise sans enlever la protection de la cellu...

Page 24: ...z 33 pour un disque 33 1 3 tours et 45 pour un disque 45 tours 3 Appuyez sur le bouton START Ne cognez pas le produit alors que le disque tourne Ne permutez pas la sélection de taille du disque pendant que le disque tourne Le produit pourrait présenter un dysfonctionnement Fonctionnement manuel Baissez le volume de l amplificateur des haut parleurs etc de manière suffisante 1 Relevez le bras de le...

Page 25: ...ine est sale ou poussiéreux débranchez d abord la fiche du câble d alimentation puis essuyez les impuretés et poussières avec un chiffon doux et sec N utilisez pas de benzènes de dissolvants etc Lors du stockage du produit pendant une longue période débranchez la fiche du câble d alimentation de la prise et enroulez l équipement dans un emballage plastique évitez qu il ne prenne l humidité Pointe ...

Page 26: ...les réglages terminés serrez les vis solidement 7 Fixez le porte cellule au bras de lecture 8 Réglez l équilibre du bras de lecture et la force d appui Reportez vous à Equilibre du bras de lecture et force d appui en p 6 pour effectuer les ajustements Remplacement de la courroie La courroie est un élément consommable Remplacez la courroie si la vitesse de lecture ralentit ou tourne de manière irré...

Page 27: ...de lecture avec la protection fixée à la cellule puis emballez l ensemble du porte cellule afin qu il ne s abîme pas Emballez le corps de la platine avec du papier ou un chiffon doux afin qu il ne s endommage pas Réglage de l overhang La position de la cellule doit être définie avec précision réglage de l overhang lors du montage d une cellule ou d un porte cellule autre que celui fourni 1 Montez ...

Page 28: ... entrée PHONO La force d appui est elle trop forte Réglez la force d appui La pointe saute La force d appui est elle trop faible Réglez la force d appui L anti skating est il mal réglé Vérifiez que l anti skating a été réglé sur la même valeur que la force d appui de la cellule Le disque est il déformé Vérifiez le disque Le disque est il rayé Vérifiez le disque Il y a des vibrations Le produit per...

Page 29: ...le Modèle de cellule AT91R Type de cellule Aimant double VM Impédance de charge recommandée 47 000 ohms Tension de sortie 3 5 mV mV à 1 kHz 5 cm sec Pointe de lecture 0 6 mil conique collée Cantilever Tuyau en aluminium Plage de force d appui 1 5 à 2 5 g standard à 2 0 g Poids de la cellule 5 0 g Porte cellule AT HS3 Poids du porte cellule 11 1 g Réglage vertical du porte cellule 8 mm Caractéristi...

Page 30: ...erliste EU Russland Verpackungsinhalt Vergewissern Sie sich vor der Verwendung dieses Produktes dass alle unten genannten Teile vorhanden sind Sollten Teile fehlen oder beschädigt sein wenden Sie sich an Ihren Audio Technica Händler vor Ort Plattenspieler Gummimatte Staubschutzhaube Plattenteller mit Antriebsriemen Gegengewicht Headshell AT HS3 mit VM Stereo Tonabnehmer AT91R Netzkabel Verwenden S...

Page 31: ...l des Geräts sofort Stellen Sie keine mit Flüssigkeiten gefüllten Gegenstände z B Vasen auf das Gerät Stellen Sie keine offenen Feuerquellen wie brennende Kerzen auf das Gerät um die Gefahr eines Brands zu vermeiden Stellen Sie dieses Gerät nicht an beengten Stellen auf z B in einem Bücherregal Installieren Sie das Gerät nur an Orten mit guter Belüftung Gebrauchshinweise Plattenspieler Verwenden S...

Page 32: ...TOP Taste Setzt den Tonarm an seine Ausgangsposition zurück und stoppt den Plattenteller 11 Staubschutzhaube 12 Vorverstärker Wahlschalter Wenn ein Verstärker mit PHONO Eingangsbuchse verwendet wird muss dieser Schalter in die PHONO Position gestellt werden Wenn das Gerät an die AUX Buchse eines Verstärkers angeschlossen wird muss dieser Schalter in die LINE Position gestellt werden 13 MM VM MC To...

Page 33: ...gespielt wird wirkt eine Kraft auf die Spitze der Abtastnadel die versucht sie nach innen zu ziehen Diese Kraft kann aufgehoben werden indem der gleiche Wert für die Anti Skating Funktion und die Auflagekraft eingestellt wird 6 Tonarmlift Bedienhebel Zur Bedienung des Tonarmlifts 7 Tonarm 8 Verriegelungsring Drehen Sie den Ring nach links entgegen dem Uhrzeigersinn um die Headshell zu sichern Um d...

Page 34: ...l erst an wenn die Montage abgeschlossen ist 1 Setzen Sie den Plattenteller auf die Mittelachse Vergewissern Sie sich dass der Plattenteller vollständig auf der Mittelachse sitzt 2 Setzen Sie den Riemen auf die Riemenscheibe messingfarben Richten Sie eine der Öffnungen des Plattentellers an der Messingriemenscheibe aus und setzen Sie den Riemen auf die Riemenscheibe während Sie an beiden Ende des ...

Page 35: ...st werden Wenn die Tonarmbalance und die Auflagekraft nicht angemessen justiert wurden kann möglicherweise die Schallplatte oder die Abtastnadel des Tonabnehmers beschädigt werden Ziehen Sie beim Justieren der Tonarmbalance und der Auflagekraft die Abtastnadel des Tonabnehmers nicht über die Schallplatte oder die Gummimatte Dies könnte die Abtastnadel beschädigen Einstellen der Tonarmbalance 1 Ent...

Page 36: ...ite des Plattenspielers um die Staubschutzhaube anzubringen Um die Staubschutzhaube zu entfernen ziehen Sie sie langsam aus den Scharnierhaltern Einstellen des MM VM MC Tonabnehmer Auswahlschalters Bei der Verwendung eines Moving Magnet Tonabnehmers MM oder VM muss dieser Schalter in die MM Position gestellt werden Bei der Verwendung eines Moving Coil Tonabnehmers MC muss dieser Schalter in die MC...

Page 37: ...t verwendet wird Trennen Sie das Netzkabel von der Steckdose wenn das Produkt längere Zeit nicht verwendet wird 1 Verbinden Sie den Stecker des Netzkabels mit einer Steckdose Heben Sie den Tonarm zur Sicherheit durch Ziehen des Tonarmlift Bedienhebels in die NACH OBEN Position Verbinden Sie den Stecker des Netzkabels mit der Steckdose ohne die Schutzkappe des Tonabnehmers zu entfernen Wenn sich de...

Page 38: ...hlen Sie 33 für eine Schallplatte mit 33 1 3 U min und 45 für eine Schallplatte mit 45 U min 3 Drücken Sie auf die START Taste Stoßen Sie nicht an das Gerät während die Schallplatte abgespielt wird Bedienen Sie nicht den Größenwahlschalter während eine Schallplatte abgespielt wird Beide Vorgänge könnten zu einer Fehlfunktion des Geräts führen Manueller Betrieb Verringern Sie die Lautstärke des Ver...

Page 39: ...Wenn der Plattenspieler verschmutzt oder verstaubt ist trennen Sie zuerst den Netzstecker und entfernen Sie dann jeglichen Schmutz und Staub mit einem weichen trockenen Tuch Verwenden Sie kein Benzin keinen Verdünner usw Wenn das Produkt für längere Zeit nicht verwendet wird trennen Sie den Netzstecker von der Steckdose und wickeln Sie das Gerät in eine Plastiktüte Das Gerät darf nicht feucht werd...

Page 40: ...Seite 12 Ziehen Sie die Schrauben nach dem Abschluss der Anpassungen fest an 7 Befestigen Sie die Headshell amTonarm 8 Passen Sie dieTonarmbalance und Auflagekraft an Details zu den erneuten Anpassungen finden Sie unter Tonarmbalance und Auflagekraft auf Seite 6 Austauschen des Riemens Beim Riemen handelt es sich um ein Verschleißteil Ersetzen Sie den Riemen wenn die Wiedergabegeschwindigkeit sich...

Page 41: ... ist und wickeln Sie die gesamte Headshell Komponente dann so ein dass sie nicht beschädigt wird Wickeln Sie den Plattenspieler in Papier oder ein weiches Tuch ein damit er nicht beschädigt wird Anpassen des Überhangs Die Position des Tonabnehmers muss exakt bestimmt werden das Anpassen des Überhangs wenn ein anderer als der mitgelieferte Tonabnehmer oder Headshell befestigt wird 1 Befestigen Sie ...

Page 42: ...tellt Justieren Sie die Auflagekraft Die Abtastnadel springt Ist eine zu niedrige Auflagekraft eingestellt Justieren Sie die Auflagekraft Ist die Anti Skating Funktion nicht richtig eingestellt Stellen Sie sicher dass derselbe Wert für das Anti Skating und die Auflagekraft des Tonabnehmers eingestellt ist Ist die Schallplatte verformt Überprüfen Sie die Schallplatte Ist die Schallplatte zerkratzt ...

Page 43: ...ichtsbereich einschließlich Headshell 14 5 bis 20 g Tonabnehmer und Headshellspezifikationen Tonabnehmermodell AT91R Tonabnehmertyp VM Dual Magnet Empfohlene Lastimpedanz 47 000 Ohm Ausgangsspannung 3 5 mV bei 1 kHz 5 cm Sek Abtastnadel 0 6 mil verbunden kegelförmig Nadelträger Aluminiumrohr Auflagekraftbereich 1 5 bis 2 5 g Standard 2 0 g Gewicht des Tonabnehmers 5 0 g Headshell Modell AT HS3 Gew...

Page 44: ... il prodotto controllare di disporre di tutti i componenti elencati di seguito Se mancano alcuni componenti o se questi sono danneggiati contattare il rivenditore locale Audio Technica Corpo del giradischi Tappetino antiscivolo Copertura antipolvere Piatto con cinghia di azionamento Contrappeso Testina sagomata AT HS3 con capsula stereo VM AT91R Cavo di alimentazione Utilizzare il cavo di alimenta...

Page 45: ...n caso di emergenza scollegare rapidamente la spina del cavo di alimentazione Non collocare sopra l apparecchio oggetti riempiti con liquidi ad esempio vasi con fiori Per evitare il pericolo di incendi non collocare fonti a fiamma viva ad esempio candele accese su questo apparecchio Non installare questo apparecchio in spazi ristretti come scaffali o simili Installare questo apparecchio in ambient...

Page 46: ...a il braccio 10 Pulsante STOP Riporta il braccio in posizione originaria e arresta il piatto 11 Copertura antipolvere 12 Selettore del preamplificatore Se si utilizza un amplificatore con jack di ingresso FONO impostare questo interruttore nella posizione PHONO Se si collega un amplificatore con jack AUX impostare questo interruttore nella posizione LINE 13 Interruttore selettore capsula MM VM MC ...

Page 47: ...raccio 5 Ghiera di controllo anti scivolo Mentre il disco è in riproduzione una forza agisce sulla punti per tirarla verso l interno Questa forza può essere contrasta impostando gli stessi valori per la forza anti scivolo e la forza di tracciamento 6 Leva di comando per il sollevamento del braccio Aziona il sollevamento del braccio 7 Braccio 8 Anello di blocco Ruotare l anello verso sinistra in se...

Page 48: ...ne prima di avere terminato il montaggio 1 Sistemare il piatto sul perno Controllare che il piatto sia sistemato correttamente in sede sul perno 2 Posizionare la cinghia sulla puleggia del motore colore ottone Allineare una delle aperture del piatto con la puleggia del motore di colore ottone e mentre si tirano entrambe le estremità del nastro rosso che è fornito già attaccato alla cinghia sistema...

Page 49: ...da soddisfare le specifiche della capsula Se il bilanciamento del braccio e la forza di tracciamento non sono regolate in modo appropriato il disco e la puntina della capsula potrebbero subire dei danni Non trascinare la puntina della capsula sul disco o sul tappetino antiscivolo quando si regola il bilanciamento del braccio o la forza di tracciamento Altrimenti si rischia di danneggiare la puntin...

Page 50: ...e supporti delle cernere sul retro del corpo Quando si smonta la copertura antipolvere tirare la copertura lentamente dai supporti delle relative cerniere Interruttore selettore capsula MM VM MC Se si utilizza una capsula con magnete mobile MM o VM impostare questo interruttore nella posizione MM Se si utilizza una capsula con bobina in movimento MC impostare questo interruttore nella posizione MC...

Page 51: ...d essere sempre presente nel prodotto anche quando non in uso scollegare la spina del cavo di alimentazione dalla spina se il prodotto non è utilizzato per un periodo prolungato di tempo 1 Collegare la spina del cavo di alimentazione alla presa Per sicurezza sollevare braccio alzando la relativa leva di comando nella posizione UP Collegare la spina del cavo di alimentazione alla presa senza toglie...

Page 52: ...ri 3 Premere il pulsante START Non urtare l unità mentre un disco è in riproduzione Non cambiare la scelta delle dimensioni del disco mentre è in riproduzione Altrimenti si potrebbe provocare un problema di funzionamento del prodotto Funzionamento manuale Abbassare il volume dell amplificatore degli altoparlanti ecc adeguatamente 1 Sollevare il braccio alzando la relativa leva di comando nella pos...

Page 53: ...el giradischi Se il corpo del giradischi è sporco o impolverato scollegare innanzitutto la spina del cavo di alimentazione e pulire la polvere e lo sporco con un panno morbido e asciutto Non usare benzene solventi ecc Quando si conserva il prodotto per un periodo prolungato di tempo scollegare la spina del cavo di alimentazione e avvolgere l apparecchiatura con la plastica evitando che si inumidis...

Page 54: ...tringere saldamente le viti 7 Collegare la testina sagomata al braccio 8 Regolare il braccio e la forza di tracciamento Vedere Bilanciamento del braccio e forza di tracciamento a pag 6 per effettuare le nuove regolazioni Sostituzione della cinghia La cinghia è un componente soggetto a usura Sostituire la cinghia se la velocità di riproduzione diminuisce o se si verificano delle rotazioni irregolar...

Page 55: ...psula e imballare tutto il gruppo della testina sagomata in modo che non subisca danni Imballare il corpo del giradischi con la carta o con un panno morbido in modo che non subisca danni Regolazione della sporgenza La posizione della capsula deve essere stabilita con precisione regolando la sporgenza quando si monta una capsula o una testina sagomata diversa da quella fornita 1 Montare la capsula ...

Page 56: ...egata all entrata PHONO È impostata una a forza di tracciamento eccessiva Regolare la forza di tracciamento La puntina salta È impostata una a forza di tracciamento troppo bassa Regolare la forza di tracciamento La funzione anti scivolo è impostata in modo inappropriato Verificare che sia impostato sullo stesso valore scelto per la forza di lettura della cartuccia Il disco è piegato Controllare il...

Page 57: ...capsula e testina sagomata Modello capsula AT91R Tipo di capsula VM a magnete doppio Impedenza di carico consigliata 47 000 ohm Tensione in uscita 3 5 mV mV a 1 kHz 5 cm sec Puntina 0 6 mil conoide Elemento a sbalzo Tubo in alluminio Intervallo forza di tracciamento Da 1 5 a 2 5 g standard 2 0 g Peso della capsula 5 0 g Modello di testina sagomata AT HS3 Peso della testina sagomata 11 1 g Regolazi...

Page 58: ...ia Contenido del paquete Antes de utilizar este producto compruebe que cuenta con todos los artículos incluidos que se detallan a continuación Si falta algún artículo o está dañado póngase en contacto con su distribuidor local de Audio Technica Cuerpo del giradiscos Alfombrilla de caucho Cubierta antipolvo Plato con correa de transmisión Contrapeso Portacápsulas AT HS3 con cápsula estéreo VM AT91R...

Page 59: ...omento En caso de emergencia desconecte rápidamente el cable de alimentación de la unidad No coloque sobre la unidad ningún objeto que contenga líquido por ejemplo un florero Para evitar que se produzcan incendios no coloque sobre la unidad fuentes de llamas vivas como velas encendidas No instale la unidad en un lugar cerrado como una librería o mobiliario similar Instale la unidad únicamente en u...

Page 60: ...el brazo fonocaptor 10 Botón STOP Parar Devuelve el brazo fonocaptor a su posición original y detiene el plato 11 Cubierta antipolvo 12 Interruptor selector de preamplificador Si utiliza un amplificador con un conector de entrada PHONO ajuste este interruptor en la posición PHONO Si conecta al conector AUX de un amplificador ajuste este interruptor en la posición LINE 13 Interruptor selector de cá...

Page 61: ...o de compensación de la fuerza lateral Durante la reproducción del disco una fuerza actúa sobre la punta de la aguja que tira de ella hacia dentro Dicha fuerza puede compensarse estableciendo los mismos valores anti skate o de compensación de la fuerza lateral y de fuerza de seguimiento 6 Palanca de control del elevador del brazo fonocaptor Acciona el elevador del brazo fonocaptor 7 Brazo fonocapt...

Page 62: ...haber completado el montaje 1 Coloque el plato en el eje Asegúrese de que el plato quede totalmente encajado en el eje 2 Coloque la correa en la polea del motor de color bronce Alinee las aberturas del plato con la polea del motor de color bronce y tirando de ambos extremos de la cinta roja que viene acoplada a la correa coloque la correa en la polea del motor como se indica en el diagrama Al real...

Page 63: ...ustarse según las especificaciones de la cápsula Si el equilibrio y la fuerza de seguimiento no se ajustan correctamente el disco o la aguja de la cápsula podría sufrir daños No arrastre la aguja de la cápsula a lo ancho del disco o de la alfombrilla de caucho cuando ajuste el equilibrio o la fuerza de seguimiento del brazo fonocaptor Si lo hace la aguja podría resultar dañada Ajuste del equilibri...

Page 64: ...rta antipolvo en los dos soportes correspondientes situados en la parte posterior del cuerpo Al retirar la cubierta antipolvo tire con cuidado de la cubierta para sacarla de los soportes de las bisagras de la cubierta antipolvo Configuración del interruptor selector de cápsula MM VM MC Si utiliza una cápsula de imán móvil MM o VM ajuste este interruptor en la posición MM Si utiliza una cápsula de ...

Page 65: ...utilizando desconecte el enchufe del cable de alimentación de la toma de corriente cuando no vaya a utilizar el producto durante un periodo de tiempo prolongado 1 Conecte el enchufe del cable de alimentación a la toma de corriente Por motivos de seguridad suba el brazo fonocaptor levantando la palanca de control de elevación del brazo fonocaptor Conecte el enchufe del cable de alimentación a la to...

Page 66: ...el producto mientras se está reproduciendo un disco No cambie el ajuste de tamaño del disco mientras se está reproduciendo un disco De no seguir dichas instrucciones podría provocar un mal funcionamiento del producto Funcionamiento manual Baje el volumen del amplificador altavoces etc lo suficiente 1 Suba el brazo fonocaptor situando la palanca de control de elevación del brazo fonocaptor en la po...

Page 67: ...del giradiscos tiene polvo o suciedad en primer lugar desconecte el enchufe del cable de alimentación y luego limpie la suciedad y el polvo con un paño suave y seco No utilice bencenos diluyentes etc Cuando vaya a guardar el producto durante un periodo de tiempo prolongado desconecte el enchufe del cable de alimentación de la toma de corriente y envuelva el quipo en plástico procure que no se hume...

Page 68: ...stes apriete los tornillos firmemente 7 Acople el portacápsulas al brazo fonocaptor 8 Ajuste el equilibrio y la fuerza de seguimiento del brazo fonocaptor Para efectuar los reajustes consulte Equilibrio y fuerza de seguimiento del brazo fonocaptor en la pág 6 Reposición de la correa La correa es un consumible Cambie la correa si se ralentiza la velocidad de reproducción o se produce una rotación i...

Page 69: ...la cápsula y a continuación envuelva el conjunto completo del portacàpsulas para evitar que sufra daños Envuelva el cuerpo del giradiscos en papel o en un paño suave para evitar que sufra daños Ajuste de la proyección La posición de la cápsula se debe determinar con precisión ajuste de la proyección al instalar una cápsula o un portacápsulas distinto del suministrado 1 Instale la cápsula de forma ...

Page 70: ...entrada PHONO Está la fuerza de seguimiento ajustada muy fuerte Ajuste la fuerza de seguimiento La aguja da saltos Está la fuerza de seguimiento ajustada muy floja Ajuste la fuerza de seguimiento Está el anti skate o compensación de la fuerza lateral mal ajustado Compruebe que está definido con el mismo valor que la fuerza de seguimiento de la cápsula Está el disco deformado Compruebe el disco Est...

Page 71: ...iones de la cápsula y el portacápsulas Modelo de cápsula AT91R Tipo de cápsula Doble imán VM Impedancia de carga recomendada 47 000 ohmios Voltaje de salida 3 5 mV mV a 1 kHz 5 cm seg Aguja Cónica de 0 6 mil Cantilever Tubo de aluminio Rango de fuerza de seguimiento De 1 5 a 2 5 g estándar 2 0 g Peso de la cápsula 5 0 g Modelo de portacápsulas AT HS3 Peso del portacápsulas 11 1 g Ajuste de la proy...

Page 72: ... do pacote Certifique se que você tenha todos os itens incluídos indicados abaixo antes de usar este produto Se alguns itens estão faltando ou danificados entre em contato com seu revendedor local da Audio Technica Corpo do toca discos Tapete de borracha Resguardo de pó Prato com correia de transmissão Contrapeso Headshell AT HS3 com cápsula estéreo VM AT91R Cabo de alimentação Use o cabo de alime...

Page 73: ...gue rapidamente a ficha do cabo de alimentação do aparelho Não coloque objetos cheios de líquidos como jarras em cima do aparelho Para evitar o perigo de incêndio não coloque nenhuma fonte de chama livre p ex velas acesas sobre o aparelho Não instale este aparelho num espaço reduzido como uma estante ou algo semelhante Para instalar este aparelho escolha um local bem ventilado Notas sobre a utiliz...

Page 74: ...raço 10 Botão STOP PARAR Coloca o braço em sua posição original e para o disco 11 Resguardo de pó 12 Interruptor do seletor do pré amplificador Se estiver usando um amplificador com conector de entrada PHONO coloque este interruptor na posição PHONO Se estiver ligado ao conector AUX de um amplificador coloque este interruptor na posição LINE 13 Interruptor do seletor da cápsula MM VM MC Se estiver...

Page 75: ...te da força anti patinagem Quando um disco está sendo reproduzido uma força age sobre a ponta da agulha puxando a para dentro Esta força pode ser compensada ajustando os mesmos valores para a força anti patinagem e força de rastreamento 6 Alavanca de controle da elevação do braço Opera a elevação do braço 7 Braço reprodutor 8 Anel de bloqueio Rode o anel para a esquerda sentido anti horário para f...

Page 76: ... o cabo de alimentação CA até a montagem estar concluída 1 Instale o prato no eixo Certifique se de que o prato está bem encaixado no eixo 2 Instale a correia do motor na polia cor bronze Alinhe uma das aberturas do prato com a polia cor bronze do motor e enquanto puxa ambas as extremidades da fita vermelha fixa à correia coloque a correia na polia do motor como mostrado no diagrama Ao fazer isto ...

Page 77: ...ser ajustadas de acordo com as especificações da cápsula Se o equilíbrio do braço e a força de rastreamento não forem ajustados corretamente o disco ou a agulha da cápsula podem sofrer danos Não arraste a agulha da cápsula através do disco ou do tapete de borracha ao ajustar o equilíbrio do braço ou a força de rastreamento Se o fizer pode danificar a agulha Ajustar o equilíbrio do braço 1 Remova o...

Page 78: ... dobradiças localizados na traseira do corpo Para remover o resguardo de pó puxe lentamente o resguardo de pó para fora dos receptáculos para as dobradiças Ajustar o Interruptor do seletor da cápsula MM VM MC Se estiver usando uma cápsula de íman móvel MM ou VM coloque este interruptor na posição MM Se estiver usando uma cápsula de bobine móvel MC coloque este interruptor na posição MC Este interr...

Page 79: ...te no produto mesmo quando não está sendo usado desconecte o ficha do cabo da tomada de corrente se você não vai usar o produto durante um longo período de tempo 1 Conectar o cabo de alimentação na tomada de parede Por segurança levante o braço levantando a alavanca de controle de elevação do braço para a posição UP Conecte o cabo de alimentação na tomada de parede sem remover o protetor da cápsul...

Page 80: ... 45 RPM 3 Pressione o botão START INICIAR Não dê batidas no produto enquanto o disco está sendo reproduzido Não troque a seleção de tamanho do disco enquanto o disco está sendo reproduzido Fazer uma dessas coisas pode causar mau funcionamento do produto Funcionamento manual Baixe suficientemente o volume do amplificador dos alto falantes etc 1 Levante o braço elevando a alavanca de controle de ele...

Page 81: ... toca discos estiver sujo ou com poeira desconecte primeiro o ficha do cabo de alimentação e limpe a sujeira ou poeira com um pano macio e seco Não use benzeno solventes etc Quando armazenar o produto durante um período de tempo prolongado desconecte a ficha de alimentação da tomada de corrente e embrulhe o equipamento em plástico para evitar que fique úmido Ponta da agulha Se poeira ou resíduos a...

Page 82: ...a 12 Depois de concluir os ajustamentos aperte bem os parafusos 7 Fixe a headshell ao braço 8 Ajuste o equilíbrio do braço e a força de rastreamento Consulte Equilíbrio do braço e força de rastreamento na página 6 para fazer os ajustamentos Substituir a correia A correia é um consumível Substitua a correia se a velocidade de reprodução diminuir ou se a rotação for irregular Como regra geral sugeri...

Page 83: ...o protetor fixo à cápsula e embrulhe todo o conjunto da headshell de modo que não sofra danos Embrulhe o corpo do toca discos com papel ou um pano macio de modo a que não sofra danos Ajustar a saliência A posição da cápsula deve ser determinada com precisão ajustando a saliência ao instalar uma cápsula ou headshell diferente da fornecida 1 Instale a cápsula de modo que fique paralela à headshell F...

Page 84: ... entrada PHONO A força de rastreamento é demasiado pesada Ajuste a força de rastreamento A agulha salta A força de rastreamento é demasiado leve Ajuste a força de rastreamento A anti patinagem está mal ajustada Certifique se de que anti skate está definido para o mesmo valor que a força de tração da cabeça O disco está empenado Verifique o disco O disco está riscado Verifique o disco Ouvem se uivo...

Page 85: ...ápsula Modelo da cápsula AT91R Tipo de cápsula Duplo imã VM Impedância de carga recomendada 47 000 Ohms Tensão de saída 3 5 mV mV a 1 kHz 5 cm s Agulha Cônica de 0 6 mil Cantilever Tubo de alumínio Intervalo de ajuste da força de rastreamento 1 5 a 2 5 g padrão 2 0 g Peso da cápsula 5 0 g Modelo da headshell AT HS3 Peso da headshell 11 1 g Ajuste da saliência da headshell 8 mm Especificações gerai...

Page 86: ...оюза Россия Содержание упаковки Перед использованием изделия пожалуйста проверьте комплектность упаковки Если какие либо части отсутствуют или повреждены обратитесь к местному дистрибьютору Audio Technica Корпус проигрывателя Резиновый мат Крышка Диск с приводным ремнем Противовес Держатель головки AT HS3 со стереофонической головкой звукоснимателяVM типа AT91R Шнур питания Используйте шнур питани...

Page 87: ...ением прикрепленной к проигрывателю Изготовитель Аудио Техника Лтд Адрес предприятия изготовителя 194 8666 Токио Мачида Ниси Нарусе 2 46 1 Страна изготовления Китай Страна изготовления Китай Импортер и уполномоченная организация ООО Транстрейд 115093 Россия г Москва ул Люсиновская д 28 19 стр 6 офис 5 9 а Контактная информация transtreyd rambler ru Сертификат соответствия RU C GB АЯ46 В 72600 Срок...

Page 88: ... началу грампластинки 10 КНОПКА STOP СТОП После нажатия тонарм возвращается в исходное положение и диск останавливается 11 Пылезащитная крышка 12 Переключатель предусилителя Для подключения проигрывателя к входу PHONO звукосниматель усилителя установите этот переключатель в положение PHONO Для подключения проигрывателя к входу AUX вспомогательный усилителя установите этот переключатель в положение...

Page 89: ...вует сила которая стремится переместить головку звукоснимателя к центру грампластинки Эту силу можно скомпенсировать правильно подобрав значения прижимной силы и силы противоскатывания 6 Рычаг опускания подъема тонарма Управляет механизмом опускания подъема тонарма 7 Тонарм 8 Фиксаторное кольцо С целью фиксации держателя головки звукоснимателя на тонарме поверните фиксаторное кольцо влево против ч...

Page 90: ... быть слышен шум Установка диска и резинового мата Перед первым использованием нужно подготовить проигрыватель к работе Не подключайте шнур питания пока не будут выполнены все описанные ниже действия 1 Установите диск на шпиндель Убедитесь что диск занял нужное положение 2 Установите ремень на шкив электродвигателя цвета латуни Выровняйте отверстия в диске со шкивом электродвигателя цвета латуни и...

Page 91: ...асно характеристикам головки В противном случае возможен ускоренный износ грампластинки и даже поломка иглы Во время регулировки тонарма проявите осторожность чтобы избежать движения иглы поперек дорожек грампластинки и контакта с резиновым матом Это может привести к повреждению иглы Балансировка тонарма 1 Снимите защитный колпачок с головки звукоснимателя 2 Придерживая держатель головки удалите п...

Page 92: ...адней стенке корпуса проигрывателя Для съема пылезащитной крышки извлеките её петли из пазов на задней стенке корпуса проигрывателя Положение переключателя типа головки MM VM MC При использовании головки звукоснимателя с подвижным магнитом типа MM илиVM установите этот переключатель в положение MM При использовании головки звукоснимателя с подвижной катушкой MC типа установите этот переключатель в...

Page 93: ...те использовать проигрыватель в течение длительного времени отсоедините вилку шнура питания от сетевой розетки 1 Вставьте вилку шнура питания в сетевую розетку В целях безопасности поднимите тонарм переместив рычаг управления подъемником тонарма в положение UP Вставьте вилку шнура питания в сетевую розетку не снимая защитный колпачок головки Если диск вращается нажмите кнопку STOP СТОП не трогая т...

Page 94: ...те 33 или 45 для 33 1 3 или 45 об мин соответственно 3 Нажмите кнопку START ПУСК Не стучите по проигрывателю во время проигрывания грампластинки Не переключайте размер грампластинки во время проигрывания грампластинки В противном случае возможно нарушение работы проигрывателя Ручное проигрывание Приглушите уровень громкости усилителя акустических систем или другого оборудования 1 Поднимите тонарм ...

Page 95: ...нке или проигрывателю во время проигрывания грампластинки Уход Корпус проигрывателя Если корпус проигрывателя покрылся пылью или грязью сначала отсоедините шнур питания от электросети а затем протрите его мягкой сухой тканью Не используйте бензин растворители Если проигрыватель не будет использоваться в течение длительного времени отсоедините шнур питания от розетки заверните проигрыватель в полиэ...

Page 96: ...чания регулировки затяните винты 7 Закрепите держатель головки на тонарме 8 Отрегулируйте баланс тонарма и прижимную силу Инструкции по регулировке см в разделах Балансировка тонарма и регулировка прижимной силы на стр 6 Замена приводного ремня Приводной ремень относится к расходным частям Ремень следует заменить если наблюдается замедление скорости или неравномерное вращение грампластинки Как пра...

Page 97: ...с надетым на нее защитным колпачком и упакуйте их вместе чтобы защитить от повреждения Заверните корпус проигрывателя в бумагу или мягкую ткань чтобы защитить его от повреждения Регулировка выноса головки Если вы устанавливаете новую головку ее положение на держателе вынос нужно тщательно отрегулировать 1 Установите головку параллельно держателю Расположите головку звукоснимателя и держатель голов...

Page 98: ...ого предусилителя корректора установлен в положение LINE а аудио кабель подключен ко входу PHONO на подключенном оборудовании Прижимная сила слишком велика Отрегулируйте прижимную силу Игла перескакивает с дорожки на дорожку Прижимная сила слишком мала Отрегулируйте прижимную силу Компенсатор скатывающей силы настроен неверно Убедитесь что компенсатор скатывающей силы установлен на то же значение ...

Page 99: ...цификации головки звукоснимателя и держателя Модель звукоснимателя AT91R Тип звукоснимателя С двумя магнитами VM типа Рекомендуемое полное сопротивление нагрузки 47 000 Ом Выходное напряжение 3 5 мВ на частоте 1 кГц 5 см с Игла сплавная коническая 0 6 мил Иглодержатель Алюминиевая трубка Диапазон прижимной силы от 1 5 до 2 5 г стандарт 2 0 г Масса звукоснимателя 5 0 г Модель головки звукоснимателя...

Page 100: ......

Page 101: ...t www audio technica com Zweijährige beschränkte Garantie Audio Technica Ltd garantiert für jedes in Großbritannien und der EU Europa erworbene Produkt von Audio Technica ab Kaufdatum zwei Jahre lang dass es frei von Material und Verarbeitungsfehlern ist Im Falle eines solchen Fehlers wird das Produkt umgehend gebührenfrei repariert oder nach unserer Wahl durch ein neues Produkt gleichen oder höhe...

Page 102: ...sária autorização prévia da Audio Technica Ltd para devolução Esta garantia exclui defeitos devido a desgaste normal abusos danos de envio ou utilização incorreta do produto Esta garantia é anulada em caso de uma reparação ou modificação não autorizada Para autorização de devolução e informações sobre o envio contacte o departamento de assistência Audio Technica Ltd Tel 44 0 113 277 1441 Fora do R...

Page 103: ...Memo ...

Page 104: ...Audio Technica Corp 2 46 1 Nishi naruse Machida Tokyo 194 8666 Japan 2016 Audio Technica Corp ver 1 2016 11 02 162501082 01 02 ver 2 2016 11 29 ...

Reviews: