10
Care
Turntable body
•
When the turntable body is dirty or dusty, first disconnect the
AC adapter, and then wipe off the dirt and dust with a soft,
dry cloth.
•
Do not use benzenes, thinners, etc.
•
When storing the product for a long time, disconnect the AC
adapter from the outlet and wrap the product in plastic; do
not allow it to become damp.
Stylus tip
•
If dirt and grime are stuck to the stylus tip, clean it with a
commercially sold brush.
•
We recommend using a stylus cleaner (sold separately) if the
stylus tip is considerably dirty. Clean the stylus tip by moving
the brush from the rear to the front of the stylus tip.
Headphones
Get into the habit of regularly cleaning the product to ensure
that it will last for a long time. Do not use alcohol, paint
thinners or other solvents for cleaning purposes.
•
Use a dry cloth to clean the headphones.
•
After using the cable, clean it with a dry cloth if sweat or
dirt is present. Failure to clean the cable may cause it to
deteriorate and harden over time, resulting in malfunction.
•
Wipe the cable’s plug with a dry cloth if dirty. Using the plug
without cleaning it can cause sound interruption or distortion.
•
To clean the earpads and headband, wipe with a dry cloth.
Earpads and headband may fade if sweat or water dries on
them. If the earpads and headband get wet, we recommend
wiping them with a dry cloth and allowing them to dry in the
shade.
•
For long-term storage, keep the product in a well-ventilated
place without high temperatures and humidity.
•
The earpads deteriorate over time due to use or storage. For
information about replacing earpads or other parts, or for
information about other serviceable parts, contact your local
Audio-Technica dealer.
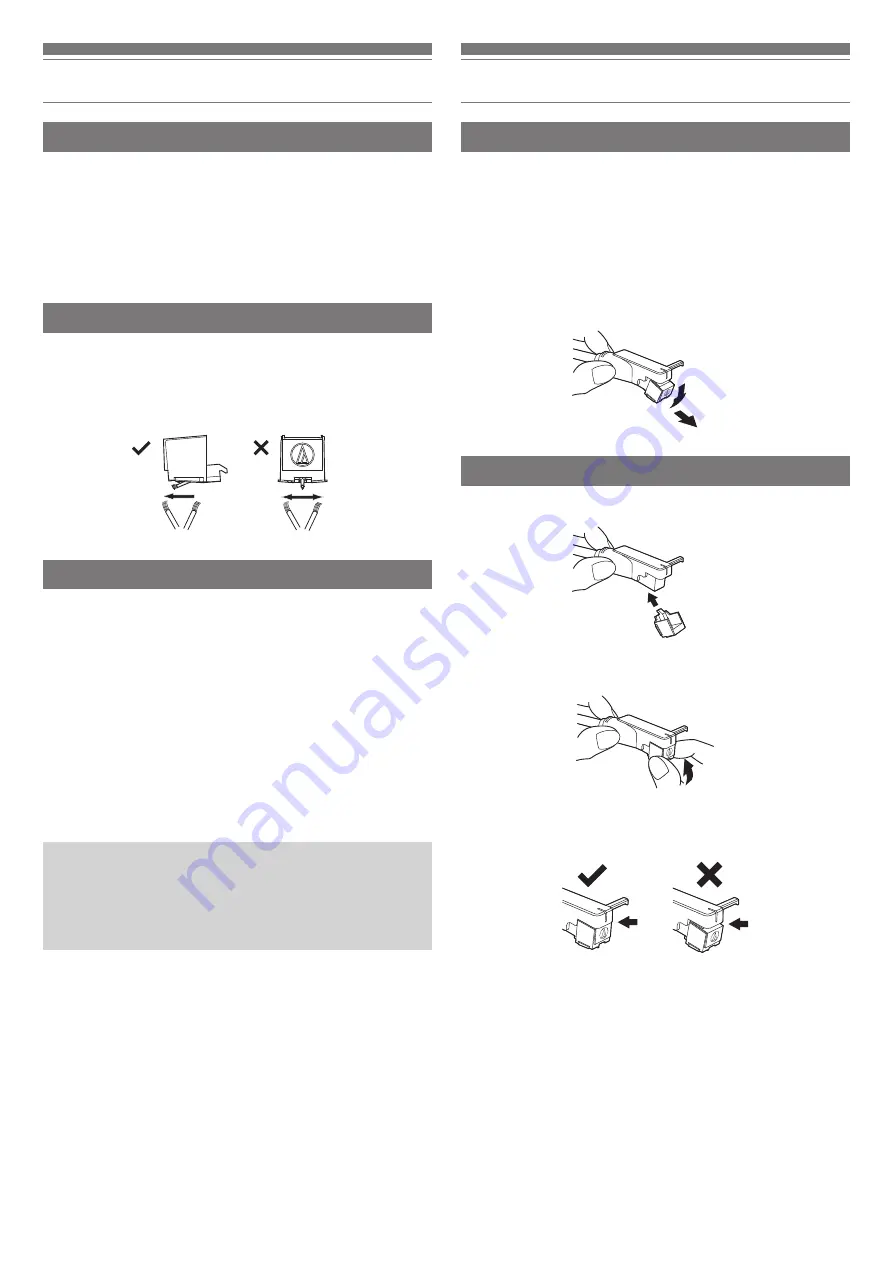
Replacing the stylus
Removing the stylus
•
In addition to the deterioration of sound quality, records may
also be damaged as the cartridge’s stylus tip wears down.
•
As a rule of thumb, replace the stylus after 400 hours of use.
•
Be sure to disconnect the product’s AC adapter from the
outlet.
•
When replacing the stylus, hold the headshell and the
cartridge body tightly.
1. Rotate the front of the stylus in a forward and down
motion.
Installing a new replacement stylus
1. Mount the new replacement stylus to the cartridge.
2. Lift the stylus up until you hear a click.
3. Make sure there is no gap between the headshell and the
cartridge.
Engage in body first


