background image

Using the product with wireless connection

19

5

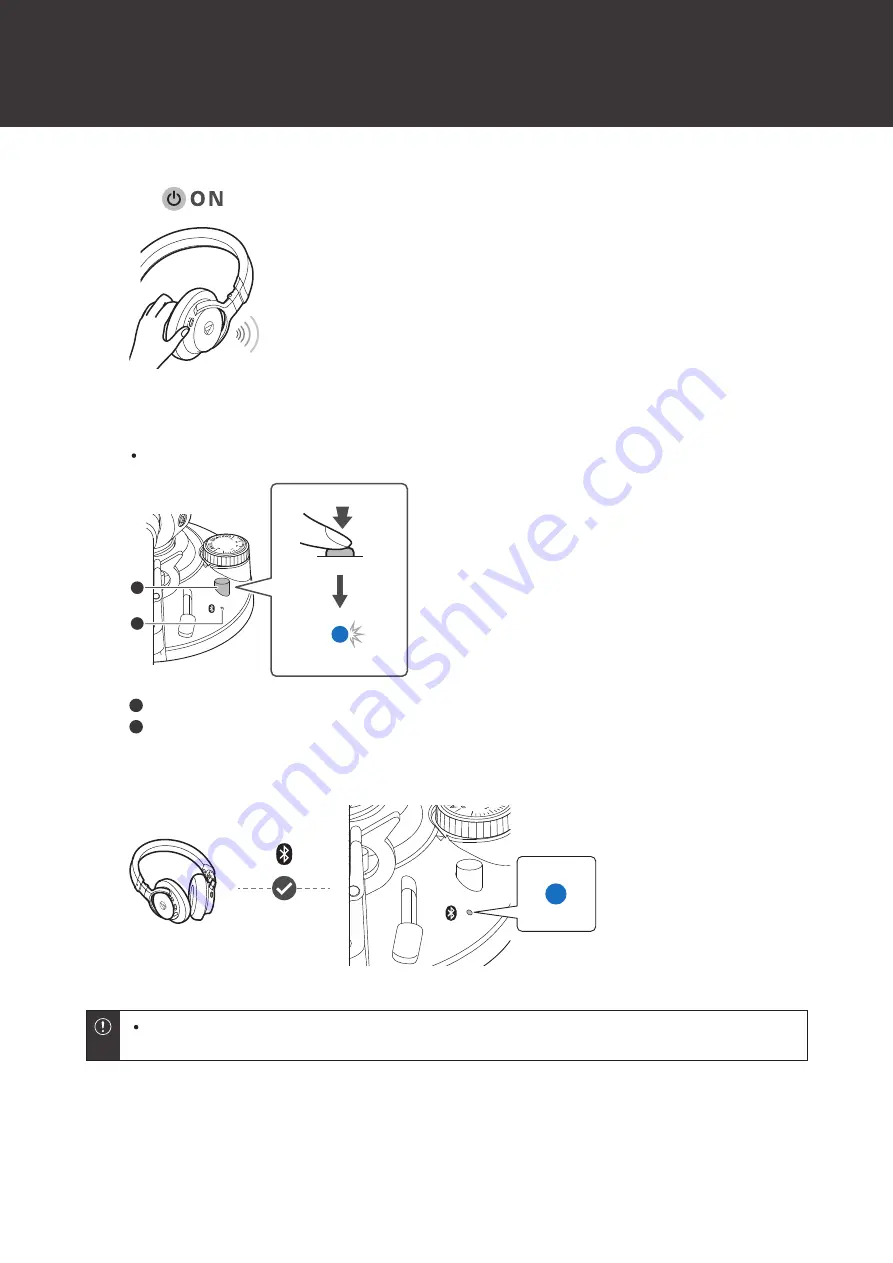
Hold down the wireless function button (approx. 2 seconds).

The Bluetooth indicator LED starts flashing blue.

1

2

1

Wireless function button

2

Bluetooth indicator LED

6

When pairing is completed, the Bluetooth indicator LED lights in blue.

The pairing mode of this product automatically ends after a fixed amount of time (approx. 30 seconds). If
pairing is not completed successfully, follow the same pairing steps again.

Summary of Contents for AT-LPW50BT

Page 1: ...AT LPW50BT Wireless Belt Drive Turntable User Manual English ...

Page 2: ...Introduction This product can be used only in the countries where the product is sold Make sure that the operating voltage and the plug of AC adapter of the product are correct for the country you live in ...

Page 3: ...any time In case of emergency disconnect the AC adapter quickly Do not place any objects filled with liquids such as vases on this apparatus To prevent fire do not place any naked flame sources such as lighted candles on this apparatus Do not install this apparatus in a confined space such as a bookcase or similar unit Install this apparatus only in the place where ventilation is good The rating l...

Page 4: ... must not be co located or operated in conjunction with any other antenna or transmitter used in other systems RF Exposure Statement This device complies with FCC radiation exposure limits set forth for an uncontrolled environment and meets the FCC radio frequency RF Exposure Guidelines This equipment has very low levels of RF energy that it deemed to comply without maximum permissive exposure eva...

Page 5: ... When closing the dust cover close it completely When using this product with a Bluetooth device connected to it be sure to also read the user manual for the Bluetooth device Cartridge Attach the provided protector to the cartridge when the product is not in use Do not touch the stylus of the cartridge with your finger Do not allow the stylus to bump against the platter rubber mat or edge of the r...

Page 6: ...me items are missing or damaged contact your local Audio Technica dealer After purchase we suggest that you save all packaging materials for possible future storage moving or shipping 3 1 8 9 10 7 6 4 5 2 11 12 13 1 Turntable body 2 Platter 3 Drive belt 4 Dust cover 5 Rubber mat 6 Dust cover hinges ...

Page 7: ...Package contents 6 7 Headshell AT HS4 SV with VM stereo cartridge AT VM95E BK 8 Counterweight 9 45 RPM adapter 10 AC Adapter 11 RCA audio cable Approx 1 0 m 3 3 12 Quick Start Guide 13 Caution Guide ...

Page 8: ...or pulley brass colored 4 Spindle 5 Rubber mat 6 Control knob Use to select the platter speed 33 1 3 or 45 RPM or start stop the platter 7 Tonearm Rear view 1 1 2 2 3 6 7 5 4 1 Feet Adjust the level of the product 2 Dust cover hinge holders Attachment points for dust cover hinges ...

Page 9: ...ht channel and the white terminal is the left channel 5 Pre amplifier selector switch If connecting to an amplifier s PHONO input jack set this switch to the PHONO position If connecting to the AUX jack of an amplifier set this switch to the LINE position 6 Power input jack Connect the AC adapter 7 Power switch Turn on off the power Tonearm 1 2 3 5 6 7 8 9 10 11 4 1 Counterweight Balances the tone...

Page 10: ...acted by setting the same values for anti skate and the tracking force 6 Wireless function button Use to connect this product to a Bluetooth device 7 Bluetooth indicator LED Indicates the Bluetooth connection status with solidly lit or flashing light 8 Tonearm lift control lever Operates the tonearm lift 9 Tonearm 10 Locking ring Rotate the ring to the left counterclockwise to secure the headshell...

Page 11: ...is near equipment cell phone etc that emits strong radio waves noise may occur Leveling the turntable After positioning the product where you want to use it adjust the feet so that the product is level Use a level sold separately as needed to ensure that the product is level Placing the platter and the rubber mat This product requires some assembly before using it for the first time Do not connect...

Page 12: ...rass colored See the diagram below To avoid damaging the spindle when seating the platter align the positions of the spindle and the platter s hole and then slowly seat the platter 1 1 Motor pulley brass colored 2 Attach the drive belt to the motor pulley brass colored Make sure that the belt does not get twisted 3 Set the rubber mat on the platter ...

Page 13: ...onearm to the tonearm rest 2 Insert the headshell into the tonearm Hold the right and left edges of the headshell so that you do not damage the stylus or cut the cartridge s wires 3 With the headshell inserted turn the locking ring counterclockwise to the left 4 Attach the counterweight to the back of the tonearm and slowly turn it counterclockwise to the left ...

Page 14: ...at when adjusting the tonearm s balance or tracking force Doing so may damage the stylus Setting tonearm balance 1 Remove the cartridge s protector 1 1 Protector 2 Remove the clamp and lift the tonearm lift control lever The tonearm is tilted because the balance has yet to be adjusted 3 Move the tonearm over the rubber mat Lower the tonearm lift control lever while holding the headshell Be careful...

Page 15: ...arm The tracking force is not adjusted simply by turning the tracking force gauge ring 0 1 1 Tracking force gauge ring 2 Turn the counterweight and the tracking force gauge ring counterclockwise to the left to set the tracking force to the recommended tracking force value for the cartridge you are using Refer to the cartridge maker s specifications for the recommended tracking force value The trac...

Page 16: ...trol dial to have the same value as the tracking force value The tracking force value for the cartridge provided with this product is 2 0 g 1 1 Anti skate control dial Installing the dust cover The dust cover is designed to protect the product s sensitive components when the product is not in use 1 Attach the dust cover hinges to the slots on the dust cover 2 Insert the hinges of the dust cover in...

Page 17: ...Preparation for use 16 When removing the dust cover slowly pull the dust cover out from the dust cover hinge holders on the body The dust cover should remain open or off while records are playing ...

Page 18: ...product to connectable equipment using Bluetooth refer to Using the product with wireless connection p 18 1 1 Wireless headphones or wireless speakers Connecting with wires To connect the product to connectable equipment using the RCA audio cable refer to Using the product with a wired connection p 24 1 1 Active speakers or amplifier If the speaker to which the product is connected has no volume c...

Page 19: ...ion of the new device will overwrite the information of the device that has the oldest connection date and time among the registered devices Pairing a Bluetooth device Also read the user manual of the Bluetooth device Place the Bluetooth device within 1 m 3 3 of this product to perform pairing Please be aware that operation of Bluetooth devices connected to this product is not guaranteed 1 Plug th...

Page 20: ... LED starts flashing blue 1 2 1 Wireless function button 2 Bluetooth indicator LED 6 When pairing is completed the Bluetooth indicator LED lights in blue The pairing mode of this product automatically ends after a fixed amount of time approx 30 seconds If pairing is not completed successfully follow the same pairing steps again ...

Page 21: ...ecting Operating status Indicator display pattern Waiting for connection Flashing blue Connecting Lit in blue Before playing a record 1 Remove the cartridge s protector Pull the protector straight forward to remove it If the tonearm is fixed to the tonearm rest remove the clamp 2 Place the record on the rubber mat so that the center hole aligns with the spindle ...

Page 22: ...uct s Bluetooth indicator LED lights in blue When the Bluetooth indicator LED is off press the wireless function button to reconnect to the Bluetooth device If amplifiers or active speakers already connected to the product with wires are left on sound will be played from both the wire connected equipment and from the Bluetooth device when it is connected to the product via Bluetooth Only turn on t...

Page 23: ... control knob to select the speed Select 33 for a 33 1 3 RPM record and 45 for a 45 RPM record The platter begins spinning 3 Raise the tonearm by lifting the tonearm lift control lever to the UP position 1 1 Tonearm lift control lever 4 Position the tonearm over the desired location groove on the record 5 Lower the tonearm by moving the tonearm lift control lever to the DOWN position ...

Page 24: ...rd 1 Lower the volume of the wireless headphones wireless speakers etc sufficiently 2 Lift the tonearm lift control lever 3 Return the tonearm to its original position and fix it with the clamp 4 Turn the control knob to the STOP position The platter slows down and rotation stops 5 Remove the record after the platter has come to a complete stop 6 Attach the protector If the rubber mat gets dirty i...

Page 25: ...ce set the pre amplifier selector switch to LINE Device with phono input Position of pre amplifier selector switch Where to connect the RCA audio cable PHONO Phono input jack and ground earth terminal of connectable equipment Device without phono input Position of pre amplifier selector switch Where to connect the RCA audio cable LINE AUX or line input jack of connectable equipment PC sound card P...

Page 26: ...e product with a wired connection 25 1 1 Active speakers Connecting to connectable equipment amplifier etc The RCA audio cable s red jack is for the right R channel and the white jack is for the left L channel ...

Page 27: ...Using the product with a wired connection 26 With PHONO input PHONO L R 1 1 Connectable equipment amplifier etc ...

Page 28: ...pment amplifier etc Depending on the equipment you are connecting a ground earth terminal may exist near the phono input jack If this is the case connect to it using the ground line from the RCA audio cable This will help prevent a low humming noise that might otherwise be heard during playback ...

Page 29: ...TOP position If the power switch remains on while the AC adapter is connected a standby current is always running through the product even when it is not being used 2 Remove the cartridge s protector Pull the protector straight forward to remove it If the tonearm is fixed to the tonearm rest remove the clamp 3 Place the record on the rubber mat so that the center hole aligns with the spindle At 33...

Page 30: ...mplifier active speakers etc sufficiently 1 Turn on the power switch ON ON 2 Use the control knob to select the speed Select 33 for a 33 1 3 RPM record and 45 for a 45 RPM record The platter begins spinning 3 Raise the tonearm by lifting the tonearm lift control lever to the UP position 1 ...

Page 31: ...subject the product to strong impact during playback The tonearm descends slowly onto the record and play begins Pausing the record 1 After lowering the volume of the amplifier active speakers etc sufficiently lift the tonearm with the tonearm lift control lever Stopping the record 1 Lower the volume of the amplifier active speakers etc sufficiently 2 Lift the tonearm lift control lever 3 Return t...

Page 32: ...emove the rubber mat periodically and wipe off any dust To prevent the record from becoming scratched or warped remove it after use Do not use a disk stabilizer Do not use a platter other than the one provided This product is not intended for DJs Do not touch the record or the platter while the record is playing ...

Page 33: ...tlet and then wrap the equipment in plastic do not allow it to become damp Stylus tip and records If dirt and grime are stuck to the stylus tip clean it as needed To clean the stylus first turn the control knob to the STOP position turn off the power switch and then disconnect the AC adapter from the outlet We recommend using a stylus cleaner sold separately by Audio Technica if the stylus tip is ...

Page 34: ...outlet When replacing the stylus hold the headshell and the cartridge body firmly 1 Release the headshell from the tonearm Fix the tonearm with the clamp and then remove the headshell gently 2 After removing the cartridge s protector remove the stylus by pulling it in the direction of the arrow without touching the cantilever stylus tip or magnet Installing a new replacement stylus 1 Mount the new...

Page 35: ...lead tips 4 Using a commercially sold non metallic slotted screwdriver remove the installation screws and then remove the cartridge from the headshell 5 Refer to the user manual for the new cartridge for mounting instructions and connecting to the lead tips 1 2 1 Installation screws 2 Plastic washer 6 Using a commercially sold non magnetic slotted screwdriver loosen the screws in both places and t...

Page 36: ...lacing the belt first turn off the power switch and disconnect the product s AC adapter from the outlet 1 Remove the rubber mat 2 First remove the belt from the motor pulley brass colored remove the platter turn the platter over and then remove the old belt Place your thumbs in the openings and pull up strongly 3 Place the new belt around the inner circle Be careful not to twist the belt while doi...

Page 37: ...of the openings with the position of the motor pulley brass colored 1 2 1 Opening 2 Motor pulley brass colored 5 Place the belt on the motor pulley brass colored Grasp the belt that was attached in step 3 and while pulling it place it on the brass motor pulley 1 2 ...

Page 38: ...Replacing the belt 37 1 Belt 2 Motor pulley brass colored 6 Set the rubber mat on the platter ...

Page 39: ...shell Match up the positions of the cartridge and headshell to the overhang adjustment guide on the figure and mount the cartridge so it is parallel to the headshell This illustration represents the actual size Place the headshell on the figure and then adjust the stylus tip of the new cartridge along the lines for the Stylus tip of the cartridge 1 4 5 m m 1 Stylus tip 2 Mount the cartridge so it ...

Page 40: ...he outlet remove the rubber mat and platter and then wrap the turntable body so that it does not get damaged If the product is moved while the platter is still seated it may damage the spindle Fix the tonearm with the clamp Remove the counterweight Remove the headshell from the tonearm with the cartridge s protector attached and then wrap the entire headshell assembly so that it does not get damag...

Page 41: ...the setting positions for the pre amplifier selector switch correct Check that the pre amplifier selector switch is set correctly to match the input on the amplifier If there is no sound or if the volume is not loud enough the product is set to the PHONO position and connected to the amplifier s AUX LINE input If the volume is too loud or is distorted the product is set to the LINE position and co...

Page 42: ...erly connected If the noise continues remove the ground line This may reduce the noise Is the headshell attached to the tonearm firmly Make sure the locking ring is tight Unable to pair Confirm that the Bluetooth device communicates using ver 2 1 EDR or higher Place the product and the Bluetooth device within 1 m 3 3 of each other When the product is connected to the Bluetooth device no sound is h...

Page 43: ... by the product Keep the space between the product and the Bluetooth device free from obstacles such as people metal or walls and place the product and device closer to each other With regard to the operation of Bluetooth devices read the user manual for your Bluetooth device since the operation procedure differs depending on the device ...

Page 44: ...43 Dimensions Unit mm 420 340 126 ...

Page 45: ... Speed Stabilization Drive method Belt drive Speeds 33 1 3 RPM 45 RPM Turntable platter Aluminum Die Casting Wow and flutter 0 15 WRMS 33 RPM at 3 kHz Signal to noise ratio 60 dB Output levels PHONO 4 0 mV nominal at 1 kHz 5 cm sec LINE 200 mV nominal at 1 kHz 5 cm sec Phono Pre amp gain 35 dB nominal RIAA equalized Tonearm specifications Type Static balanced straight carbon tonearm Effective leng...

Page 46: ...Headshell overhang adjustment 5 mm General specifications Power supply requirements 100 to 240 V 50 60 Hz 0 5 A Max Power consumption 1 8 W AC Adapter 12 V 1 0 A Dimensions 420 mm 17 340 mm 13 126 mm 5 0 W D H Weight 5 5 kg 12 lbs Accessories Dust cover Rubber mat Platter with drive belt Dust cover hinges Counterweight Headshell AT HS4 SV with VM stereo cartridge AT VM95E BK 45 RPM adapter RCA aud...

Page 47: ...etooth word mark and logos are registered trademarks owned by Bluetooth SIG Inc and any use of such marks by Audio Technica Corporation is under license Other trademarks and trade names are those of their respective owners ...

Page 48: ...1 www audio technica co jp Audio Technica Corporation 2 46 1 Nishi naruse Machida Tokyo 194 8666 Japan www audio technica com 2022 Audio Technica Corporation Global Support Contact www at globalsupport com 162502480 02 01 ver 1 2022 08 01 ...

Reviews: