background image

Setup

30

LOCK SETUP 

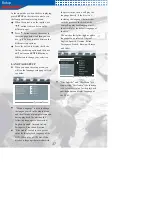
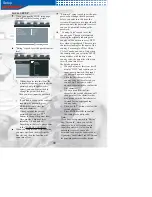
When you open the LOCK setup page, 
you will see the following picture. 

Move

Select

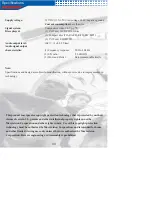
“Rating” is used to set the parent control 
level.

Move

Select

Prev.

When you enter into this item, the 
system will require you to input the 
password, only the password is 
correct, can you be permitted to 
change the parent lock level. 

      Then you must input the password 

“3351”.
If you find it wrong in the course of 
inputting the password, press 

CLEAR

 button to clear the 

inputted character. 
When you input the correct 
password, you can use 

/

buttons to change the parent level. 
Here provide 9 kinds of level 
including 1~8 and unlock. 
Regarding to the levels, please refer 
to the “PARENT CONTROL”.

When you complete the set in the setup, 
you must eject/load the disc from the 
disc slot, and then the function will 
come into effect.   

“Password” setup is used to set the new 
password or change the old password;
before you enter into this item, the 
system will require you to input the old 
password, only the password is correct, 
can you be permitted to change the 
password.
“ Country Code” is used to set the 
country code. The code information 
standing for original producing area 
country will be written in every DVD 
disc when it is produced. There are two 
characters standing for the name of the 
country. For example, CN for China, 
CA for Canada, and so on. Only when 
the country code you set in the SETUP 
menu matches with the disc’s own 
country code, the parent level that you 
set will come into effect. 

The detail operation is:   

When you first set this item, it will 
display “NEW” and require you to 
input a new password, then input 
the password again to confirm it. 
Then the first character of the 
country code will be selected, you 
can use 

/

 buttons to select 

upward or downward to confirm the 
first character; 
When you confirm the first 
character, the second character will 
change into all the characters that 
may match with the first character 
to stand for the corresponding 
country code; 
Then use 

/

  buttons to select the 

second character;   
Press

ENTER

or

OK

 to confirm 

the setting for country code.

Note:

If you have set a password in “Rating” 
and “Password”, when you set the 
country code, it will require you to 
input the password. Only when the 
password is correct, can you be 
permitted to change the country code. 
If you select “Load Default” in SETUP menu, 
the password you have set will be cleared.

Summary of Contents for AVDVD07N

Page 1: ...UNIVERSAL MOUNT DVD PLAYER WITH REMOTE CONTROL AVDVD07N OPERATING INTSTRUCTIONS PLEASE RETAIN MANUAL FOR FUTURE USE AND REFERENCE QUALITY RELIABILITY PURE BLISS ...

Page 2: ......

Page 3: ...E PLAYER 3 4 5 7 8 9 10 INSTALLATION 11 13 ELECTRICAL CONNECTION 14 REMOTE CONTROL 15 17 WARNING DISCLAIMER 34 WARRANTY 35 36 SAFETY 6 Table of Contents Table of Contents 2 GENERAL OPERATION 18 19 ADVANCED OPERATION 20 26 SETUP 27 31 TROUBLESHOOTING 32 SPECIFICATIONS 33 ...

Page 4: ......

Page 5: ...Unit Introduction Digital Audio Out Coaxial DVD Player Multi subtitle Languages Function Multi audio Languages Function Multi angle Function Parental Control Remote Control ...

Page 6: ...eep the volume level low enough to be aware of road and traffic conditions When Parked Parking in direct sunlight can produce very high temperatures inside your vehicle Give the interior a chance to cool down before starting playback Use the Proper Power Supply This product is designed to operate with a 12 volt DC negative ground battery system the regular system in a North American car Protect th...

Page 7: ...PATENTS AND OTHER INTELLECTUAL PROPERTY RIGHTS OWNED BY ACROVISION ORPORATION AND OTHER RIGHTS OWNERS 5SE OF THIS COPYRIGHT PROTECTION TECHNOLOGY MUST BE AUTHORIZED BY ACROVISION ORPORATION AND IS INTENDED FOR HOME AND OTHER LIMITED VIEWING USES ONLY UNLESS OTHERWISE AUTHORIZED BY ACROVISION ORPORATION 2EVERSE ENGINEERING OR DISASS EMBLY IS PROHIBITED 2EGION ANAGEMENT NFORMATION 2EGION ANAGEMENT N...

Page 8: ...THE SEATS OR DASHBOARD ISC LEANING 5SE A DRY SOFT CLOTH TO WIPE THE SURFACE F THE DISC IS QUITE DIRTY USE A SOFT CLOTH SLIGHTLY MOISTURED WITH ISOPROPYL RUBBING ALCOHOL EVER USE SOLVENTS SUCH AS BENZINE THINNER OR CONVENTIONAL RECORD CLEANERS AS THEY MAY MAR THE SURFACE OF THE DISC OTE DISC MAY BECOME SOMEWHAT SCRATCHED ALTHOUGH NOT ENOUGH TO MAKE IT UNUSABLE DEPENDING ON THE WAY IT IS HANDLED AND...

Page 9: ...ES ON ITS INSIDE AND OUTSIDE EDGES F A DISC WITH ROUGH EDGES IS USED THE PROPER SETTING WILL NOT BE PERFORMED AND THE PLAYER WILL NOT PLAY THE DISC 4HEREFORE REMOVE THE ROUGH EDGES IN ADVANCE BY USING A BALL POINT PEN OR PENCIL AS SHOWN ON THE RIGHT 4O REMOVE THE ROUGH EDGES PRESS THE SIDE OF THE PEN OR PENCIL AGAINST THE INSIDE AND OUTSIDE EDGES OF THE DISC ...

Page 10: ... PAUSE 8 STOP 9 PREV 10 NEXT 11 VOLUME 12 VOLUME 13 cursor buttons 14 ENTER 15 Indicator Light for DVD 16 Indicator Light for AV 17 Indicator Light for STAND BY 18 VIDEO IN 19 AUDIO IN L 20 AUDIO IN R 21 IR 22 Reset button 1 7 6 12 15 16 11 2 17 21 22 8 3 9 5 13 18 14 19 20 10 4 ...

Page 11: ...er 10 BACK VIEW 23 DC 12V INPUT Socket 24 DC 12V OUTPUT Socket 25 AV OUTPUT TYPE Switch 26 DIGITAL AUDIO 27 REMOTE Socket 28 S VIDEO Socket 29 AUDIO VIDEO OUTPUT 1 30 AUDIO VIDEO OUTPUT 2 4 23 24 25 26 27 28 30 ...

Page 12: ...T This unit can be properly installed either from Front conventional DIN Front mount or Rear DIN Rear mount installation utilizing threaded screw holes at the sides of the unit chassis For details refer to the following illustrated installation methods TAKE OUT SCREW BEFORE INSTALLATION Before install the unit please remove the two screws DIN FRONT MOUNT Method A Installation Opening This unit can...

Page 13: ...e back of the unit If necessary bend the metal strap to fit your vehicle s mounting area Then use the supplied hardware Tapping Screw 5x25mm and Plain Washer to attach the other end of metal strap to a solid metal part of the vehicle under the dashboard This strap also helps ensure proper electrical grounding of the unit Mounting Bolt Plain Washer Tapping Screw Metal Strap Spring Washer Hex Nut 9 ...

Page 14: ...ide View showing Screw Holes marked T N or S Screw To fasten the unit to the factory radio mounting brackets 1 Use a screwdriver to loose the hook s screws on the front left and right sides of the unit and remove the hooks 2 Align the screw holes on the bracket with the screw holes on the unit and then tighten the screws on each side 3 Fasten with the supplied truss screws 5x5mm or flush surface s...

Page 15: ...e switch is slid to B side the AV INPUT signal is directly outputted from AV1 OUTPUT and it is out of control of any buttons When the switch is slid to A side the AV OUTPUT signal is under control of MODE button or SOURCE YELLOW YELLOW RED RED WHITE WHITE VIDEO 2 OUT VIDEO 1 OUT AUDIO 2 R OUT AUDIO 1 R OUT AUDIO 2 L OUT AUDIO 1 L OUT DIGITAL AUDIO OPTIONAL OPTIONAL REMOTE CONTROL RECEIVER CIGARETT...

Page 16: ...Remote Control 15 LOCATION AND FUNCTION OF KEYS 24 27 1 5 3 8 32 2 6 9 25 4 28 10 31 7 30 26 123 29 15 11 18 13 19 23 17 20 16 14 22 21 ...

Page 17: ...Changing for slow forward reverse playback motion 15 Press to play the disc 16 Press to search forward rapidly to search reverse rapidly 17 Press to skip to the next track press to skip back one track 18 Press it to stop playback 19 Press it for the first time to pause playback Press it again to stop at the next picture step function for DVD VCD SVCD 20 0 9 Numeric buttons 21 3D During disc playba...

Page 18: ...re that the positive and negative terminals of the battery are oriented as indicated 3 Close the cover Battery one button cell lithium battery Using the Remote Control Face the remote control towards the player front face IR mark remote control signal receiver Operation angle About 30 degree in each the direction of the front of the IR mark ...

Page 19: ...ill release automatically Remote Sensor IR Point the remote handset to the remote sensor IR on the front panel Receive the signal from the remote handset Loading a Disc 1 Insert the disc with printed side facing up into the disc slot 2 The player will start playback automatically Disc Slot Eject Button Ejecting a Disc Press EJ button on the front panel or on the remote control to eject the disc BA...

Page 20: ... menu picture 2 Use cursor buttons to move between the highlight bars in the menu 3 Press ENTER button or OK button to confirm the selected item MODE SELECTION Press SOURCE button on the front panel of the unit or MODE button on the remote control to select among DVD and AV mode When select one mode the corresponding indicator on the front panel will be illuminated RESET FUNCTION Reset button is p...

Page 21: ...it will repeat playing the passage you just set from A to B 4 To revert to normal playback press A B button again PBC MENU PLAYBACK OF VCD SVCD For some VCD or SVCD discs there is a menu in order to select the desired contents This menu is called PBC Playback Control menu Press PBC button on the remote control to change between PBC ON and PBC OFF on the disc In PBC ON mode REPEAT RANDOM BOOKMARK A...

Page 22: ...Display the current subtitle language it can switch to other subtitle language Method buttons or press SUB T button 6 Item Angle Function Display the current angle it can switch to other angle Method buttons or press ANGLE button 7 Item Sound Function Display the current sound mode it can switch between normal and 3D surround effect mode Method buttons or 3D button For VCD Sound Move Select 1 Item...

Page 23: ...nt to set a bookmark press BOOKMK button the information will appear This is to tell you that you have set a bookmark 2 If you want to watch the section that you just set a bookmark press GOTO button then press buttons to move the cursor to the desired number of the bookmark and press or ENTER button or OK button to confirm NOTE You can press BOOKMK button again to close the search menu on the scr...

Page 24: ...playback The following information will be shown on the screen Each time the button is pressed the audio soundtrack language changes on sequential order Notes The language number is different according to the disc Some discs only contain one soundtrack language Multi angle Function Press ANGLE during playback The following information will be shown on the screen Each time the button is pressed the...

Page 25: ... To play a higher rated disc you must change the player s rating to a higher number For example consider a disc that generally is suitable for most audiences and is rated as level 2 for the most part However in the middle there are also scenes rated at 5 7 not suitable for children Alternative scenes with lower rating are included The player plays the highest rated scene that the parental setting ...

Page 26: ...reen 1 Press TITLE button to switch between Music Photo and Movie these three pages 2 In Music page there are three areas Play list Program list and the Edit area in the middle Press or ENTER or OK to open the highlight folder in the play list or play the audio file in the play list or program list Use ADD ADD ALL DELETE and DELETE ALL these four operation buttons on the middle edit area to edit t...

Page 27: ... the control bar When selecting the Mixed Play button in the middle area and pressing ENTER or OK to confirm it will start to display all the pictures in full screen in turn and add the MP3 file as background music The Speed button in the middle area is used to adjust the display interval speed between the pictures Press buttons to switch between and 4 In Movie page press or ENTER or OK to open th...

Page 28: ...all kinds of prompt information during playback The unit has the following languages to be selected English Spanish German Italian Portuguese French and Russian Disc Audio is used to set a preset value for the playback language of the DVD When play a DVD disc if the disc has a language that matches with the preset value then it will play the language directly if the disc isn t including the langua...

Page 29: ... are Letterbox and Panscan to be selected Letterbox Display the picture of the cinema effect with the black bands at the top and bottom of the screen Panscan Display the picture of the clipped TV screen The left and right edges are cut off TV Output is used to select the TV output mode This player can play discs recorded in either PAL or NTSC format Select NTSC format when the unit is connected to...

Page 30: ...lse Code Modulation When connect to the amplifier with two channels digital stereo select this item When playing a DVD disc with Dolby Digital and recorded by MPEG1 or MPEG2 record system the DVD player will output the audio in PCM2 playback mode DTS means Date Transmission System There are Bitstream and PCM to be selected Sample Freq means Sample Frequency Select the Sample Freq between 48kHz and...

Page 31: ...o set the country code The code information standing for original producing area country will be written in every DVD disc when it is produced There are two characters standing for the name of the country For example CN for China CA for Canada and so on Only when the country code you set in the SETUP menu matches with the disc s own country code the parent level that you set will come into effect ...

Page 32: ...THERS setup page you will see the following picture You can change the setting for Load Default and Screen Saver Move Select Load Default is used to revert to factory initial settings Screen Saver is used to switch on off the screen saver function ...

Page 33: ...URE The disc format is not according to the TV set used PAL NTSC DISC DOES NOT PLAY Ensure the disc label is upwards Clean the disc Check if the disc is defective by trying another disc NO SOUND Check audio connections If using a HIFI amplifier try another sound source NO RETURN TO START UP SCREEN WHEN DISC IS REMOVED Press POWER to turn off the unit then press it again to turn on the unit Press R...

Page 34: ...er Below measurable limits Note Specifications and design are subject to modification without notice due to improvements in technology This product incorporates copyright protection technology that is protected by method claims of certain U S patents and other intellectual property rights owned by Macrovision Corporation and other rights owners Use of this copyright protection technology must be a...

Page 35: ... ...

Page 36: ...32 ...

Page 37: ...nufacturer defect will be returned to the sender at their cost You must acquire a Return Authorization Number RA prior to returning ANY product to Audiobahn That Return Authorization Number RA must be prominently and clearly marked on the outside of the shipping carton or product delivery will be refused no exceptions will be made Please note All shipping and handling to and from charges will be t...

Reviews: