background image

Connecting your system

Step 1– Connecting the Speaker Wire
Connect the 

RED 

(+) and BLACK (-) terminals from the left speaker to the 

corresponding  terminals  on  the  right  speaker  using  the  included  speaker 

wire.  Be sure to match the gold-colored side of the speaker wire with the 

RED 

(+) terminals and the silver-colored side to the BLACK (-) terminals on 

each speaker. 

As the Audioengine 5 speaker system is self-powered, do not connect the 

speaker terminals to the speaker outputs of a stereo receiver. 

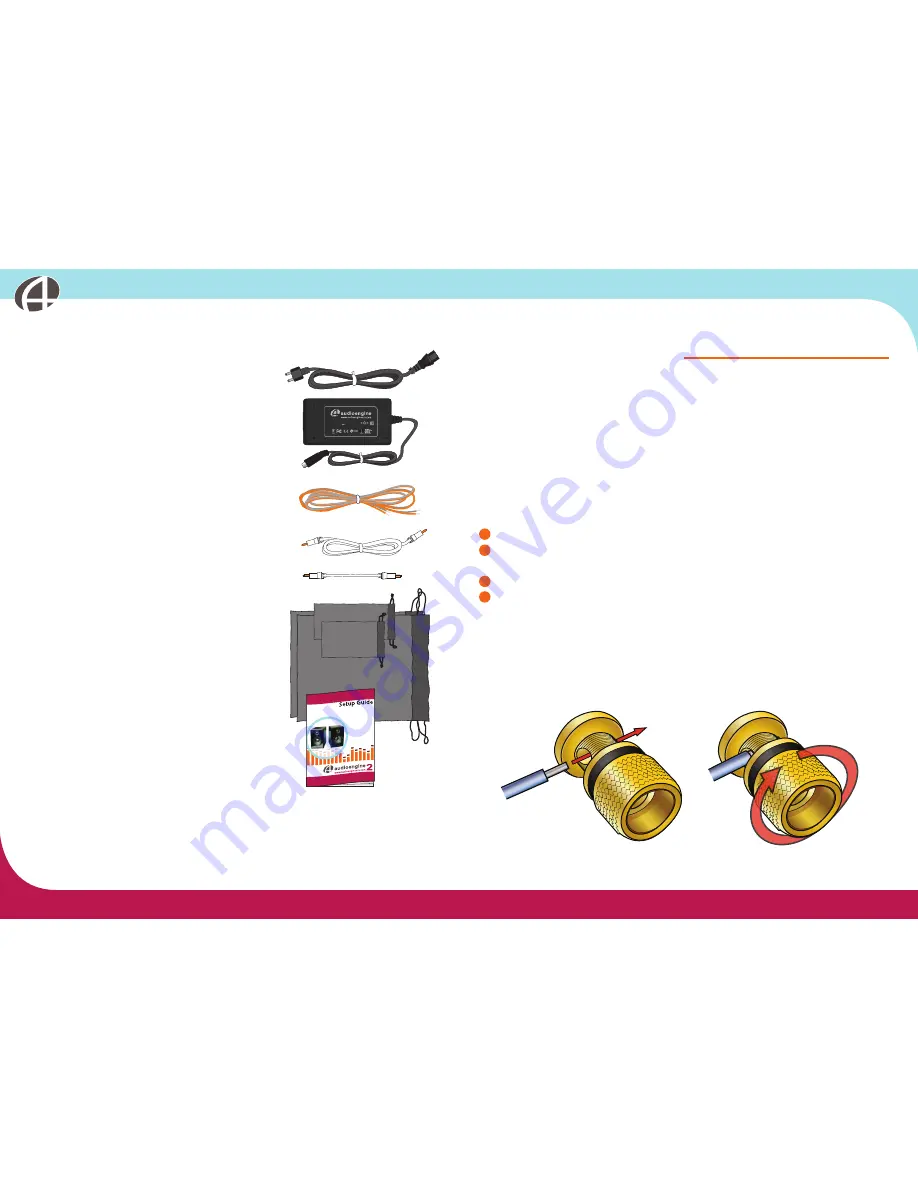
Detailed Procedure:

1  Use your thumb and finger to unscrew the binding post connectors.

2  Insert each speaker wire into the holes on the side of binding post 

connectors.

3  Retighten the binding posts with your fingers.

4  The stripped portion of the wire should be secured firmly in each 

connector. 

Repeat the procedure to connect the other end of the speaker wire to the 

other speaker.  Make sure that none of the speaker wire strands have come 

in contact with an adjoining terminal.

Box Contents

Included with the speakers:


t

  Power supply


 t

  Speaker cable (16AWG), 2 meters (~6.5 feet)

 t

  1⁄8” mini-jack audio cable, 2 meters (~6.5 feet)


t

  1⁄8” mini-jack audio cable, 20 cm (~8 inches)


 t

  Drawstring power supply bag


t

  Drawstring cable bag


t

  DrawString speaker bag (2)


 t

  Setup Guide

audioengine 2 setup guide

audioengine 2 setup guide

4

5

Assembled in China

100-240V~ 50/60Hz 1.8A
  17.5V       2.0A

±

INPUT:

                 OUTPUT:

+

Summary of Contents for Speaker

Page 1: ...Setup Guide 2007 Audioengine Corp All Rights Reserved Copyright Notice Audioengine and Audioengine 2 are trademarks of Audioengine Ltd Audioengine Ltd support audioengineusa com www audioengineusa com ...

Page 2: ...ersonnel t Servicing is required when the apparatus has been damaged in any way such as power supply cord or plug is damaged liquid has been spilled or objects have fallen into the apparatus the apparatus has been exposed to rain or moisture does not operate normally or has been dropped Do not attempt to service this product yourself Opening or removing covers may expose you to dangerous voltages ...

Page 3: ...nks to all who helped out If it wasn t for our customers resellers reviewers engineering team and many others we never would have been able to complete this product Unpacking Your Audioengine speakers were carefully tested and inspected before packaging and shipping After unpacking please check for any damage It is rare that a unit is damaged during shipping but if this does happen contact the shi...

Page 4: ...each speaker wire into the holes on the side of binding post connectors 3 Retighten the binding posts with your fingers 4 The stripped portion of the wire should be secured firmly in each connector Repeat the procedure to connect the other end of the speaker wire to the other speaker Make sure that none of the speaker wire strands have come in contact with an adjoining terminal Box Contents Includ...

Page 5: ...to email us at support audioengineusa com or call toll free at 877 853 4447 Connecting your system continued Step 2 Connecting the Power Supply Be sure that the volume power switch on the rear panel is in the OFF posi tion by rotating it counterclockwise until it clicks off 1 Connect the DIN power cable from the power supply to the rear DIN power input connector on the speaker Note This connector ...

Page 6: ... Limited Warranty does not cover damage caused by accident misuse abuse neglect excessive moisture lightning power surges other acts of nature unauthorized product modification or repairs or failure to follow the instructions outlined in the Setup Guide What we will do We will repair or replace any defective parts at our option within a reasonable amount of time and free of charge any time during ...

Reviews: