2
1.0 s a f e t y a n d s e r v i c i n g n o t e s
3. Apply soldering iron to both component lead and pad
before applying solder. Make sure that the soldering
iron is applied long enough for the solder to wet
properly, but do not apply for too long or component
damage may occur.
4. Allow a small gap between component body and
pad. Solder must not reach the base of the
component.
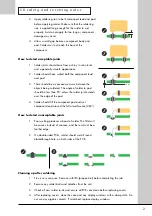
How to detect acceptable joints
1. Solder joints should have from a shiny to satin lustre
and a generally smooth appearance.
2. Solder should have wetted both the component lead
and pad.
3. There should be a concave meniscus between the
objects being soldered. The angle of solder to pad
should be less than 90° unless the solder joint extends
over the edge of the pad.
4. Solder should fill the component pad and wet
component lead around the full circumference (360°).
How to detect unacceptable joints
1. Poor wetting produces a bead of solder. The fillet will
be convex instead of concave, and there will not be a
feather edge.
2. On double-sided PCBs, solder should wet all round
plated-through hole, on both sides of the PCB.
Cleaning up after soldering
1. Flux is very corrosive. Remove with IPA (propan-2-ol) before completing the job.
2. Remove any solder balls and splashes from the unit.
3. Check all new solder joints and ensure all PCBs are clean before replacing covers.
4. After replacing covers, clean the case and any display windows with a damp cloth. Do
not use any organic solvents. If scratched, replace display windows.
Trim Line
Summary of Contents for 8000S
Page 1: ...service manual Integrated amplifier 8000S ...
Page 25: ...25 7 0 c i rc u i t s c h e m a t i c s 7 9 Digital system interface schematic SCH26701 03 01 ...
Page 27: ...27 7 0 c i rc u i t s c h e m a t i c s 7 11 Relay coils schematic SCH26701 05 01 ...
Page 28: ...28 7 0 c i rc u i t s c h e m a t i c s 7 12 Front panel schematic SCH26702 01 01 ...
Page 29: ...29 7 0 c i rc u i t s c h e m a t i c s 7 13 Speaker outputs schematic SCH26703 01 01 ...


