background image

20


·


While you are in the setup menu the display brightness is set to 100% 
for better readability. After leaving the setup menu the display bright-
ness is automatically reset to its user selected level. 

·


If you power down the SAM 20 SE to stand-by mode all settings are 
stored automatically in the non-volatile memory of the unit. Even after 
disconnecting from mains power the SAM 20 SE will still remember 
your settings. 


In the following all options of the setup menu are explained in detail. 


7.1  Overview setup menu 

The setup menu of the SAM 20 SE consists of four menu items. The menu 
item 

Global Setup

 is a sub menu containing 6 further setup options. 

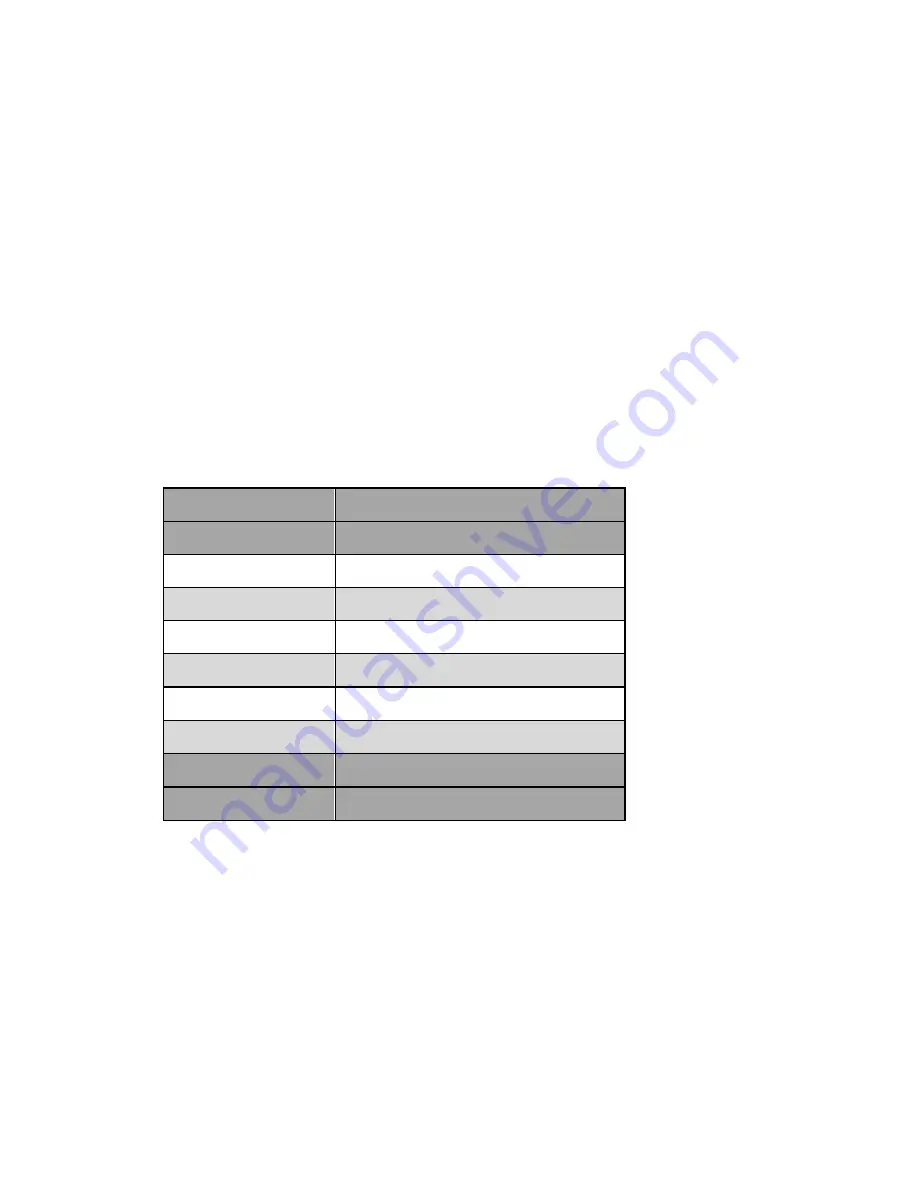
The following table give an overview of the whole menu structure. 


Select Input 

Select the desired input channel 

Global Setup 

Main setup menu 


Headphones 

Headphones mode 


Display 

Adjust display brightness 


Pre Output 

Switch preamplifier output on/off 


AutoStart 

Setup automatic start-up mode 


By-Pass Channel 

Select input channel for By-Pass mode 


Channel Name 

Edit name of input channel (max. 14 characters) 

Factory Default Reset 

Reset device to factory defaults 

Device Info 

Get information on device 


7.2  Select Input 

Please refer to section "

Input selection

" on page 17. 


Summary of Contents for SAM 20 SE

Page 1: ...1 audionet SAM 20 SE Stereo Amplifier User s Manual...

Page 2: ...2...

Page 3: ...1 Inputs 11 5 2 Speaker terminals 11 5 3 Preamplifier Output 12 5 4 Recording devices 12 5 5 Phono 13 5 6 Headphones socket 13 5 7 Audionet Link 13 6 Usage 14 6 1 Powering up 14 6 2 Switching on and...

Page 4: ...Device Info 28 8 Audionet Metal Remote Control 29 8 1 Key assignment SAM 20 SE 30 8 2 Changing the batteries 30 8 3 Settings for Audionet preamplifier 31 9 Protection system 33 10 Phono module 34 10...

Page 5: ...Managing Partner Dipl Ing Thomas Pohl Head of R D Hardware Audionet components are no marketing products they are authentic Con ceived and developed with scientific inspiration professional engineerin...

Page 6: ...ndard mains power cord Audionet Metal Remote Control 1 2 Transport Important Please transport the SAM 20 SE only in the included package Always use the provided cloth bag to prevent scratches on the c...

Page 7: ...7 2 Overview front panel Display power key down key IR remote control receiver up key set key SAM 20 SE...

Page 8: ...ght 7 Speaker terminal right channel 8 Speaker terminal left channel 9 Mains input 10 Mains switch 11 Marking mains phase 12 Audionet Link output OUT 13 Earth connector for turntable 14 Headphones soc...

Page 9: ...ot place the SAM 20 SE in close range to heat sources like radia tors Do not place the SAM 20 SE on top of other units especially not on top of power amplifiers pre amplifiers or similar that produce...

Page 10: ...nel power down the unit to stand by mode and switch off the unit using mains switch 10 Only in cases of extended absence like vacations or if massive trouble on the mains power is to be expected you s...

Page 11: ...ect the left and right input of the same number printed on the back panel of the SAM 20 SE to the corresponding output of the source you would like to connect to the SAM 20 SE 5 2 Speaker terminals Co...

Page 12: ...20 SE with an additional amplifier or subwoofer 5 4 Recording devices You can connect one recording device to the SAM 20 SE for recording and playback Connect your recording device like DAT or tape re...

Page 13: ...24 5 6 Headphones socket A 6 3 mm headphones socket 14 is located at the rear of your SAM 20 SE The signal at this socket can be switched on and off to allow the head phones to be plugged in permanen...

Page 14: ...M 20 SE from mains power While the SAM 20 SE is in stand by mode operate mains switch 10 on the back panel To discon nect the SAM 20 SE from mains power completely you have to pull the mains power cor...

Page 15: ...elements on the front panel The front panel has four keys to control the SAM 20 SE see section Over view front panel on page 7 With these keys you are able control all func tions as well as all setup...

Page 16: ...y In the normal operating mode the display provides the following infor mation 1 Status of the loudspeaker output mode see section Headphones on page 21 2 Status of the headphones output mode see sect...

Page 17: ...ain Now select the desired input channel with the keys up and down The last line of the display provides the number and the user definable name of the currently selected input channel Push set again t...

Page 18: ...set to Off the text is displayed see section Display on page 22 To un mute the SAM 20 SE press key again Note While the unit is muted you may of course select a different input chan nel as described a...

Page 19: ...by the menu item marker Use keys up and down on the front panel to move the menu item marker to the desired menu item To select a menu item press key set shortly To the right of each menu item a symb...

Page 20: ...p menu The setup menu of the SAM 20 SE consists of four menu items The menu item Global Setup is a sub menu containing 6 further setup options The following table give an overview of the whole menu st...

Page 21: ...he music signal is only avail able on the speaker terminals 7 and 8 Headphones only Only the headphones output PHONES 14 is active The speaker out puts 7 and 8 are disabled Speakers Headphones The hea...

Page 22: ...tches off automatically several seconds after the last user entry The SAM 20 SE activates the display saver automatically after 10 minutes without any user entry During active display saver the displa...

Page 23: ...the front panel to activate the AutoStart function If you like to disable the AutoStart function press the key down disabled The AutoStart function is disabled After switching on the mains power swit...

Page 24: ...Mode The By Pass Mode is primarily intended to integrate the overwhelming sound quality of the SAM 20 SE into an existing home cinema setup or expand an existing excellent stereophonic system based on...

Page 25: ...evel The special function By Pass Mode of your SAM 20 SE is activated auto matically if you switch to the input channel dedicated for By Pass Mode in the setup menu item By Pass Channel The signal at...

Page 26: ...u select the menu item Chan nel Name of the Global Setup menu the display will show the number of the currently selected input channel and the assigned channel name The cursor in the display marks the...

Page 27: ...ess key up to confirm and reset all settings to the factory defaults Press key set to abort and return to the setup menu 7 4 1 Overview factory default settings Option Setting Select Input Line Input...

Page 28: ...28 7 5 Device Info The menu item Device Info provides information on the device name und the installed firmware version Device Info Device SAM 20 SE ID N Firmware 04 0B...

Page 29: ...ote Control The included Audionet Metal Remote Control controls all the important function of everyday use of your SAM 20 SE The following explains all these commands in detail 1 2 3 6 4 5 CD SAM 20 S...

Page 30: ...xt input channel of the SAM 20 SE 3 Key CH selects the previous input channel of the SAM 20 SE 4 Key VOL increases the volume of the SAM 20 SE 5 Key VOL decreases the volume of the SAM 20 SE 6 Mute ke...

Page 31: ...ent SAM 20 SE explains the function of these keys Depending on their type Audionet pre amplifiers use different system addresses for their remote control code A DIP switch on the circuit board of the...

Page 32: ...llowing table Audionet preamplifier Address STERN PRE G2 PRE 1 G3 SAM 20 SE SAM G2 DNA DNP DNA 1 19 MAP 1 16 Note If not ordered explicitly the Audionet Metal Remote Control is pre configured to setti...

Page 33: ...cuit or defective speaker Overheating ventilation slots covered High Frequency defective pre amplifier stage DC Voltage exceeding DC level at the output defective pre amplifier stage or source unit Po...

Page 34: ...dule optimally to the pickup In case of doubt treat the pickup as MM system and use the standard settings listed below Section Fine tuning on page 37 offers more detailed information on fur ther adjus...

Page 35: ...istance the remaining four positions determine the input capacitance Again the values are printed on the board right beside the jumper positions To setup 68 kW input resistance please remove the corre...

Page 36: ...ckups 3 5 mV position 48 dB is better suited In case you have a low output pickup 0 8 mV set the gain to 68 dB In case of doubt assume your pickup is working at a normal output level For MC pickup sys...

Page 37: ...printed be sides the jumper field represent the gain in dB Important Excessive gain could lead to overdrive and distortion Set the gain so that the output voltage of the phono module Umodul is approx...

Page 38: ...ms call for a higher input resistance 2 2 kW others need a much lower setting 100 W for optimum performance Please fol low the recommendations of the manufacturer of the pickup 10 7 Factory defaults T...

Page 39: ...t cover the unit Do not open the unit Unauthorised opening will void warranty Do not short circuit the outputs During connecting or removing the SAM 20 SE to from sources and or power pre amplifiers a...

Page 40: ...rik Input impedance Line input 10 k 10 pF XLR input 3 k 170 pF Outputs 2 pair Furutech 4 mm jacks Rhodium 1 pair RCA gold plated Teflon insulated Pre Out 1 pair RCA gold plated Teflon insulated Rec Ou...

Page 41: ...ing By Pass mode for home cinema integration microprocessor with its own power supply controls and handles all functions headphones output electronically switchable remote activation of other Audionet...

Page 42: ...42 audionet is a trademark of Idektron GmbH Co KG Engineered and produced by Idektron GmbH Co KG Alboinstra e 36 42 12103 Berlin Germany www audionet de contact audionet de...

Reviews: