


Calibration process :
Please note : This process does not need to be executed when using our AUDIOROOT eSMART
Li-xxWh or LiFe-xxxWh batteries. The 2 push buttons of the front panel are inoperative when
an eSMART battery is connected to the system.
The K-ART's calibration process is very similar to it's little brother eSMART BG-DU. The main
difference is that the K-ART can be connected to 2 batteries simultaneously. The K-ART's fuel gauges are
fully independent and do not share battery calibration informations. In other words this means that a
battery that has been calibrated while being connected to battery input #1 should allways be used on the
same input #1. If the user wishes to use the battery on either battery input he will need to perform the
claibration process twice (once on each battery input).
We therefore recommend to identify your batteries with a letter/digit pair. For example the user
can identify his batteries as 1.A, 1.B, 2.A ,2.B, 3.A, 3.B, etc... were battery 1.A will allways be connected
to input #1 and battery 1.B will allways be connected to input #2.
Here are the steps to perform calibration of 2 batteries at a time :
1. Label the 2 batteries you wish to calibrate with a number ranging from 1 to 8 and adding the suffix
.A or .B to identify each unit. In this example we will use batteries 3.A and 3.B. The 2 batteries
must be fully charged before launching the calibration process.
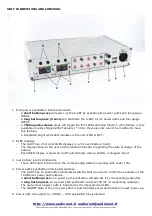
2. Plug the two batteries on the eSMART K-ART power distributor with a compatible power cable
( leave pins 2 and 3 on the XLR4 connectors unused). In our example we will connect battery
labeled 3.A to input #1 and battery labeled 3.B to input #2.
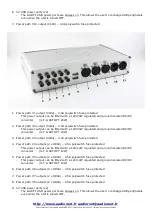
3. Plug all the equipment that will be used in normal operation (for exemple a mixer, a recorder and
several wireless receivers).
4. Power up the K-ART using the main power pushbutton switch (short press).
5. Activate all used outputs with a short press on each corresponding pushbutton switch (short press)
and power ON all your equipment.
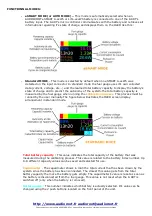
6. By using the 2 push buttons select the battery index that was chosen in step 1. In this example
battery index is 3. You need to select the battery index on both fuel gauges.
7. Initiate the calibration process by pushing simultaneously the 2 push buttons. This must be done
on both fuel gauges.
You can also calibrate only one battery at a time. To do this simply execute the calibration steps
above with only one battery connected to the K-ART.
The fuel gauges will now keep measuring and saving the value of the total current drawn. This
process can be ended only when the batteries are empty.
In the case of a li-ion or LIFEPO4 battery the calibration process will stop automatically when the
low voltage protection circuit of the battery trips.
When calibrating a battery of another chemistry type ( lead acid or nimh) the user needs to
disconnect the battery manually when it's voltage level gets too low in order to achieve the calibration
process correctly ( for exemple the low voltage level of a 6 cell lead acid battery is 10.5 Volts : this value
can be used to terminate the calibration process of a standard SLA battery).
The fuel gauge is now aware of the batteries' total capacity. The user only needs to recall the
corresponding battery pair index number to monitor it's state of charge efficiently and accordingly.
PLEASE NOTE: A battery that has been previously calibrated must allways be connected fully
charged to the eSMART K-ART or the state of charge indications will be inaccurate.
http://www.audioroot.fr
audioroot@audioroot.fr
Ce document est la propriété d'AUDIOROOT, et ne peut-être reproduit ou communiqué sans autorisation


