RM500SL
®
User's Guide Version 3.4
June 2011
5. Highlight and <PICK> [Start test]
6. Highlight and <PICK> [Continue] to capture the comparison curve once the noise
reduction function has responded.
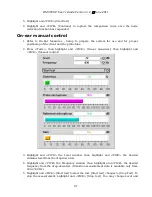
On-ear manual control
1. Refer to On-Ear Measures - Setup to prepare the system for use and for proper
positioning of the client and the probe tube.
2. Press <Tests>, then highlight and <PICK> [On-ear measures], then highlight and
<PICK> [Manual control].
3. Highlight and <PICK> the Level window, then highlight and <PICK> the desired
stimulus level from the drop-down list.
4. Highlight and <PICK> the Frequency window, then highlight and <PICK> the desired
frequency from the drop-down list. (Distortion measurement data is available only from
200-2500 Hz.)
5. Highlight and <PICK> [Start test] to start the test. [Start test] changes to [Stop Test]. To
stop the measurement, highlight and <PICK> [Stop test]. You may change Level and
61
Summary of Contents for RM500SL
Page 1: ...RM500SL User s Guide Version 3 4 March 2010...
Page 9: ...RM500SL User s Guide Version 3 4 June 2011 EC Declaration of Conformity 9...
Page 10: ...RM500SL User s Guide Version 3 4 June 2011 10...
Page 37: ...RM500SL User s Guide Version 3 4 June 2011 37...
Page 43: ...RM500SL User s Guide Version 3 4 June 2011 telecoil test 43...
Page 51: ...RM500SL User s Guide Version 3 4 June 2011 51...
Page 57: ...RM500SL User s Guide Version 3 4 June 2011 57...
Page 64: ...RM500SL User s Guide Version 3 4 June 2011 64...
Page 78: ...RM500SL User s Guide Version 3 4 June 2011 Screen tour unaided screen 78...
Page 97: ...RM500SL User s Guide Version 3 4 June 2011 97...
Page 98: ...RM500SL User s Guide Version 3 4 June 2011 98...
Page 99: ...RM500SL User s Guide Version 3 4 June 2011 99...
Page 102: ...RM500SL User s Guide Version 3 4 June 2011 102...
Page 112: ...RM500SL User s Guide Version 3 4 June 2011 112...
Page 113: ...RM500SL User s Guide Version 3 4 June 2011 113...

