7
CONNECTION OF SPEAKER BOXES
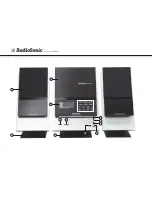
• Unwrap the speaker-cords of both speaker-boxes.
• Please notice that each speakers cord consists of 2 wires, one is "clear" and one has
a black line.
• Insert the "clear" wire of the left speaker-box into the "red" ( + ) speaker connector
beside the main-unit, which has the "l" indication (next to the speaker-connector).
• Insert the "black" wire of the left speaker-box into the "black" ( - ) speaker
connector beside the main-unit, which has the "l" indication (next to the speaker-
connector).
• Repeat the above 2 steps for the "right" speaker box, but this time, inserting them into
the red & black connectors which have the "R" indication.
• When inserting each wire into a connector, press downwards on the connector's
plastic knob (red or black part) & push the exposed metal end of the wire all the
way into the hole above this knob.
• Place the speaker boxes as far apart as possible for best sound effect.
DIGITAL CLOCK FUNCTION
How to set correct time:
• The set has a built-in digital clock, which is displayed when the unit is in "standby
mode" or when you press & hold program key for two seconds during cd or radio
operation.
To set the correct time, follow this procedure:
1. Switch unit to "stand-by" mode (display light = off)
2. Press & hold program for 2 seconds
3. Display shows hour or hour (flashing)
4. Press next or back to select 12-hour or 24-hour clock display system & press
program to confirm your selection
5. Press next or back repeatedly to set the correct hour in the display & press
program to confirm
6. Press next or back repeatedly to set the correct minute in the display & press
program to confirm
7. Correct time is now set & will be shown in the display!
AUTOMATIC POWER ON/OFF TIMER FUNCTION
This set has a timer function to enable you to program the unit to automatically
switch “ON” or “OFF” at preset times. this is useful as a morning alarm clock :
How to set timer
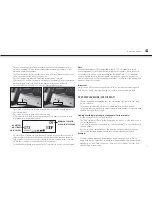
1. Press and hold timer key. the on symbol appears in the display.
2. Press next or back to adjust the hour of the desired "power on" time and then
press timer to confirm.
3. Press next or back to adjust the minutes of the desired "power on" time and then
press timer to confirm. now the symbol in the display changes to show off .
4. Press next or back to adjust the hour of the desired "power off" time and then
press timer to confirm.
5. Press next or back to adjust the minutes of the desired "power off" time and then
press timer to confirm. now the display will indicate the "wake up mode" (cd or
radio).
6. Press next to choose the desired mode & press timer to confirm
7. The display then shows the "wake up volume level" (loundness). press back or next to
decrease or increase the volume level to be used for the music to be played when the
timer switches on the unit at the pre-set time.
8. Press timer to confirm. the unit will then automatically display all your settings in
sequence:
• "power on time" ( ON )
• "power off time" ( OFF )
• "power on mode" (cd or tuner)
• "power on volume level" (loudness)
EN
Instruction Manual
Summary of Contents for TXCD-1530
Page 2: ...2 ...
Page 4: ...2 7 5 6 11 12 3 4 9 10 8 1 4 Instruction Manual ...
Page 16: ...2 7 5 6 11 12 3 4 9 10 8 1 16 Gebruiksaanwijzing ...
Page 28: ...2 7 5 6 11 12 3 4 9 10 8 1 28 Mode d emploi ...
Page 40: ...2 7 5 6 11 12 3 4 9 10 8 1 40 Bedienungsanleitung ...
Page 52: ...2 7 5 6 11 12 3 4 9 10 8 1 52 Manual de instrucciones ...
Page 64: ...2 7 5 6 11 12 3 4 9 10 8 1 64 Manual de Instruções ...
Page 76: ...2 7 5 6 11 12 3 4 9 10 8 1 76 Instrukcje użytkowania ...
Page 88: ...2 7 5 6 11 12 3 4 9 10 8 1 88 Istruzioni per l uso ...
Page 100: ...2 7 5 6 11 12 3 4 9 10 8 1 100 Användare ...
Page 111: ...111 ...
Page 112: ...Tristar Europe B V JulesVerneweg 87 5015 BH Tilburg The Netherlands www tristar eu TXCD 1530 ...


