background image

Remote Sensor

Min

Max

Volume 

Tuning

Power

Tuner

AM/FM 

+10

Auto

Mono

Memory

Left

Right

Balance

Min

Max

Treble

Min

Max

Bass

5

Video 2

1

2

3

4

6

Video 1

Tape

7

CD

8

9

Video 3

Phono

Model PreAmp/Tuner Two
Stereo PreAmplifier and AM/FM Digital Tuner

Auto

FM

AM

104.5

Memory

Stereo

15

MHz
KHz

Tuned

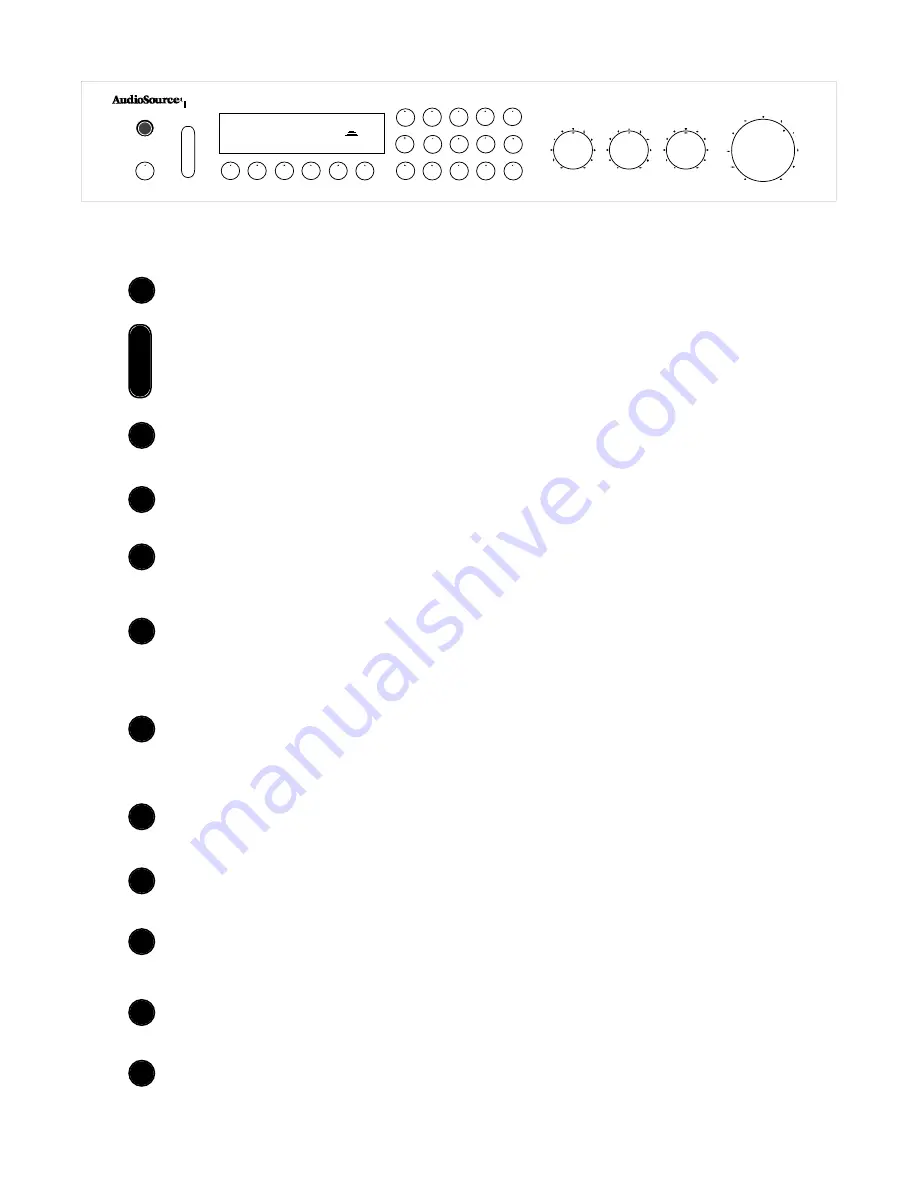
Power : Press this button to Turn "ON" the A.C. power to the PreAmp/Tuner Two. The
Red LED indicator will remain lit when the unit is ON.

Tuning : Press the TOP END of this button to RAISE the frequency of the AM/FM tuner.
Press the BOTTOM END of this button to LOWER  the frequency of the AM/FM tuner.

Tuner : Press this button to select the Tuner as your input source. The Red LED will
indicate your selection.

AM/FM : Press this button to select between AM and FM bands. The Red LED and
Display window will indicate your selection.

Mono : Press this button to receive a station in "Mono". This Button is useful for "weak"
or "hard to capture" FM stations.

Memory : Press this button when entering stations into the tuner's "Memory". When
you've found a station to store into the tuner's memory, Press this button once, and then
press the numbered buttons (#1 to #9)

Auto : Press this button to choose between "Automatic" or "Manual" tuning of radio
stations. In the "Auto" mode, the tuner will scan directly from station to station, every time
the "Tuning" button is pushed. In the "Manual" mode, the tuner will advance "up" or
"down" incrementally, every time the "Tuning" button is pushed.

+10 : Push this button "In" to access the Tuner Presets #11 to #19. Keep this button in the
"Out" position to access the Tuner Presets #1 to #9.

#1 to #9 : Push these numbered buttons to listen to "Memorized" stations, or to enter
stations into "Memory".

Video 1 : Press this button to select "Video 1" as your input source. The Red LED will
indicate your selection.

Video 2 : Press this button to select "Video 2" as your input source. The Red LED will
indicate your selection.

Video 3 : Press this button to select "Video 3" as your input source. The Red LED will
indicate your selection.

Using The Controls

Memory

Video 3

Video 2

Video 1

5

+10

Auto

AM/FM

Mono

Tuner

Tuning

Power

4.

Summary of Contents for PreAmp/Tuner Two

Page 1: ...n this manual should you need to refer to it in the future Owner s Manual 1996 AudioSource Inc Stereo PreAmplifier and AM FM Digital Tuner with Wireless Remote Control Model PreAmp Tnr TWO Stereo PreAmplifier and Digital Tuner Remote Sensor Min Max Volume Tuning Power Tuner AM FM 10 Auto Mono Memory Left Right Balance Min Max Treble Min Max Bass Quartz PLL Digital Synthesiser FM Stereo Memory Pres...

Page 2: ...ss this button when entering stations into the tuner s Memory When you ve found a station to store into the tuner s memory Press this button once and then press the numbered buttons 1 to 9 Auto Press this button to choose between Automatic or Manual tuning of radio stations In the Auto mode the tuner will scan directly from station to station every time the Tuning button is pushed In the Manual mo...

Page 3: ...s Turn this control to the left to decrease the amount of Treble or high frequencies The 12 00 Position indicates a Flat Response Balance Turn this control to the left to increase the volume of the left channel while decreasing the volume of the right channel Turn this control to the right to increase ther volume of the right channel while decreasing the volume of the left channel The 12 00 positi...

Page 4: ...vance to the Next Tuner preset station For instance either 1 2 3 4 etc or 11 12 13 14 etc FM AM Press this button to select between AM and FM bands on the Tuner Phono Press this button to select the Phonograph as your input source C D Press this button to select the C D player as your input source Tuner Press this button to select the Tuner as your input source Tape Press this button to select the...

Page 5: ...k Record Plug the Video In jack of your Video 3 component into this jack Video 3 Plug the Video Out jack of your Video 3 component into this jack Video 2 Plug the Video Out jack of your Video 2 component into this jack Video 1 Plug the Video Out jack of your Video 1 component into this jack Note When using an outboard processor or graphic equalizer follow the additional connections in Set up Diagr...

Page 6: ...Line 75 dB Phono 76 dB FM Mono 70 dB FM Stereo 60 dB AM Input Sensitivity 150 MV Line 2 5 MV Phono Input Impedance 47K Ω Alternate Channel Selectivity FM 65 dB Image Rejection FM 70 dB Capture Ratio FM 1 dB T H D FM Mono 0 2 Stereo 0 4 Image Rejection AM at 1000 kHz 40 dB IF Rejection AM at 1000 kHz 60 dB Inputs Phono CD Tape Video 1 Video 2 Video 3 Outputs Line Out 1 L R Line Out 2 L R Tape Rec A...

Page 7: ...s A Video Output jack for the TV Monitor is also provided Two sets of Master Line Outputs allow for direct Subwoofer connection or multiple amplifiers within the system Three sets of A C power inputs permit direct connection of system components The Tuner section features 18 random station presets with precise control over all parameters Quartz Digital Phase Lock Loop tuning assures pinpoint accur...

Page 8: ...Line In L R INPUT REC PLAY REC OUTPUT TAPE 1 TAPE 2 LINE MODEL PreAmp Tuner Two L R Phono Tape Rec Tape Mon CD Line Out 2 Video 1 Video 2 Video 3 Video 3 Rec Line Out 1 AM GND 300 ohm Video 1 Video 2 Video 3 Record Monitor 75 ohm Power Consumption 17 w Max Power 200 w Max Power 500 w Max Power 500 w AC 120 V 60 HZ Unswitched Switched Switched POWER AMPLIFIER LINE IN LEFT RIGHT SPEAKERS R L C D PLA...

Page 9: ...enna In an area where signals are strong near to the broadcast stations the AM Loop antenna provided on the rear panel may be adequate This antenna is effective in all areas except those where the signal strength is very low or in buildings made from reinforced concrete Position this antenna so that as many Tuned indicators as possible are lighted when tuned to an AM broadcast Outdoor Antenna If y...

Reviews: