background image

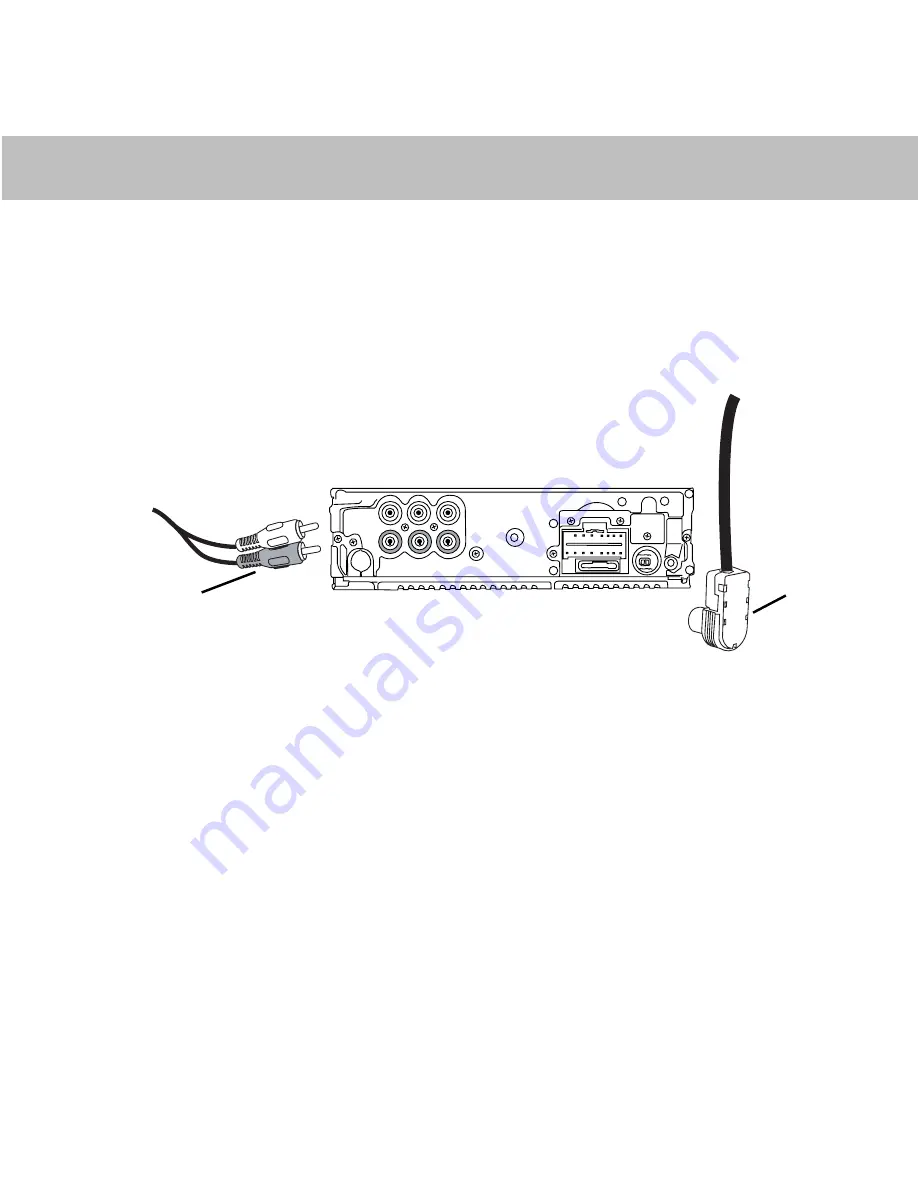
Left/Right Audio
Cables (Model Specific)

Connector

Installation (Continued)

Installation (Continued)

Installation (Continued)

Installation (Continued)

Installation (Continued)

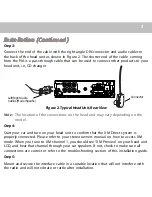
Figure 2. Typical Head Unit, Rear View

Note:

The location of the connections on the head unit may vary depending on the
model.

Step 4:

Start your car and turn on your head unit to confirm that the XM Direct system is
properly connected. Please refer to your stereo owners manual on how to access XM
mode. When you tune to XM channel 1, you should see “XM Preview” on your head unit
LCD, and hear that channel through your car speakers. If not, check to make sure all
connections are correct or refer to the troubleshooting section of this installation guide.

Step 5:

Mount and secure the interface cable in a suitable location that will not interfere with
the radio and will not vibrate or rattle after installation.

Step 3:

Connect the end of the cable with the right angle DIN connector and audio cables to
the back of the head unit as shown in Figure 2. The shorter end of the cable  coming
from the PIA is a pass-through cable that can be used to connect other products to your
head unit, i.e., CD changer.

3

Summary of Contents for 128-7984A

Page 1: ...Interface Cable Interface Cable Interface Cable Interface Cable Interface Cable Installation Guide Installation Guide Installation Guide Installation Guide Installation Guide...

Page 2: ...nector to the Programmable Interface Adapter PIA mating connector as shown in Figure 1 Slide the rubber strain relief onto the PIA case Attach the Car Dock USB connector into the USB receptacle on the...

Page 3: ...o XM channel 1 you should see XM Preview on your head unit LCD and hear that channel through your car speakers If not check to make sure all connections are correct or refer to the troubleshooting sec...

Page 4: ...llation Continued Installation Continued Installation Continued Step6 Return the head unit to its original location in the dashboard CAUTION Ensure the cables are not kinked or get disconnected when i...

Page 5: ...head unit to the XM Preview Channel channel 1 and follow instructions for activation You can also go on line at www xmradio com in the U S www xmradio ca in Canada or call the toll free XM activation...

Page 6: ...or Wait until the car is in an area that has a clear view of the open sky LOADING Radio is acquiring audio or program information Wait until the radio has received the information OFFAIR The channel c...

Page 7: ...Company that has been damaged through alteration improper installation mishandling misuse neglect accident or by removal or defacement of the fac tory serial number bar code label s THE EXTENT OFTHE...

Page 8: ...additional information call 1 800 645 4994 or visit www audiovox com For more information about XM Satellite Radio service visit www xmradio com or call 1 800 852 9636 The XM name and related logos a...

Reviews: