background image

-13-

volume control, adjust the Level control to decrease the
output from the system. Once the correct setting is
found, this control should not require any further adjustment.

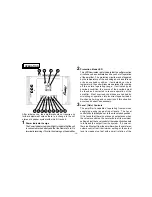
4

4/3/2 Channel Mode Selector

Set this switch to the 4-Channel (4CH), 3-Channel (3CH)
or 2-Channel (2CH) position as appropriate for the
type of system and speakers you are using.

5

Crossover Filter Selectors

These switches allow selection of the frequency filters that
permit the respective channels of the amplifier to be
used to reproduce the entire audio range or just the
bass range.

In the "FULL" position of the switch, the response is flat
and unaffected so the entire audio frequency range is
reproduced by the amplifier. Use this setting if the
respective amplifier channels are being used to power
a full range speaker system.

In the "LPF" setting, only the bass frequencies

below

the frequency set by the Crossover Frequency Control

6

will be amplified and fed to the speakers. Use this

setting if the respective amplifier channels are being
used to power a sub-woofer speaker system.

6

Crossover Frequency Controls

These Controls select the crossover frequency when
the Filter Selector

5

is in the "LPF" setting. Adjust it to the

appropriate position for the characteristics and crossover
frequency requirements of the speaker system with which
the respective channels of the amplifier are being used.

7

Bass Boost Switches

This switch is used to accentuate the bass frequencies
by adding 12 dB of boost to the signal (at 60 Hz.) on the
respective channels.

8

Cooling Fan

This unit incorporates a fan to provide continuous air
flow through the unit to keep the heat-sink and components,
safely within their operating temperature range. The fan
is automatically activated wh12 volts is supplied
to the Remote Turn-On terminal.

9

Fuses

The circuitry of the amplifier is protected from damage
by automotive-type fast-blow fuses. If fuse replacement
is necessary, use only fuses of the same ampere rating
as originally supplied with the unit. The use of fuses with
incorrect ratings may cause serious damage to the amplifier.
If fuses blow consistently, carefully check all electrical
connections to the unit.

Summary of Contents for 1285307

Page 1: ...Owner s Owner s Owner s Owner s Owner s Manual Manual Manual Manual Manual ModelAMP 596 500WattStereoAmplifier ...

Page 2: ...Channel and Mixed Mono Input Wiring Diagram 6 4 Channel and Mixed Mono Output Wiring Diagram 7 3 Channel Input Wiring Diagram 8 3 Channel Output Wiring Diagram 9 2 Channel Mono Bridged Input Wiring Diagram 10 2 Channel Mono Bridged Output Wiring Diagram 11 Operation 12 13 Warranty Back Cover ...

Page 3: ...ELP SPECIFICATIONS 1 Due to continuing improvement Audiovox reserves the right to change features and design without notice Maximum Output Power 4 Channel Operation 2 Channel Operation Output Power 0 1 T H D 4 Channel Operation 2 Channel Operation Output Impedance Frequency Response Channel Separation Signal Noise Ratio 125 watts x 4 4 ohms 250 watts x 2 4 ohms 75 watts RMS x 4 150 watts RMS x 2 2...

Page 4: ...ors will shut off operation until it has cooled down sufficiently 4 If fuse replacement is necessary use only fuses of the same ampere rating as originally supplied with the unit The use of fuses with incorrect ratings may cause serious damage to the amplifier If fuses blow consistently carefully check all electrical connections to the unit 5 Supply of adequate battery voltage is critical to the p...

Page 5: ...g surface and mark the locations of the four mounting holes as shown in the illustration 3 Remove the amplifier and drill a 1 8 hole at each of the four locations CAUTION Before drilling the holes look at the underside of the mounting surface Always check carefully to avoid drilling into wiring braces fuel or brake lines CHECK BEFORE YOU DRILL 4 Secure the amplifier to the mounting surface using t...

Page 6: ...maller gauge wire for this lead and connect it to the terminal of the battery after all other wiring is completed 2 Ground Connection The ground terminal GND connection is also critical to the correct operation of the amplifier Use a wire of the same gauge as the power connection 10 or thicker and connect it between the ground terminal GND of the amplifier and a metal part of the vehicle close to ...

Page 7: ... high level inputs not both If low level outputs are provided from the car stereo it is recommended that the low level inputs be used for lowest distortion and best performance Use good quality shielded audio cables with RCA plugs at both ends to connect the stereo to the amplifier and keep the cable lengths to a minimum to avoid noise If the car stereo does not provide low level outputs the ampli...

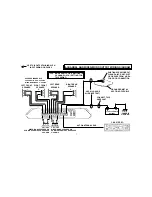
Page 8: ...OUTPUT WIRING ON PAGE 7 4 CHANNEL AND MIXED MONO INPUT WIRING DIAGRAM RIGHTFRONT RIGHTFRONT LEFTFRONT LEFTFRONT LOW LEVEL RCA OUTPUTS GREEN WHITE BROWN GRAY LEFTFRONT RIGHTFRONT LEFTREAR LEFTREAR RIGHTREAR RIGHTREAR RIGHTREAR LEFTREAR TOCH1 TOCH2 TOCH4 TOCH3 NOTE MODE SWITCH ON AMPLIFIER IN 4 CHANNEL 4CH SETTING FOR THIS WIRING BLACK GREEN WHITE BROWN GRAY BLACK CHASSISGROUNDONRADIO ...

Page 9: ... NOTE MODE SWITCH ON AMPLIFIER IN 4 CHANNEL 4CH SETTING FOR THIS WIRING USE THIS OUTPUT WIRING WITH INPUT WIRING ON PAGE 6 4 CHANNEL AND MIXED MONO OUTPUT WIRING DIAGRAM LEFT FRONT SPEAKER SPEAKERIMPEDANCE 4 CHANNEL MODE 2 8 OHMS MIXED MONO MODE 4 8 OHMS CH1 CH2 MIXED MONO SPEAKER OR SUB WOOFERWITHCROSSOVER 4 8 OHMS RIGHT REAR SPEAKER RIGHT FRONT SPEAKER CH3 CH4 MIXED MONO SPEAKER OR SUB WOOFERWIT...

Page 10: ...R LOW LEVEL INPUTS NOT BOTH HIGH LEVEL SPEAKER OUTPUTS CAR STEREO RIGHTFRONT RIGHTFRONT LEFTFRONT LEFTFRONT LOW LEVEL RCA OUTPUTS GREEN WHITE BROWN GRAY LEFT RIGHT MONOORSUB WOOFER MONOORSUB WOOFER TOCH1 TOCH2 TOCH4 NOTE MODE SWITCH ON AMPLIFIER IN 3 CHANNEL 3CH SETTING FOR THIS WIRING BLACK GREEN WHITE BROWN GRAY BLACK CHASSISGROUNDONRADIO MONOORSUB WOOFER N O CONNECTION ...

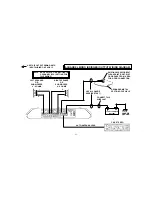
Page 11: ...N OF VEHICLE 12 VOLT VEHICLE BATTERY CHASSIS GROUND NOTE MODE SWITCH ON AMPLIFIER IN 3 CHANNEL 3CH SETTING FOR THIS WIRING USE THIS OUTPUT WIRING WITH INPUT WIRING ON PAGE 8 3 CHANNEL OUTPUT WIRING DIAGRAM LEFT SPEAKER CH1 CH2 MIXED MONO SPEAKER OR SUB WOOFERWITHCROSSOVER 4 8 OHMS MONO SPEAKER OR SUB WOOFER 4 8 OHMS RIGHT SPEAKER SPEAKER IMPEDANCE 2 8 OHMS 4 8 OHMS IN MIXED MONO MODE ...

Page 12: ...R STEREO USE THIS INPUT WIRING WITH OUTPUT WIRING ON PAGE 11 2 CHANNEL MONO BRIDGED INPUT WIRING DIAGRAM RIGHT RIGHT LOW LEVEL RCA OUTPUTS BROWN WHITE GREEN GRAY LEFT LEFT RIGHT LEFT TOCH1 TOCH4 NOTE MODE SWITCH ON AMPLIFIER IN 2 CHANNEL 2CH SETTING FOR THIS WIRING CHASSISGROUNDONRADIO BLACK N O CONNECTION BROWN WHITE GREEN GRAY BLACK N O CONNECTION ...

Page 13: ...M AREA FOR GOOD CONNECTION GROUNDED METAL SECTION OF VEHICLE 12 VOLT VEHICLE BATTERY CHASSIS GROUND NOTE MODE SWITCH ON AMPLIFIER IN 2 CHANNEL 2CH SETTING FOR THIS WIRING USE THIS OUTPUT WIRING WITH INPUT WIRING ON PAGE 10 2 CHANNEL MONO BRIDGED OUTPUT WIRING DIAGRAM LEFT SPEAKER OR SUB WOOFER 4 8 OHMS RIGHT SPEAKER OR SUB WOOFER 4 8 OHMS ...

Page 14: ...ng off to a normal operating range If activated by an overload condition the source of the overload must be found and corrected to resume operation of the amplifier Most overload conditions are caused by mis wiring or operation into incorrect speaker loads Re check all wiring and connections if this situation occurs and correct as necessary 3Level Gain Controls The amplifier is capable of operatin...

Page 15: ...lifier channels are being used to power a sub woofer speaker system 6Crossover Frequency Controls These Controls select the crossover frequency when the Filter Selector 5 is in the LPF setting Adjust it to the appropriate position for the characteristics and crossover frequency requirements of the speaker system with which the respective channels of the amplifier are being used 7Bass Boost Switche...

Page 16: ...NY S LIABILITY UNDER THIS WARRANTY IS LIMITED TO THE REPAIR OR REPLACEMENT PROVIDED ABOVE AND IN NO EVENT SHALL THE COMPANY S LIABILITY EXCEED THE PURCHASE PRICE PAID BY PURCHASER FOR THE PRODUCT This Warranty is in lieu of all other express warranties or liabilities ANY IMPLIED WARRANTIES INCLUDING ANY IMPLIED WARRANTY OF MERCHANTABILITY SHALL BE LIMITED TO THE DURATION OF THIS WRITTEN WARRANTY A...

Page 17: ... 16 ...

Page 18: ... 1998 Audiovox Corp Hauppauge N Y Printed in Korea Form No 128 5306 ...

Reviews: