background image

128-6602

5 of 16

the Black w/ White wire is at open circuit through the control switch, the remote starter is disabled.
Connect the Black w/ White tracer wire to one of the wires from the back of the previously mounted control switch.
Connect the remaining wire of the control switch to chassis ground.  Always try to mount the switch so that the ON
position is in an upward or toward the driver direction.

GREY Wire: Negative Inhibit Input 1
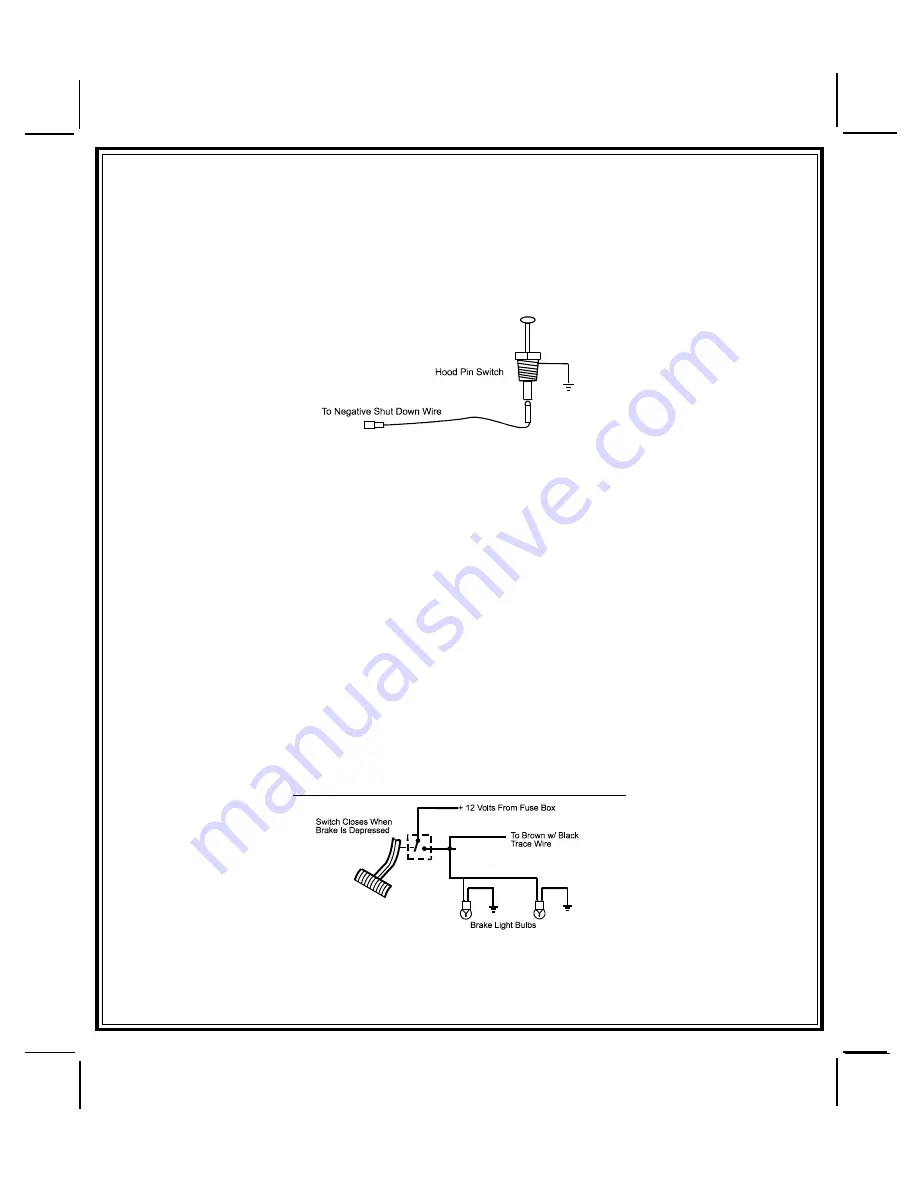
Connect the GREY wire to the previously mounted hood pin switch provided .  This wire will be routed through the
fire wall into the engine compartment.  It is necessary to use an existing grommet when passing wires through the
fire wall to prevent short circuiting. This is an important safety feature of AS-9075, and failure to use this feature can
result in serious injury. Route the wire to the pin switch and connect it using the bullet connector provided.

GREY w/ BLACK Tracer Wire: Negative Inhibit Input 2
Any time the grey w/ black tracer wire is grounded, the Remote Starter will stop operating, even if the signal is received
from the transmitter.
If the brake light switch in the vehicle switches ground to the brake light circuit, connect the Grey w/ Black trace wire
to the output of the brake light switch.  If the brake light switch in the vehicle sw12 Volts, do not use the Grey
w/ Black wire; see Brown w/ Black tracer wire.

BROWN Wire: Positive Inhibit Input 1
Any time + 12 Volts is applied to the Brown wire, the Remote Starter will stop operating, even if the signal is received
from the transmitter.
If the vehicle has a factory installed hood pin switch, and that switch pr 12 Volts to an under hood light, the
Brown wire can be connected to the existing pin switch.

BROWN w/ BLACK Tracer Wire: Positive Inhibit Input 2
Any time + 12 Volts is applied to the Brown w/ Black tracer wire, the Remote Starter will stop operating, even if the
signal is received from the transmitter. If the brake light switch in the vehicle sw 12 Volts to the brake light
circuit, connect the Brown w/ Black trace wire to the output of the brake light switch. If the brake light switch in the vehicle
switches ground, do not use the Brown w/ Black wire; see Grey w/ Black tracer wire.
Note: The Brown/Black wire is used for programming, if the brake switch in the vehicle switches ground, a normally

open push-button switch must be added.  During the program sequence, when the brake pedal is pressed
and released, this switch will be used in it's place.

If the installation of this switch is necessary, connect one end of the normally open push button switch to the Brown/
Black wire, and connect the other end of the switch to a fused + 12 volt source.

Brake Switch Positive Shutdown Detail

YELLOW w/ BLACK Tracer Wire: + 12 Volt Alarm By - Pass Output

NOTE: YOU  MUST  DISCONNECT  THE  IGNITION  INPUT  OF  THE  ALARM  FROM  ANY  OTHER  WIRE  THAT  IT  IS

PRESENTLY  CONNECTED  TO  IN  THE  VEHICLE.

This wire provides a 500mA + 12 Volt transistorized output when the ignition key is turned to the “ON” position, and
0 Volts when the ignition key is “OFF” and when the vehicle is running  under the control of the remote starter.

5

Summary of Contents for 1286602

Page 1: ... Systems Gasoline or Diesel With True Tach Reference And Automatic Transmissions Only Kit Contents 1 Control Module 1 MultiPinInput OutputHarness 1 Six Pin Power Harness 1 Four Pin Auxiliary Harness 1 Three Pin I O Harness 2 30 Amp In line Fuse Holders With Fuses 1 Control Switch Programming Switch 1 Ring Terminal 4 1 2 Long Screws 1 Pin Switch 1 Remote Start Warning Label 1 Literature Package 1 ...

Page 2: ...firewall behind the hood seal In either case the switch must be set up to allow the hood door to depress the switch at least 1 4 inch when the hood is closed and fully extended when the hood is opened For direct mounting a 1 4 inch hole must be drilled Carefully check behind the chosen location to insure the drill will not penetrate any existing factory wiring or fluid lines Drill a 1 4 hole in th...

Page 3: ...e Tech Update issued 9 30 96 YELLOW Wire Starter Output Careful consideration for the connection of this wire must be made to prevent the vehicle from starting while in gear Understanding the difference between a mechanical and an electrical Neu tral Start Switch will allow you to properly identify the circuit and select the correct installation method In addition you will realize why the connecti...

Page 4: ...nnect this wire to the Accessory wire from the ignition switch This wire will show 12 volts when the ignition switch is turned to the ACCESSORY or ON and RUN positions and will show 0 volts when the key is turned to the OFF and START or CRANK positions WIRING CONNECTIONS 12 Pin Input Output Harness Black Wire Chassis Ground Source Connect the Black wire to a known vehicle ground source or to a sol...

Page 5: ...Remote Starter will stop operating even if the signal is received from the transmitter If the vehicle has a factory installed hood pin switch and that switch provides 12 Volts to an under hood light the Brown wire can be connected to the existing pin switch BROWN w BLACK Tracer Wire Positive Inhibit Input 2 Any time 12 Volts is applied to the Brown w Black tracer wire the Remote Starter will stop ...

Page 6: ...d during the Remote Start activation period then vibration from the running vehicle can cause the alarm to trigger In this case connect the Light Blue Wire to terminal 86 of a external relay Connect terminal 85 of the relay to a fused 12 volt battery source Cut the shock sensor trigger wire and connect one end of the cut wire to terminal 30 and the other end of the cut wire to terminal 87a Just be...

Page 7: ...ut will allow the ignition to keep the glow plugs active for the vehicles automatic time out period before cranking the starter motor If this wire is connected to the glow plug wire this will take precidence over the timing setting and the gas Diesel selection in the feature selection chart Use this wire if you do not want to set the timing of the glow plug preheat circuit as shown in the feature ...

Page 8: ... This wire is also referred to as the ECM wake up wire in some Chrysler vehicles NOTE The outputs above are low current outputs and must be used with a relay if the circuit s requirement is more than 300 mA 4PINKEYLESSENTRYUPGRADEINPUTTRIGGERWIRES The system allows the factory keyless entry units to directly trigger the remote start providing the factory system sequentially unlocks first the drive...

Page 9: ...ctable features 1 Start with the ignition switch in the OFF position and the programming switch in the ON position 2 Turn the ignition key to the ON position 3 Within 5 Seconds begin to toggle the control program switch OFF ON OFF ON OFF then ON 3a Parking Lights Turn On 4 Within 5 Seconds Turn the ignition key OFF then ON 4a Parking Lights Turn Off 5 Within 5 Seconds begin to toggle the control p...

Page 10: ... Off Position 5 Flashes RF shutdown Remote signal received or manual start trigger wire reactivated 6 Flashes High RPM Signal Received 7 Flashes Tach Signal Has Not Properly Been Learned TIMEDSTARTPROGRAM The Remote Start unit has the ability to start the vehicle automatically at timed intervals This feature is useful in extremely cold climates where starting the engine is the only means to keep t...

Page 11: ...g out the firing order of the engine in groups of as indicated below Draw a circle around any of the columns The Green Black wires should be connected to the negative terminal of the respective cylinder number which appears in any of the circles 2 For vehicles utilizing 2 cylinder firing per coil pack connect Green Black to the tach side of each coil pack For 8 cylinder four coil systems connect t...

Page 12: ...ld shut off If the unit fails this test recheck your enable switch connection to the Ground and the Black White wire of the Audiovox Remote Start Unit If you have a plug in enable switch check that the two pin connector is firmly seated in the mating connector on the control module DO NOT RELEASE THIS VEHICLE TO THE CONSUMER UNTIL YOU CONFIRM THE OPERATION OF THE MANUAL SHUT DOWN ENABLE FEATURE NE...

Page 13: ...e vehicle Park Neutral ECM Input or the vehicle key in sensor This connection will prevent remote start operation if the key is left in the ignition switch regardless of the gear selectors position PARK NEUTRAL ECM INPUT The Park Neutral ECM input is the preferred method of installation This not only maintains the integrity of the factory circuit it is also the easiest to install providing the veh...

Page 14: ... may also effect other warning tones such as the light on reminder These situations should be carefully considered before altering the vehicle s wiring and must be fully explained to the consumer The Following circuits may be used only if the above circuit is not available METHOD 1 To connect to the key in sensor as shown in method 1 A Locate the control wire that connects the drivers door pin swi...

Page 15: ...his manual COMPLETING THE INSTALLATION After you have confirmed the operation of the Audiovox Remote Start unit and tested all the safety features of the system 1 If you have not done so already place the red rubber handle cover over the handle of the control switch for ease of identification This will allow your customer to distinguish the Remote Start control switch from the program switch 2 Mou...

Page 16: ...128 6602 16 of 16 16 2003 Audiovox Electronics Corp Hauppauge N Y 11788 128 6602 ...

Reviews: