background image

128-7451

9 of 16

NOTE:  The outputs above are low current outputs and must be used with a relay if the circuit's requirement is
more than 300 mA.
2 Pin Door Lock/Unlock Harness: (White Connector)

The Red & Green Door Lock/Unlock output wires provide either a pulsed ground or 12 volts to control the
vehicle door lock / unlock circuits.  The output of these wires has a maximum switching capability of 300mA.  Many
vehicles today have factory door lock relays which can be connected directly to these outputs, however always confirm
that the factory relays in your particular vehicle do not exceed the rated 300mA output of the units door lock/unlock
circuit. Plug the 2 pin connector of the door lock/unlock harness into the mating connector shell of the control module.
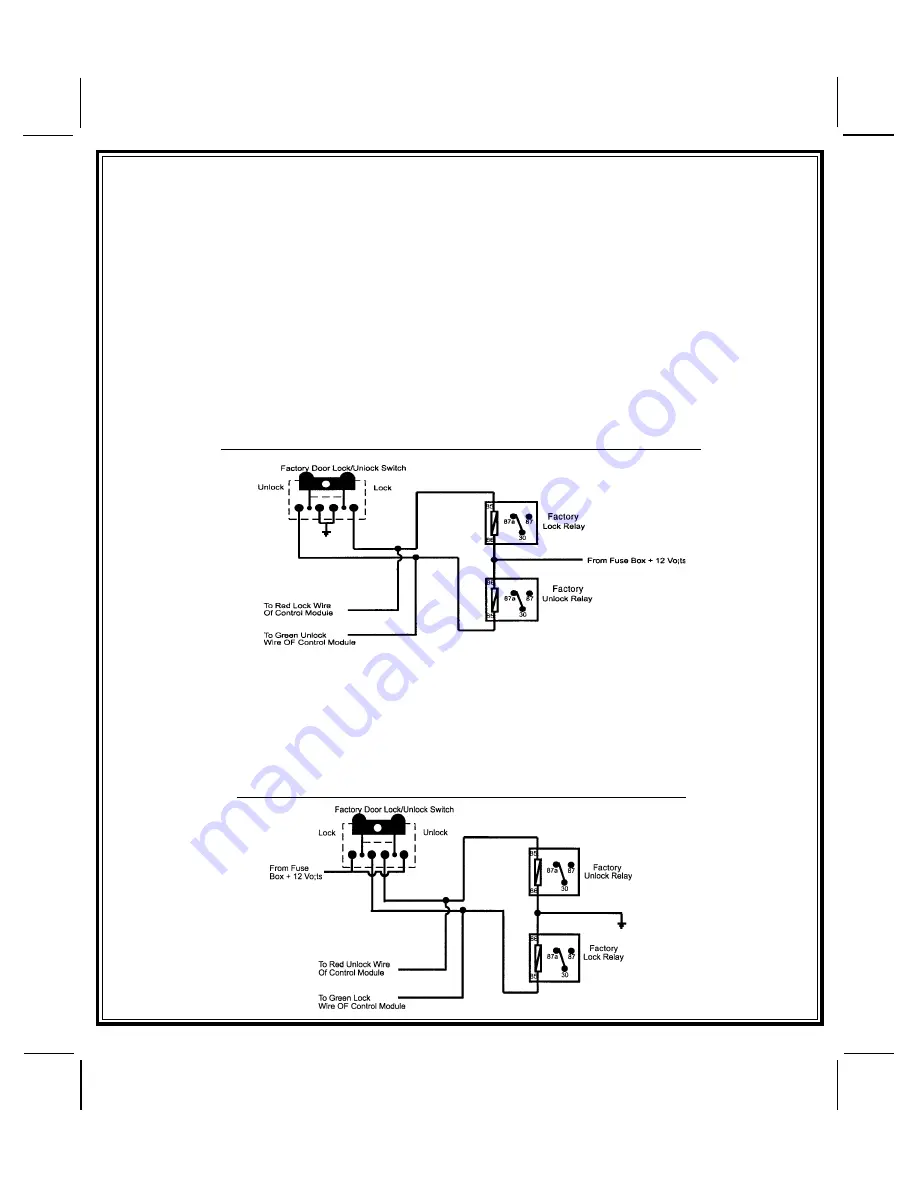
Determine the door lock circuit of the vehicle you are working on and wire according to the diagrams shown.

3 Wire Ground Switched Door Lock Circuits:

In this application, the Red wire of the 2 pin harness provides a ground pulse during the arming sequence, or pulsed
ground lock output.  Connect the Red wire to the low current ground signal wire from the factory door lock switch to the
factory door lock relay.
The Green wire of the 2 pin harness provides a ground pulse during the disarming sequence, or pulsed ground
unlock output.  Connect the Green wire to the low current ground signal wire from the factory door unlock switch to the
factory door unlock relay.  See Below For Wiring Detail.

3 Wire Ground Switched Door Lock/Unlock Wiring Detail

3 Wire Positive Switched Door Locks:

In this application, the Red wire of the two pin harness provides a + 12 volt pulse during the disarming  sequence, or
pulsed 12 volt unlock output.  Connect the Red wire to the low current 12 volt signal wire from the factory door unlock
switch to the factory door unlock relay.
The Green wire of the two pin harness provides a + 12 volt pulse during the arming sequence or pulsed 12 volt lock
output.  Connect the Green wire to the low current 12 volt signal wire from the factory door lock switch to the factory
door lock relay.  See Below For Wiring Detail.

3 Wire Positive Switched Door Lock/Unlock Wiring Detail

9

Summary of Contents for 1287451

Page 1: ...unk Release Harness 1 Wire Loaded 2 30 Amp In line Fuse Holders With Fuses 1 Control Switch 1 Programming Switch 1 Ring Terminal 4 1 2 Long Screws 1 Pin Switch 1 Remote Start Warning Label 1 Literatur...

Page 2: ...penetrate any existing factory wiring or fluid lines Drill a 1 4 hole in the desired location and thread the hood pin switch into it using a 7 16 nut driver or deep well socket If using the mounting...

Page 3: ...wire as used by the battery 1 source Most vehicles have more than one battery source supplying power to the ignition switch Separate feed wires must be used for the Red and Red White wires If your ve...

Page 4: ...tch This wire will show 12 volts when the ignition key is turned to the to the ON or RUN and the START or CRANK positions and will have 0 volts when the key is turned to the OFF and ACCESSORY position...

Page 5: ...ition is in an upward or toward the driver direction GRAYWIRE NegativeInhibitInput1 Connect the GRAY wire to the previously mounted hood pin switch provided This wire will be routed through the firewa...

Page 6: ...ut when the ignition key is turned to the ON position and 0 Volts when the ignition key is OFF and when the vehicle is running under the control of the remote starter This wire should be connected to...

Page 7: ...30 85 to a fused 12 volt battery source rated for a minimum of 25 Amp Connect terminal 87 to the third ignition wire in the vehicle C GM VATS Key Override If the vehicle has the General Motors VATS sy...

Page 8: ...OUTPUT HARNESS The auxiliary 4 pin connector provides low current outputs to control various functions in the vehicle during different stages of the Remote Start unit s operation Understanding these o...

Page 9: ...es a ground pulse during the arming sequence or pulsed ground lock output Connect the Red wire to the low current ground signal wire from the factory door lock switch to the factory door lock relay Th...

Page 10: ...r is firmly seated making good contact to the control unit 1 RF Programmable Features Feature Selection 1 Flash 2 Flash 3 Flash 4 Flash Default 1 Run Time 5 Min 10 Min 15 Min 20 Min 10 Min 2 Ign 2 Dur...

Page 11: ...ved to Off position 5 Flashes RF Shutdown command received 6 Flashes High RPM signal over speed shut down 7 Flashes Tach has NOT learned Multi Coil Pack Adapter Optional The multi coil pack adapter P...

Page 12: ...t the 2 pin connector is firmly seated in the mating connector on the control module WA R N I N G DO NOT RELEASE THIS VEHICLE TO THE CONSUMER UNTIL YOU CONFIRM THE OPERATION OF THE MANUAL SHUT DOWN EN...

Page 13: ...t reconfiguration of the control switch wiring and the addition of a 4000 series diode Shown is a typical GM Park Neutral ECM input circuit To connect the Audiovox remote start unit to the GM Park Neu...

Page 14: ...e original factory key in chime module will not alert the owner that the key has been left in the ignition switch In addition this may also effect other warning tones such as the light on reminder The...

Page 15: ...s manual COMPLETING THE INSTALLATION After you have confirmed the operation of the Audiovox Remote Start unit and tested all the safety features of the system 1 If you have not done so already place t...

Page 16: ...128 7451 16 of 16 2005 Audiovox Electronics Corp Hauppauge NY 11788 1287451...

Reviews: