background image

128-xxxx

8 of 24

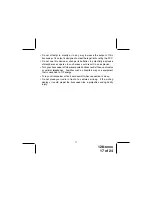
GMRS100 OPERATIONAL MODES

8

NOTE:

To differentiate between operating modes, look for HI or LO
indication below the battery power level indicator when in GMRS
mode.Refer to the appropriate section of this manual for de-
tailed operating instructions for each mode. Channels 1 through
7 are shared GMRS/FRS. Channels 8 through 14 are FRS only,
and channels 15 through 22 are GMRS only.

Controls:

Power On-Off/SCAN Button (13)
Press and hold the PWR on/off button for at least 2 seconds. You will hear
a confirming melody to indicate the unit is on.  To turn the unit off, press and
hold the button for at least 2 seconds.

Adjusting the Volume (11, 10)
With the unit powered on, press the Up Channel/Volume button (   ) to
increase volume and the Down Channel/Volume button (   ) to decrease

GMRS/FRS
(MODE)

POWER
SELECT

CTCSS
SELECT

CHANNEL
SELECT

ROGER
BEEP

(1-22)

(oF, 01-38)

(GMRS channels only)

(on or oF)

Summary of Contents for GMRS100

Page 1: ...128 XXXX 1 of 24 General Mobile Radio Service GMRS Model GMRS100 Released 3 10 03 Owner s Manual MODE LO HI ...

Page 2: ...LACING THE GMRS122 2 RADIO TRANSCEIVER FOR PRO LONGED PERIODS OF TIME IN DIRECT SUNLIGHT OR TEMPERATURES BELOW 4 F 20 C OR ABOVE 140 F 60 C KEEP THE ANTENNA AT 1 INCH 2 5 cm AWAY FROM YOUR HEAD AND BODY DO NOT USE YOUR GMRS122 2 RADIO TRANSCEIVER WITH A DAMAGED ANTENNA PLACE THE RUBBER COVERS ON JACKS WHEN NOT IN USE GMRSLICENSE USE OF THIS RADIO WITHIN THE UNITED STATES REQUIRES AN FCC GMRS LICEN...

Page 3: ... External Speaker SP Microphone MIC CHG Jack 7 Built in Speaker Model GMRS100 FCC License Required 8 Liquid Crystal Display LCD 9 Built in Microphone 10 Up Channel Volume Button 11 Down Channel Volume Button 12 MODE VOX Button 13 Power On Off and SCAN Button 14 Battery Charging Contacts 3 5 4 1 2 12 11 13 3 REF 14 7 1 REF 10 9 6 8 MODE PTT M ...

Page 4: ... This function allows the user to scan a chanel every 0 5 second to search for a valid signal 6 HI LO Indicators Appropriate icon appears when the transmit power is set to desired output power 7 Battery Level Indicator Icon appears flashing to indicate low battery charge level 8 Small Segment Display Indicates the CTCSS tone code 1 38 function is active for the main channel in use 9 Monitor Indica...

Page 5: ...y 10 12 hours Use of other brands of rechargeable batteries is not recommended as battery charging time will vary Do not mix old and new or batteries of differing manufacture since the charging will be uneven and will result in decreased battery life If necessary four AAA alkaline batteries can be used to power the GMRS100 but note that these type batteries can not be recharged and damage to the c...

Page 6: ...t out from the radio body Next press down with the thumb at the embossed arrow slide the battery cover down and lift it away from the compartment Insert four AAA batteries alternate positive ends toward the top of the transceiver starting left to right 2 Then lift cover at bottom to open Remove cover 3 Insert four AAA batteries positive end toward the top begining at left side and alternating posi...

Page 7: ...x alkaline standard carbon zinc or rechargeable batteries 3 If the unit is not to be used for an extended period of time remove the batteries Old or leaking batteries can cause damage to the unit and will void the warranty NOTE Only Audiovox approved rechargeable batteries P N GMRS1222BAT can be recharged in the radio transceiver MODE LO HI MIC CHG SPK JACK GMRS100 ...

Page 8: ...are FRS only and channels 15 through 22 are GMRS only Controls Power On Off SCAN Button 13 Press and hold the PWR on off button for at least 2 seconds You will hear a confirming melody to indicate the unit is on To turn the unit off press and hold the button for at least 2 seconds Adjusting the Volume 11 10 With the unit powered on press the Up Channel Volume button to increase volume and the Down...

Page 9: ...ange By pressing the monitor button momentarily the LCD backlight is turned on the LCD backlight will turn off automatically in about 5 seconds unless the monitor button is pressed momentarily once again Push To Talk PTT Button 4 Pressing and holding this button will allow you to speak to any transceiver that is set to the same channel and privacy code setting as yours Hold the transceiver approxi...

Page 10: ...utton will be used to adjust the unit s settings MODE Button 12 This button is used to select various feature settings in the GMRS and FRS modes External Speaker SPK Microphone MIC CHG Jack 6 This jack accepts both the optional Audiovox headset microphone connector For additional equipment and accessories for the GMRS100 visit the Audiovox web site at www audiovox com http www audiovox com Scan Bu...

Page 11: ...S tone frequency function is enabled not oF Channel Selection In order to communicate with other GMRS FRS units both the transmit ting and receiving party must be on the same frequency The GMRS100 has 22 channels frequencies indicated by the large digits on the LCD display panel Channels 1 through 7 are the shared GMRS FRS channels Channels 8 14 are FRS only channels while chan nels 15 22 are assi...

Page 12: ...the same main channel Since there are 38 CTCSS Sub channels for each main channel a different subcode may be se lected for each of the 22 channels To change the CTCSS Sub channel From GMRS FRS standby mode press the MODE Button twice a flash ing oF or sub channel number is displayed Press the Up or Down button to select the desired sub channel for use 01 38 Press the PTT button to confirm selectio...

Page 13: ...ing low power will greatly extend battery life We suggest you experi ment with switching between low and high power To access the transmitter power selection function From GMRS standby mode press the MODE Button 3 times until the Po indication appears flashing on the display with a steady Hi or Lo indication Press the Up or Down button to toggle between the High and Low se lections Press the PTT b...

Page 14: ...press the PTT button To set the radio for VOX operation From GMRS FRS standby mode press and hold the MODE button for 3 seconds or until the VOX icon appears on the display To terminate VOX operation press and hold the MODE button for at least 3 seconds the VOX indication will disappear Button Beep Key Tone This feature allows the transceiver to sound a confirmation tone whenever the following key...

Page 15: ...n To enable the channel scan mode From GMRS FRS standby mode momentarily press the Power On Off Button SCAN will appear on the LCD display The radio will automatically display each channel 1 22 in ascending order to find an active main channel When the unit doesn t find any signals and you want to transmit press the PTT Button to return to primary channel operation The transceiver will automatical...

Page 16: ...u do not use the units closer than 5 feet apart 3 For best transmission results always keep your mouth about 2 3 inches from the microphone 9 and speak slowly in a normal voice 4 To increase battery life use the SCAN feature sparingly This feature will reduce operating time considerably Warning Do not operate the transceiver unless you are licensed to do so Remove the batteries from the transceive...

Page 17: ...sparks in such areas could result in an explosion Turn your transceiver off wherever posted notices restrict the use of radios or cellular telephones Facilities such as hospitals may use equipment that is sensitive to RF energy Turn your transceiver off on board aircraft when requested to do so Do not place your radio in front of a vehicle s air bag If the air bag deploys it could propel the trans...

Page 18: ...Avoid operating in or near large buildings or vehicles Unit beeps but Batteries extremely Charge or replace batteries will not function discharged when turned on Reception of CTCSS privacy mode Turn on the CTCSS privacy unwanted signals not on mode and set code number to match the setting of the target transceiver Interference from Turn the devices off or move electronic devices such farther away ...

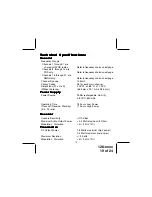
Page 19: ...ly Power Supply Power Supply Power Supply Power Source Ni MH rechargeable AAA 4 4 8 VDC 650 mAh Operating Time 18 hours Low Power Transmit Receive Standby 11 hours High Power 5 5 90 ratio Receiver Receiver Receiver Receiver Receiver Useable Sensitivity 119 dBm Maximum Audio Output Power 0 3 Watt maximum 8 Ohm Modulation Distortion 5 1 kHz 70 T T T T Tr r r r ransmitter ansmitter ansmitter ansmitte...

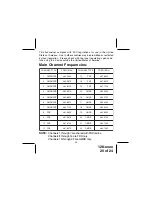
Page 20: ... T L E N N A H C z H M Q E R F E P Y T L E N N A H C z H M Q E R F S R F S R M G 1 5 2 6 5 2 6 4 S R F 2 1 5 2 6 6 7 6 4 S R F S R M G 2 5 7 8 5 2 6 4 S R F 3 1 5 7 8 6 7 6 4 S R F S R M G 3 5 2 1 6 2 6 4 S R F 4 1 5 2 1 7 7 6 4 S R F S R M G 4 5 7 3 6 2 6 4 S R M G 5 1 0 0 5 5 2 6 4 S R F S R M G 5 5 2 6 6 2 6 4 S R M G 6 1 0 5 7 5 2 6 4 S R F S R M G 6 5 7 8 6 2 6 4 S R M G 7 1 0 0 0 6 2 6 4 S R...

Page 21: ...8 2 71 9 21 136 5 3 74 4 22 141 3 4 77 0 23 146 2 5 79 7 24 151 4 6 82 5 25 156 7 7 85 4 26 162 2 8 88 5 27 167 9 9 91 5 28 173 8 10 94 8 29 179 9 11 97 4 30 186 2 12 100 0 31 192 8 13 103 5 32 203 5 14 107 2 33 210 7 15 110 9 34 218 1 16 114 8 35 225 7 17 118 8 36 233 6 18 123 0 37 241 8 19 127 3 38 250 3 oF No Tone 21 ...

Page 22: ...he Company has been damaged through alteration improper installation mishandling misues neglect or accident THE EXTENT OF THE COMPANY S LIABILITY UNDER THIS WARRANTY IS LIMITED TO THE REPAIR OR REPLACEMENT PROVIDED ABOVE AND IN NO EVENT SHALL THE COMPANY S LIABILITY EXCEED THE PURCHASE PRICE PAID BY THE PURCHASER FOR THE PRODUCT This warranty is in lieu of all other express warranties or liabiliti...

Page 23: ...128 6675 23 of 24 THIS PAGE LEFT BLANK INTENTIONALLY ...

Page 24: ...128 xxxx 24 of 24 128 xxxx Printed in China www asaelectronics com ...

Reviews: