background image

128-7199

1 of 16

Kit Contents

(1) Control Module

(1) 3 Button High Frequency Transmitters

(1) 5 Button Two Way LED Based Transceiver

(1) On Glass Mount Superheterodyne Transceiver

(1) Multi Pin Input/Output Harness

(1) Six Pin Power Harness

(1) Diesel Wait To Start Input

(1) Auxiliary 4 Pin Output Harness

(1) 2 Pin Door Lock Harness

(2) 30 Amp In-line Fuse Holders With Fuses

(1) Control Switch

(1) Plug In Push-Button Programming Switch

(1) Ring Terminal

(4) 1/2" Long Screws

(1) Pin Switch

(1) Remote Start Warning Label

(1) Literature Package

Model APS-55TWT

Installation Manual

3 Channel Remote Start / Keyless Entry System

Installation Instructions

This Unit Is Intended For Installation In Vehicles With

12 Volt  Negative Ground Electrical Systems,

 Gasoline or Diesel  With True Tach Reference

 And Automatic Transmissions Only.

Released: 6-28-04

Summary of Contents for Prestige APS-55TWT

Page 1: ...ock Harness 2 30 Amp In line Fuse Holders With Fuses 1 Control Switch 1 Plug In Push Button Programming Switch 1 Ring Terminal 4 1 2 Long Screws 1 Pin Switch 1 Remote Start Warning Label 1 Literature Package Model APS 55TWT Installation Manual 3 Channel Remote Start Keyless Entry System Installation Instructions This Unit Is Intended For Installation In Vehicles With 12 Volt Negative Ground Electr...

Page 2: ...t be drilled Carefully check behind the chosen location to insure the drill will not penetrate any existing factory wiring or fluid lines Drill a 1 4 hole in the desired location and thread the hood pin switch into it using a 7 16 nut driver or deep well socket If using the mounting bracket first secure the bracket to the desired location and secure the hood pin switch in the pre threaded mounting...

Page 3: ...te feed wires must be used for the Red and Red White wires If your vehicle does not have two battery feed wires at the ignition switch then it is possible to connect both wires to the vehicle s battery This wire provides power for the start relay and the accessory relay I M P O R T A N T IT IS THE RESPONSIBILITY OF THE INSTALLING TECHNICIAN TO DETERMINE THE LOAD F ACTOR OF THE VEHICLES ELECTRICAL ...

Page 4: ...uit that powers the glow plugs if the vehicle requires glow plug pre heating GREEN WIRE Ignition 2 Output Connect this wire to the ignition 2 wire from the ignition switch This wire will show 12 volts when the ignition key is turned to the ON or RUN position and is some cases the START or CRANK position This wire will show 0 volts when the key is turned to the OFF and ACCESSORY positions NOTE See ...

Page 5: ...of theSystem failuretousethisfeaturecanresultinserious injury Route the wire to the pin switch and connect it using the bullet connector provided GRAY w BLACK TRACER WIRE Negative Inhibit Input 2 Any time the gray w black tracer wire is grounded the Remote Starter will stop operating even if the signal is received from the transmitter If the brake light switch in the vehicle switches ground to the...

Page 6: ...ing Light Flasher These wires are the COMMON and NORMALLY OPEN contacts of the on board parking lamp relay If the vehicle s parking lights are a 12 volt switched system connect 1 of the White wires to a fused 15A max 12 volt battery source and connect the second White wire to the vehicle s parking light wire If the vehicle s parking lights are a chassis ground switched system connect 1 of the Whit...

Page 7: ...system installed you will need to bypass the system while the vehicle is operating under the control of the Remote Start Unit To Do This 1 Measure the resistance of the resistor pellet on the ignition key then select a resistor within 5 of the key s value from the resistor pack supplied 2 Locate the pair of VATS wires in the vehicle usually a pair of thin gauge wires running from the ignition swit...

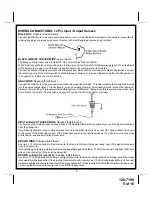
Page 8: ...in connector provides low current outputs to control various functions in the vehicle during different stages of the Remote Start unit s operation Understanding these outputs and the time in which they occur will allow you to determine if they are needed for the particular vehicle you are working on as well as how to use them Black w Blue Trace Wire Pulsed Ground Output Before Start The Black w Bl...

Page 9: ...des a ground pulse during the arming sequence or pulsed ground lock output Connect the Red wire to the low current ground signal wire from the factory door lock switch to the factory door lock relay The Green wire of the 2 pin harness provides a ground pulse during the disarming sequence or pulsed ground unlock output Connect the Green wire to the low current ground signal wire from the factory do...

Page 10: ...ertain this connector is firmly seated making good contact to the control unit 1 RF Programmable Features Feature Selection 1 Flash 2 Flash 3 Flash 4 Flash Default 1 Run Time 5 Min 10 Min 15 Min 20 Min 10 Min 2 Ign 2 During Crank Off On On 3 Light Output During Run Steady Flash Steady 4 Tach Mode NA Tach Tach 5 Voltage Level NA NA NA 6 Trouble Shooting Off On Off 7 Door Locks 1 Sec 1 Sec 3 5 Sec 3...

Page 11: ...signal over speed shut down 7 Flashes Tach has NOT learned Multi Coil Pack Adapter Optional The multi coil pack adapter P N 136B1400 is designed for use with vehicles that do not respond to single coil tach programming Although the tach resolution of this circuit is designed to interface direct with most vehicles there may be an occasion where the following circuit may be required To use the adapt...

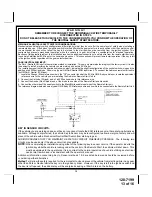
Page 12: ... DOWN ENABLE FEATURE NEUTRAL START SAFETY TEST The intent of the neutral start switch is to prevent the vehicle from starting while the gear selector is in any position other than Park or Neutral When installing a Remote Start Device it is imperative that the Yellow Starter wire be connected to the ignition switch side of the Neutral Start Switch Consideration for the placement of a starter inhibi...

Page 13: ...he ECM in GM B Body vehicles or locate the equivalent reference wire in the vehicle you are installing the Audiovox Remote Start Unit in 2 Connect the Cathode Striped end of a 4000 series diode to this reference wire 3 Connect the Anode Non Striped end of the diode to one side of the Remote Start enable switch 4 Connect the other side of the enable switch to the Black White enable input wire of th...

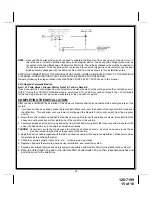
Page 14: ...ive shut down safety wire Gray Black of the Audiovox Remote Start Unit F Connect terminal 86 of the relay to a fused 12 volt constant battery source G Connect terminal 87 of the relay to the Chime Module side of the previously cut wire in step D H Connect terminal 85 of the relay to the Drivers Door side of the pin switch wire previously cut in step B METHOD 1 NOTE A second 4002 series diode may b...

Page 15: ...confirmed the operation of the Audiovox Remote Start unit and tested all the safety features of the system 1 If you have not done so already place the red rubber handle cover over the handle of the control switch for ease of identification This will allow your customer to distinguish the Remote Start control switch from the program switch 2 Mount the control module up and behind the dash securing ...

Page 16: ...128 7199 16 of 16 2004 Audiovox Electronics Corp Hauppauge NY 11788 128 7199 ...

Reviews: