background image

© Copyright  2001 Audiovox Electronics Corp. 150 Marcus Blvd. Hauppauge, NY 11788                             128-6065

WWW

.audiovox.com

F o r  C u sto m e r  S e rvice

V isit  O u r  W e b site   A t

P ro d u c t In fo rm a tio n ,  P h o to s ,

FA Q ’s  O w n e r ’s   M a n u a ls

Summary of Contents for VOH560PKG

Page 1: ...VOH560PKG Drop Down Video Monitor and Video Cassette Player System Installation and Operation Manual ELECTRONICS CORP ...

Page 2: ...d with a television viewer or screen that is located in the motor vehicle at any point forward of the back of the driver s seat or that is visible directly or indirectly to the operator of the motor vehicle Please note that the state of Rhode Island forbids the installation of such a device in a motor vehicle ...

Page 3: ...ackage for AVP756 4 x 3 8 Screws 4 pcs Mounting Bracket 2 pcs 1 TOOLS REQUIRED 2 Phillips Screwdriver 1 Phillips Screwdriver Utility or Razor Knife or Shears Wire Strippers Upholstery hook tool for removal of panels as necessary Electrical Tape Masking Tape Multimeter to verify 12 volt DC and continuity Do not use a test light or logic probe Marker pen to mark headliner Scribe to mark trim ring if...

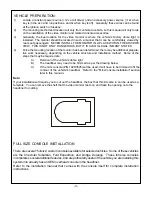
Page 4: ...ch component to allow working room 6 Remove all A V system components from their packaging and place them loosely in the vehicle at their respective locations 7 Connect all components together electrically and verify proper operation of all system functions Note This is best done BEFORE components have been permanently mounted 8 After verifying proper operation of the system proceed to mount each ...

Page 5: ...ucture and installation method Some of the steps that may be required are A Removal of the vehicle s dome light B The headliner may need to be trimmed as per the drawing below C If the mini console P N 102D3595 will be used it will have to be trimmed to fit the contour of the vehicle s headliner Refer to the Mini Console installation section later in this manual Note If your installation will requ...

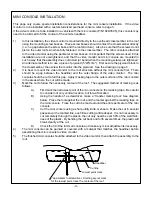
Page 6: ...sking tape to the outer surface of the mini console in the areas where the cut will be made 3 Mark the cut to follow the necessary contour of the roof The suggested method of marking is as follows A First mark the narrowest point of the mini console on the masking tape Be careful to consider not only vertical location but fore aft location B Using the handle of a screwdriver make a transfer markin...

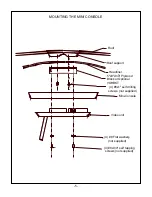
Page 7: ...t Headliner 5 x9 x3 4 Plywood Block or Optional VOHBKT 4 8x1 self drilling screws not supplied Mini Console Video unit 4 8 Flat washers not supplied 4 8x3 4 self tapping screws not supplied 5 MOUNTING THE MINI CONSOLE ...

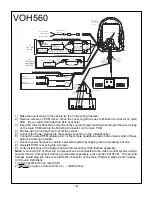
Page 8: ...d harness would plug into the second Mini Din connector on the main PCB as in steps 2 and 3 above A V Source Definitions 1 VCP right Mini Din on main PCB 2 2nd VCP or game or future DVD etc left Mini Din 6 VOH560 4 Item 11 Antenna Dash Radio Acce ssory Harness P N 801073 0 Optional LE FT WHITE RIG HT RED Red 12 V DC Accessory Cir Power Harness Item 4 Refer to Instructions with the RF Mod ulato r K...

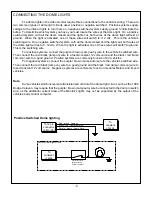
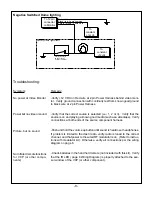
Page 9: ...witched system with all the doors closed and the lights out both wires at the dome light will rest at 12vdc When the light is activated one of these wires will switch to ground This is the switching wire For positive systems connect the purple brown Lamp auto wire to the vehicle s switched wire Then connect the red black lamp on wire to a fused constant 12 volt source and the black red lamp common...

Page 10: ...ss Push and hold the volume up button until sound is heard over headphones If problem is limited to the dash radio verify radio is tuned to the correct channel and that power to the wired RF modulator is on Refer to instruc tions with modulator kit Otherwise verify all connections per the wiring diagram on page 6 Check batteries in the hand held remote not included with this kit Verify that the IR...

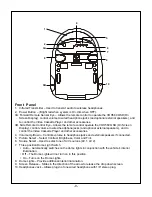
Page 11: ...d optional external speakers and to control the Video Cassette Player and other accessories 4 Volume Up Down Controls volume to headphone jacks and external speakers if connected 5 Picture Select Select Contrast Brightness Color and Tint 6 Source Select Used to select one of A V sources AV 1 AV 2 7 Three position Dome Light Switch Auto Automatically switches on the dome lights in conjunction with ...

Page 12: ...earch mode and the tape advances rapidly with the pictures The fast forward indicator lamp will blink Press it once more the tape will advance at a high speed with the lamp blinking more quickly Press Fast Forward in the stop mode the tape will advance at a very high rate without any picture and sound Press Fast Forward once in the Fast Rewind mode the VCP enters the forward picture search mode an...

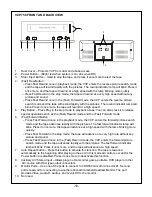
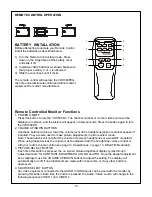
Page 13: ...led They are also used to make picture adjustments in picture select mode Note These buttons will not affect the volume of wireless headphones or a wired RF modulator When using these devices the volume must be adjusted with the headphone volume control or with your radio s volume control see page 13 Headphones or page 14 Wired FM Modulator 3 PICTURE SELECT BUTTON Each time this button is pressed ...

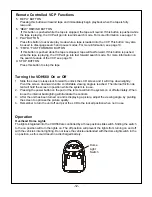
Page 14: ...or Off 1 Slide the screen release lock forward to unlock the LCD screen and it will drop down slightly Pivot the screen downward until a comfortable viewing angle is reached The internal friction de tent will hold the screen in position while the system is in use 2 Pressing the power button on the pod or the remote will turn the system on or off alternately When in use the internal backlighting wi...

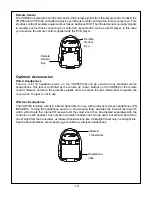
Page 15: ...he volume up down buttons on the VOH560 or the remote control Remove and save the protective plastic cover to access the jack Remember to replace the cover when the jack is not in use Remote Sensor Eye Remote Sensor Eye 13 Wireless Headphones The VOH560 includes a built in infrared transmitter for use with Audiovox wireless headphones PN MVSWHS Turning the headphone switch on and wearing them acti...

Page 16: ...poor Turning the remote mounted toggle switch off will allow normal radio reception Optional Video Monitor s The VOH560 provides a video output for an optional video monitor s Refer to page 6 of the installa tion guide for more details This output will provide a video signal that duplicates the signal displayed by the VOH560 to an additional monitor or video display AVP756 provides monitor port fo...

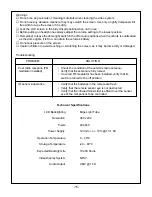
Page 17: ...hing the screen as it may become dirty or damaged Troubleshooting PROBLEM SOLUTION Poor radio reception FM Check the condition of the vehicle s radio antenna modulator installed Verify that the antenna is fully raised If a wired RF modulator has been installed verify that its switch is turned to the off position IR sensor inoperative Verify that the batteries in the remote are fresh Verify that th...

Page 18: ... Copyright 2001 Audiovox Electronics Corp 150 Marcus Blvd Hauppauge NY 11788 128 6065 WWW audiovox com For Custom er Service Visit Our W ebsite At Product Information Photos FAQ s Owner s M anuals ...

Reviews: