background image

CAUTION!

 Immediately upon receiving the product, carefully unpack the carton, check the contents to ensure that all parts 

are present, and have been received in good condition. Notify the shipper immediately and retain packing material for 
inspection if any parts appear damage from shipping or the package itself shows signs of mishandling. Save the package and 
all packing materials. In the event that the product must be returned to the factory, it is important that the product be 
returned in the original factory box and packing.  
 
If the device has been exposed to drastic temperature fluctuation (e.g. after transportation), do not switch it on immediately. 
The arising condensation water might damage your device. Leave the device switched off until it has reached room 
temperature.


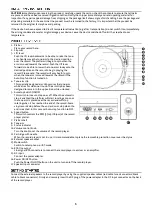
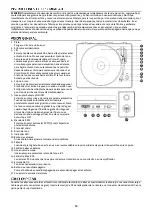
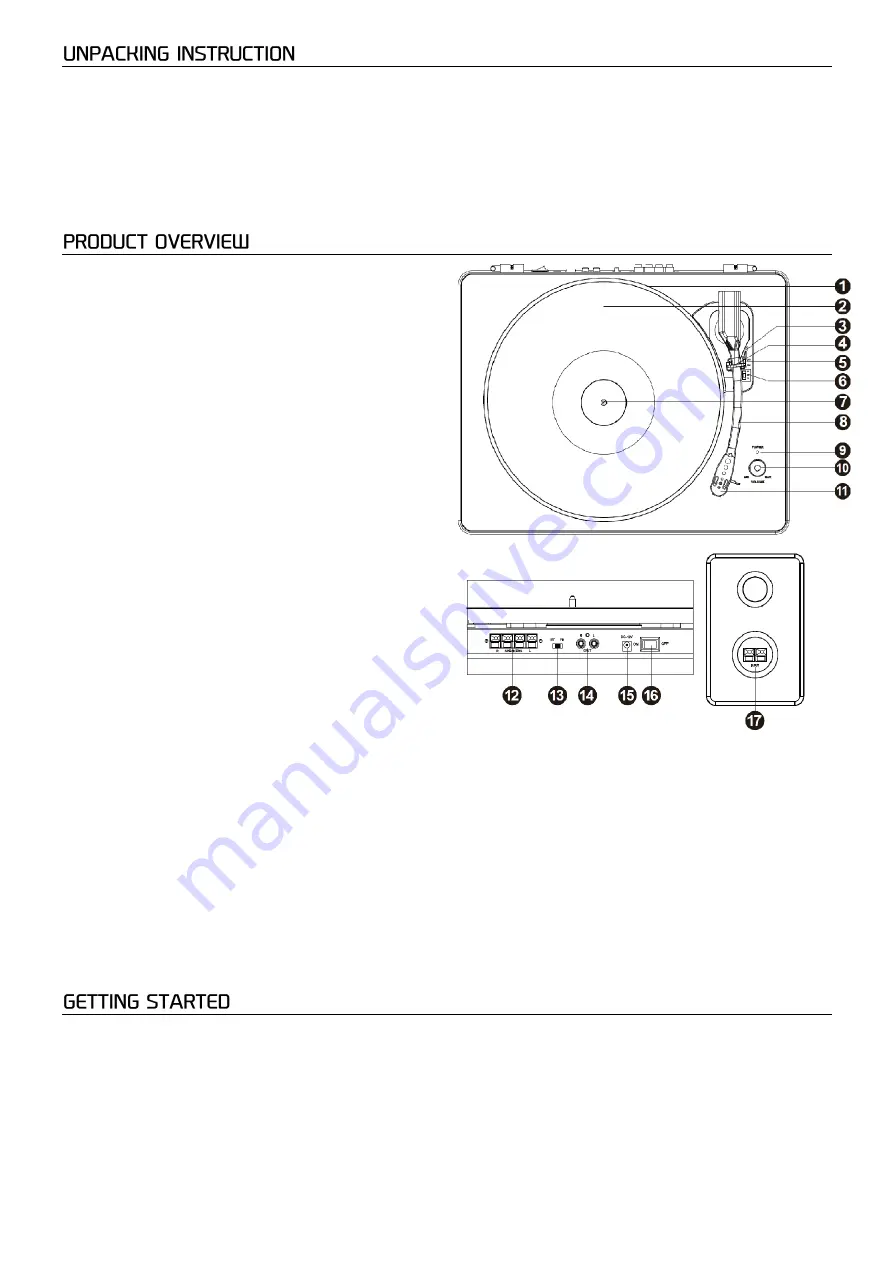
1.


Platter 
Place your record here. 

2.


Slip mat 

3.


Lift lever 
Push the lift lever backwards to be able to raise the tone-
arm. Gently move the tone-arm to the desired position 
over the record. The platter will begin to spin when the 
arm is moved towards the record. Push the lift lever 
forwards to be able to lower the tone-arm slowly onto the 
desired position on the record to begin playing the 
record. Please note: The record will only begin to spin 
when the tone-arm is moved towards the record if the 
Auto Stop function is turned on. 

4.


Tone-arm clip 
This specially designed arm clip secures the tone-arm 
while at rest or when not in use. The arm clip has been 
designed to remain in the up position while unlocked. 

5.


Autostop Switch ON/OFF 
This switch turns auto stop on or off. When the automatic 
stop is enabled, the platform will start rotating as soon as 
the tone arm is placed over the record and will stop 
rotating when it has reached the end of the record. Some 
vinyl records stop before the end or do not stop when the 
end is reached. In this case set Auto-stop function to OFF. 

6.


Speed button 
This switch controls the RPM (33/45/78rpm) of the record 
player platter.


7.


Platter shaft 

8.


Tone arm 

9.


Status indicator 

10.


Volume control knob 
Turn the knob to set the volume of the record player. 

11.


Cartridge with needle 
When the record player is not in use, it is recommendable to place the removable protection cover over the stylus. 

12.


External speaker output 

13.


Mode switch 
Switch to select phono- or BT-mode. 

14.


RCA line output 
Line signal RCA connectors to connect the record player to a mixer or an amplifier. 

15.


DC input 
Connect the power adapter. 

16.


Power ON/OFF button 
Push the Power On/Off button on the unit to turn on/off the record player. 

17.


Speaker input connector 


Connect the external speakers to the record player by using the supplied speaker cables (red cable to red connectors; black 
cable to black connectors). Firmly and securely insert the DC plug of the power adapter in the DC input connector on the back 
of the record player. 


Summary of Contents for 102.178

Page 1: ... Ref nr 102 178 102 179 INSTRUCTION MANUAL GEBRUIKSAANWIJZING BEDIENUNGSANLEITUNG MANUAL DE INSTRUCCIONES MANUEL D INSTRUCTIONS V1 0 ...

Page 2: ...2 ...

Page 3: ...EMENTEN 11 ERSTE SCHRITTE 11 PHONO BETRIEB 12 BT ANSCHLUSS 12 RCA AUSGANG 12 ESPAÑOL 13 INSTRUCCIONES DE DESEMBALAJE 14 VISIÓN GENERAL 14 CÓMO EMPEZAR 14 OPERACIÓN FONO 15 CONEXIÓN A BT 15 MODO DE SALIDA RCA 15 FRANÇAIS 16 DEBALLAGE 17 VUE GLOBALE DU PRODUIT 17 POUR COMMENCER 17 FONCTIONNEMENT PHONO 18 CONNEXION BT 18 SORTIE RCA 18 TECHNICAL SPECIFICATION TECHNISCHE SPECIFICATIE TECHNISCHE DATEN E...

Page 4: ...rom a specialist Do not force the controls This unit is with speaker inside which can cause magnetic field Keep this unit at least 60cm away from computer or TV If this product have a built in lead acid rechargeable battery Please recharge the battery every 3 months if you are not going to use the product for a long period of time Otherwise the battery may be permanently damaged If the battery is ...

Page 5: ...on 4 Tone arm clip This specially designed arm clip secures the tone arm while at rest or when not in use The arm clip has been designed to remain in the up position while unlocked 5 Autostop Switch ON OFF This switch turns auto stop on or off When the automatic stop is enabled the platform will start rotating as soon as the tone arm is placed over the record and will stop rotating when it has rea...

Page 6: ...volume Noted If the AUTO STOP ON OFF Switch is turned ON the record will stop automatically when finished If Auto Stop Control is turned OFF record will NOT stop automatically when finished Set the function switch to BT mode The LED indicator will flash in blue color Turn on the BT function on your mobile phone or tablet PC on and search for the record player Audizio recordplayer After pairing the...

Page 7: ...rden gevolgd Het apparaat buiten bereik van kinderen houden Bovendien mag het apparaat nooit onbeheerd gelaten worden Gebruik geen schoonmaakspray om de schakelaars te reinigen Restanten van deze spray zorgen ervoor dat smeer en stof ophopen Raadpleeg bij storing te allen tijde een deskundige Gebruik geen overmatige kracht bij het bedienen van het apparaat Dit apparaat kan magnetisch veld veroorza...

Page 8: ... deze niet wordt gebruikt De armklem is ontworpen om in de opwaartse positie te blijven terwijl hij ontgrendeld is 5 Autostop schakelaar AAN UIT Met deze schakelaar schakelt u de automatische stopfunctie aan of uit Als de automatische stop is ingeschakeld zal het plateau beginnen te draaien zodra de toonarm wordt geplaatst over de plaat en stopt met draaien wanneer het einde van de langspeelplaat ...

Page 9: ...eau Opmerking Als de AUTO STOP AAN UIT schakelaar wordt ingeschakeld stopt het afspelen automatisch als de plaat afgelopen is Als de AUTO STOP is uitgeschakeld zal het afspelen NIET automatisch stoppen wanneer de plaat afgelopen is Zet de functieschakelaar op BT modus De LED indicator knippert in een blauwe kleur Zet de BT functie op uw mobiele telefoon of tablet pc aan en zoek vervolgens de plate...

Page 10: ...rät niemals unbeaufsichtigt lassen Die Regler nicht mit Reinigungssprays reinigen Diese hinterlassen Rückstände die zu Staub und Fettansammlungen führen Bei Störungen immer einen Fachmann um Rat fragen Das Gerät nur mit sauberen Händen bedienen Das Gerät nicht mit Gewalt bedienen Dieses Gerät kann dazu führen Magnetfeld Halten Sie das Gerät mindestens 60 cm vom Computer oder Fernseher Wenn dieses ...

Page 11: ...Klammer sichert den Tonarm in Ruhe oder wenn sie nicht in Gebrauch ist 5 Auto Stop Schalter Wenn der automatische Stopp aktiviert ist beginnt sich die Platte zu drehen sobald der Tonarm über die Aufnahme gelegt wird und stoppt das drehen automatisch wenn sie das Ende der Aufnahme erreicht hat Einige Vinylplatten stoppen vor dem Ende Stellen Sie in diesem Fall Autostop auf OFF 6 Drehzahlregler Dies...

Page 12: ... Schalter AUTO STOP ON OFF eingeschaltet ist stoppt die Wiedergabe automatisch wenn die Platte fertig aufgezeichnet ist Wenn der AUTO STOP Schalter ausgeschaltet ist wird die Wiedergabe NICHT automatisch gestoppt wenn die Platte fertig ist Stellen Sie den Funktionsschalter auf BT Modus Die LED Anzeige blinkt blau Schalten Sie die BT Funktion auf Ihrem Mobiltelefon oder Tablet PC ein und suchen Sie...

Page 13: ...iños No deje el aparato sin vigilancia No utilice sprays limpiadores para limpiar los interruptores Los residuos de estos sprays producen depósitos de polvo y grasa En caso de mal funcionamiento siempre consulte a un profesional No fuerce los controles Si el aparato se ha caído siempre haga que lo verifique un técnico cualificado antes de encenderlo otra vez NO utilice productos químicos para limp...

Page 14: ...ta pinza de brazo especialmente diseñada asegura el brazo mientras está en reposo o cuando no está en uso El clip de brazo ha sido diseñado para permanecer en la posición de arriba mientras está desbloqueado 5 Interruptor Autostop ON OFF Este interruptor activa o desactiva la parada automática Cuando la parada automática está activada la plataforma comenzará a girar tan pronto como el brazo de ton...

Page 15: ...ario para ajustar el volumen Nota Si el interruptor AUTO STOP ON OFF está activado el disco se detendrá automáticamente cuando termine Si el control de parada automática está desactivado el registro NO se detendrá automáticamente cuando haya terminado Poner el interruptor de función en modo BT El indicador LED parpadeará en color azul Enciende la función BT de tu teléfono móvil o tableta PC y lueg...

Page 16: ... contient un haut parleur pouvant engendrer des champs magnétiques Tenez cet appareil à 60 cm au moins d un téléviseur ou ordinateur Si le produit comprend un accumulateur intégré plomb acide rechargez l accumulateur tous les 3 mois en cas de non utilisation prolongée de l appareil Sinon l accumulateur pourrait être endommagé de manière permanente Si l accumulateur est endommagé remplacez le par u...

Page 17: ...llé 5 Interrupteur Autostop ON OFF Cet interrupteur active l arrêt automatique ou le désactive Lorsque l arrêt automatique est activé la plate forme commence à tourner dès que le bras de lecture est placé sur le disque et s arrête lorsqu elle atteint la fin du disque Certains disques vinyle s arrêtent avant la fin ou ne s arrêtent pas lorsque la fin est atteinte Dans ce cas réglez l arrêt automati...

Page 18: ...rnez le bouton de réglage du volume dans le sens des aiguilles d une montre pour régler le volume Remarque Si l interrupteur AUTO STOP ON OFF est sur ON la platine s arrête automatiquement lorsque le disque est terminé Si la fonction auto Stop Control est sur OFF le disque ne s arrête pas automatiquement lorsqu il est fini Placez le commutateur de fonctions en mode BT L indicateur LED clignote en ...

Page 19: ... x 235mm Weight 6 80 kg The specifications are typical The actual values can slightly change from one unit to the other Specifications can be changed without prior notice The products referred to in this manual conform to the European Community Directives to which they are subject Low Voltage LVD 2014 35 EU Electromagnetic Compatibility EMC 2014 30 EU Restriction of Hazardous Substances RoHS 2011 ...

Page 20: ...Specifications and design are subject to change without prior notice www tronios com Copyright 2021 by Tronios The Netherlands ...

Reviews: