background image

It  is  recommended  that  you  use  extreme  care  when  manipulating  the  tone  arm,  stylus,  and  other  components  of  this 
turntable. These parts are very sensitive and can easily break or become damaged if they are carelessly handled.

1.

Turn the the 

Power ON/OFF 

volume button clockwise till the LED 

display

 lights up, if not, check the power and adapter.

2.

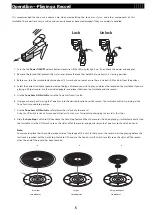
Remove the shroud that protects the stylus, and release the lock that holds the Tone Arm in it’s resting position.

3.

Before use, turn the turntable clockwise about 10 times by hand to make sure there is no belt shift or kinks from the


pulleys.

4. Select the correct turntable speed based on the type of record you wish to play, and place the record on the turntable. If you are

playing a 45 rpm record, use the included adapter and place it between the turntable and the record.

5. Use the 

Tone Arm Lift Switch

 to raise the Tone Arm from its catch.

6. Using your hand, gently swing the Tone Arm into the desired location over the record. The turntable will start spinning as the

Tone Arm is moved into position.

7. Use the 

Tone Arm Lift Switch

 to safely lower the stylus onto the record.

Using the Lift Switch instead of your hand will reduce the chance of accidentally damaging the record or the stylus.

8. Slide the 

Auto Stop

 Switch to ON to enable the Auto Stop feature. When the record is finished playing, it will automatically stop

the turntable. Use the Lift Switch to raise the stylus off of the record, and gently return the Tone Arm to the catch by hand.

Note:

Some records place their Auto Stop area outside of the range of this unit. In these cases, the record will stop playing before the
last track is reached. Set the Auto Stop Switch to OFF and use the Tone Arm Lift Switch to safely raise the stylus off the record
when the end of the record has been reached.

33 1/3 rpm 

12in diameter

78 rpm 

10in diameter

45 rpm & adapter 

7in diameter

Lock

Unlock

Operation---Playing a Record


5

Summary of Contents for TE-2026

Page 1: ...Turntable with USB and Bluetooth Reception User s Guide TE 2026 Portable SuitcaseRecord Player TurntableInstructionManual 1 ...

Page 2: ...ctions for future reference About Records About USB TF cards that can be used with this unit 1 The file format that can be played by this unit is WAV MP3 format extension wav mp3 only USB in FAT FAT32 format only 2 This product is not compatible with USB hubs 3 When a large capacity USB flash drive or TF card is connected it may take some time to load the file 4 Press and hold the Pause Play DEL b...

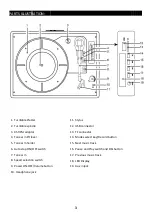
Page 3: ...rm holder 6 Auto stop ON OFFswitch 7 Tone arm 8 Speed selection switch 9 Power ON OFF Volumebutton 10 Headphone jack 11 Stylus 12 USB connector 13 TF connector 14 Modes select key Record button 15 Next music track 16 Pause and Play switch and DELbutton 17 Previous music track 18 LED Display 19 Aux in jack 3 ...

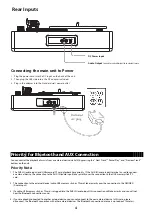
Page 4: ...o the DEFINED Audio Input 3 If a cable USB memory stick or TF card is plugged into the AUX IN audio input this connection will take priority and you will not hear the Bluetooth connection sound 4 If you are already connected to another external device you cannot connect to the new external device In this case please disconnect the Bluetooth connection with other external devices The Bluetooth conn...

Page 5: ... the Tone Arm from its catch 6 Using your hand gently swing the Tone Arm into the desired location over the record The turntable will start spinning as the Tone Arm is moved into position 7 Use the Tone Arm Lift Switch to safely lower the stylus onto the record Using the Lift Switch instead of your hand will reduce the chance of accidentally damaging the record or the stylus 8 Slide the Auto Stop ...

Page 6: ...uetooth Input pairing with Bluetooth 1 Insert your USB TF card into the USB TF slot Press and hold the M button for 3 seconds till the display shows rEC you will hear one time beep sound and it begins to recording meanwhile the display shows the time counting of the recording 2 Stop recording Press and hold the M button for few seconds the recording will stop display will show STOP and save the re...

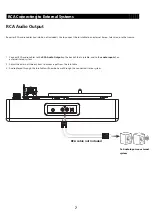
Page 7: ...other source 1 Connect RCA audio cables to the RCA Audio Output on the back of the turntable and to the audio input of an external stereo system 2 Adjust the external stereo system to accept input from the turntable 3 Audio played through the turntable will now be heard through the connected stereo system To Audio Inputs on external system 5 7 RCA cable not included ...

Page 8: ...o 3 Audio played through the connected device will now be heard through the speakers AUX cable is not included 1 Gently pull down the front edge of the needle 2 Pull needle forward 3 Pull out and remove Installing Needle 1 Position the needle with its tip facing down 2 Line up the back of the needle with the cartridge 3 Insert the needle with its front end at a downward angle and gently lift the f...

Page 9: ... cable is plugged into the aux in jack unplug it Bluetooth is connected disconnect it and reset the mode to PHO Turntable is spinning but no sound or not loud enough USB Recording not working USB is not formatted in FAT FAT32 USB flash drive has little room for storage USB is pulled out when recording is going User didn t long press M till enter into recording mode My record is skipping Use the to...

Page 10: ...is equipment does cause harmful interference to radio or television reception which can be determined by turning the equipment off and on the user is encouraged to try to correct the interference by one or more of the following measures Reorient or relocate the receiving antenna Increase the separation between the equipment and receiver Connect the equipment into an outlet on a circuit different f...

Reviews: