background image

5

DE

GERÄTEÜBERSICHT

1  Ausrichtungsschraube mit Gummiabdeckung

2  Gegengewicht

3  Pitchregler (Tonhöhenregler)

4  Geschwindigkeitsregler

5  Lifthebel

Sperre für Tonarm

7  LED-Betriebsanzeige

8  Einschalthebel

Achsadapter

10  Strobebeleuchtung

11  Line Out/ Phono Ausgangsschalter

12  Line Out Anschluss (L/R)

13  Wechselstromkabel

Summary of Contents for 10031933

Page 1: ...w w w a u n a m u l t i m e d i a c o m Plattenspieler Record Player 10031933 ...

Page 2: ......

Page 3: ...olgenden Hinweise sorgfältig durch und befolgen Sie diese um möglichen Schäden vorzubeugen Für Schäden die durch Missachtung der Hinweise und unsachgemäßen Gebrauch entstehen übernehmen wir keine Haftung TECHNISCHE DATEN Artikelnummer 10031933 Stromversorgung Netzteil 220 240 V 50 60 Hz ...

Page 4: ... Überhitzungsschutzes notwendig sein sollte senden Sie das Gerät bitte an den Hersteller zurück oder kontaktieren Sie eine hierfür qualifizierte Person Zur Reinigung des Geräts folgen Sie bitte den in der Anweisung beschriebenen Hinweisen Wenn sie das Gerät für eine lange Zeit nicht nutzen stecken Sie es bitte aus Das Gerät sollte von einer dafür qualifizierten Person repariert werden wenn a das S...

Page 5: ...ung 2 Gegengewicht 3 Pitchregler Tonhöhenregler 4 Geschwindigkeitsregler 5 Lifthebel 6 Sperre für Tonarm 7 LED Betriebsanzeige 8 Einschalthebel 9 Achsadapter 10 Strobebeleuchtung 11 Line Out Phono Ausgangsschalter 12 Line Out Anschluss L R 13 Wechselstromkabel ...

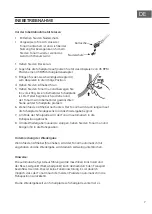
Page 6: ...n das Gerät eingeschaltet ist wird die LED Anzeige 7 aufleuchten Das System ist nun bereit Musik abzuspielen Bitte lesen Sie für genauere Hinweise zu Bedienung des Geräts den Abschnitt Bedienung Installation des Gegengewichts 1 Schieben Sie das Gegengewicht 2 komplett ans Ende des Tonarms und drehen Sie es dann im Uhrzeigersinn bis es einrastet 2 Drehen Sie das Gegengewicht im Uhrzeigersinn und na...

Page 7: ...challplatte platziert 6 Ziehen Sie den Lifthebel nach unten Der Tonarm wird dann langsam auf die Schallplatte hinabgesenkt und die Wiedergabe beginnt 7 Am Ende der Schalplatte wird der Tonarm automatisch in die Ruheposition gebracht 8 Um die Wiedergabe manuell zu stoppen heben Sie den Tonarm an und bringen ihn in die Ruheposition Unterbrechung der Wiedergabe Wenn Sie den Lifthebel 5 anheben wird d...

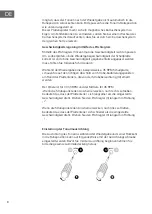
Page 8: ...beispielsweise 45 RPM Schallplatte schauen Sie auf den richtigen Abschnitt von Strobe Kalibrierungspunkten am Rand des Plattentellers die von der Strobebeleuchtung 10 erhellt werden Der Obere ist für 33 1 3 RPM und der Mittlere für 45 RPM Wenn die Strobepunkte den Anschein erwecken nach rechts zu fließen bedeutet das dass der Plattenteller sich langsamer als die eingestellte Geschwindigkeit dreht ...

Page 9: ...prüfen Sie die Halteposition während der Anpassung mehrmals um ein Überdrehen der Schraube im Inneren zu vermeiden Line Out Verbindung Sie können das Gerät mit Ihrem Hi Fi System verbinden Stellen Sie hierfür mit einem RCA Kabel eine Verbindung zwischen Line Out Anschluss 12 und dem AUX Anschluss her Wenn Sie den Line Out Phono Schalter 11 in die Line Out Position bringen wird das Output Signal di...

Page 10: ...lektronischer Gerätschaften Richten Sie sich nach den örtlichen Regelungen und entsorgen Sie Altgeräte nicht über den Hausmüll Durch die regelkonforme Entsorgung der Altgeräte werden Umwelt und die Gesundheit Ihrer Mitmenschen vor möglichen negativen Konsequenzen geschützt Materialrecycling hilft den Verbrauch von Rohstoffen zu verringern Konformitätserklärung Hersteller Chal Tec GmbH Wallstraße 1...

Page 11: ...e of the following hints on installation and use to avoid technical damages Any failure caused by ignoring the items and cautions mentioned in the operation and installation instructions are not covered by our warranty and any liability TECHNICAL DATA Item number 10031933 Power supply adaptor 220 240 V 50 60 Hz ...

Page 12: ...acturer technician For cleaning the device please follow the recommendations of the notice The sector cord should be unplugged a long period of use Device shall be repaired by a qualified person when a the power cord is damaged b objects have fallen into the apparatus or a liquid has been spilledinto device c device was exposes to the rain d device does not work correctly without notable exterior ...

Page 13: ... cover 2 Counter weight 3 Pitch adjust 4 Turntable speed selector 5 Cueing lever 6 Tone arm lock 7 Power LED indicator 8 Power switch 9 Spindle adaptor 10 Strobe illuminator 11 Line out Phono output selection switch 12 Line out socket L R 13 AC power cord ...

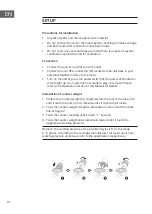
Page 14: ...or 7 will light up Your system is now ready to play your music Please refer to the Operations section of this Manual for details Installation of counter weight 1 Slide in the counter weight 2 completely into the rear of the tone arm until it reach the end turn it clockwise until it click with pit inside 2 Twist the counter weight clockwise backward until it reach the white line as figure 2 3 Twist...

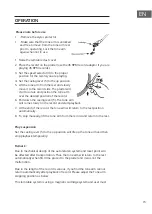
Page 15: ...e cueing lever 5 The tone arm will come slowly on the record and start playback 7 At the end of the record the tone arm will return to the rest position automatically 8 To stop manually lift the tone arm from the record and return to the rest Play suspension Set the cueing lever 5 to the up position will life up the tone arm and then stop playback temporarily Remark Due to mechanical design of the...

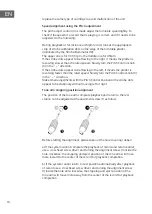
Page 16: ... speed Slowly turn the Pitch Control knob 3 in the direction Make small adjustments with the Pitch Control knob until the strobe dots appear to be stationary without moving left or right Tone arm stopping position alignment The position of the tone arm complete playback and return to the rest station can be adjusted at the alignment screw 1 as follow Before starting the alignment please take out t...

Page 17: ...onnection You can connect the system to your own hi fi system by connecting the line out socket 12 to the auxiliary input socket with a RCA cable If set the Line out Phono switch 11 at Line out position the output signal will pass through the system built in pre amplifier circuit If set the switch 11 at Phono The output signal will come directly from the cartridge without amplified Due to ErP stag...

Page 18: ...s product is disposed of correctly you will help prevent potential negative consequences for the environment and human health which could otherwise be caused by inappropriate waste handling of this product For more detailed information about recycling of this product please contact your local council or your household waste disposal service Declaration of Conformity Producer Chal Tec GmbH Wallstra...

Page 19: ......

Page 20: ......

Reviews: