background image

22

EN

DISPOSAL CONSIDERATIONS

According to the European waste regulation 2012/19/EU this 

symbol on the product or on its packaging indicates that this 

product may not be treated as household waste. Instead it 

should be taken to the appropriate collection point for the 

recycling of electrical and electronic equipment. By ensuring 

this product is disposed of correctly, you will help prevent 

potential negative consequences for the environment 

and human health, which could otherwise be caused by 

inappropriate waste handling of this product. For more 

detailed information about recycling of this product, please 

contact your local council or your household waste disposal 

service.

Declaration of Conformity

Producer: Chal-Tec  GmbH, Wallstraße 16, 10179 Berlin. 

Germany 


This product is conform to the following European Directives: 


2011/65/EU (RoHS) 

2014/53/EU  (RED) 

2014/35/EU (LVD)

Summary of Contents for 10032018

Page 1: ...w w w a u n a m u l t i m e d i a c o m Verticalo DAB Vertikaler Plattenspieler m it DAB Vertical Record Player w ith DAB 10032018 ...

Page 2: ......

Page 3: ...nleitung enthaltenen Warnhinweise und befolgen Sie die Anweisungen Verwenden Sie dieses Gerät nicht in der Nähe von Spritzwasser oder in feuchter Umgebung Stellen Sie keine mit Wasser gefüllten Gegenstände wie beispielsweise Blumenvasen auf das Gerät Reinigen Sie das Gerät nur mit einem trockenen Lappen Blockieren Sie die Belüftungsöffnungen des Geräts nicht Installieren Sie das Gerät gemäß der An...

Page 4: ...cht Verwenden Sie nur die angegebenen Stromquellen Erklärung der Symbole auf dem Gerät CAUTION RISK OF ELECTRIC SHOCK DO NOT OPEN ZUR VERMEIDUNG VON FEUER ODER STROMSCHLAGGEFAHR VERWENDEN SIE DIESES GERÄT NICHT IN VERBINDUNG MIT VERLÄNGERUNGSKABELN ODER STECKDOSEN BEI DENEN DER STECKER NICHT VOLLSTÄNDIG EINGESTECKT WERDEN KANN UND SETZEN SIE DAS GERÄT NICHT REGEN ODER FEUCHTIGKEIT AUS Das Blitzsym...

Page 5: ...aste PAIR SCAN 7 Wecker 8 Schlaf 9 Standby 10 Sendersuche 11 Lautstärkeregler 12 USB Anschluss 13 Magnetischer Adapter 14 LCD Bildschirm 15 Menü Info Taste 16 Eingabe Schlummertaste 17 Einstellungen 18 Modus 19 Abspielgeschwindigkeit 20 AUX Eingang 21 Kopfhöreranschluss 22 Stromversorgung 23 Netzschalter Vorderansicht Rückseite ...

Page 6: ...ng abgedeckt werden Hinweis Das Gerät ist mit einem Standardnetzstecker ausgestattet Wenn Dieser Netzstecker nicht in Ihre Steckdose passt versuchen Sie bitte nicht diesen durch Feilen passend zu machen Wenn dieser Stecker nicht in Ihre Steckdose passt ist Ihre Steckdose vermutlich veraltet und nicht gepolt Sie sollten Ihre Steckdose in diesem Fall von einem qualifizierten Elektriker austauschen l...

Page 7: ...rgabe stoppt der Tonarm automatisch Hinweis Drehen oder stoppen Sie den Plattenteller keinesfalls manuell Das manuelle Bewegen oder das Belasten des Plattentellers ohne den Tonarm vorher zu fixieren kann zu Schäden am Tonarm führen RADIOBETRIEB 1 Schalten Sie das Gerät ein 2 Drücken Sie die Taste MODE um den UKW Modus auszuwählen Der Bildschirm zeigt UKW an 3 Drücken Sie die Taste Koppelung Suche ...

Page 8: ...ste um das Gerät auszuschalten Senderspeicherung im DAB UKW Modus 1 Drehen Sie im DAB UKW Modus den TUNE Knopf um den Radiosender den Sie gerne speichern würden auszuwählen 2 Drücken Sie die Taste PRESET Der Bildschirm wird nach dem Drücken der Taste Voreinstellung 1 leer anzeigen 3 Drücken Sie zum Bestätigen die Taste ENTER Das Display zeigt dann Voreinstellung 1 gespeichert an 4 Wiederholen Sie ...

Page 9: ...nd die Wiedergabe startet anschließend automatisch Wenn kein USB Stick verbunden ist zeigt der Bildschirm NO USB an 4 Während der Wiedergabe drücken Sie zum Pausieren die Taste WIEDERGABE PAUSE Drücken Sie sie zum Fortsetzen der Wiedergabe erneut 5 Zum Überspringen des nächsten oder des vorherigen Titels drehen Sie am TUNE Knopf AUX EINGANG 1 Schalten Sie das Gerät ein 2 Verbinden Sie Ihr externes...

Page 10: ...7 Drehen Sie erneut am TUNE Knopf wird 12 24 Stundenformat einstellen auf dem Bildschirm angezeigt werden Drücken Sie die Taste ENTER SNOOZE um in den Einstellungsmodus zu gelangen 12 Stundenformat oder 24 Stundenformat wird auf dem Bildschirm angezeigt wenn Sie am TUNE Knopf drehen Sie können das von Ihnen gewünschte Stundenformat auswählen und die Auswahl durch Drücken der ENTER SNOOZE Taste bes...

Page 11: ...bol auf dem Bildschirm angezeigt wird Nachdem der Alarm aktiviert wurde wird er wenn die aktuelle Uhrzeit mit der von Ihnen eingestellten Weckzeit übereinstimmt ertönen Wenn der Alarm ertönt drücken Sie die ENTER SNOOZE Taste zum Aktivieren der Schlummerfunktion 5 Minuten später wird der Alarm erneut ertönen Um die Alarmfunktion permanent auszuschalten folgen Sie den Hinweisen im Abschnitt Alarm a...

Page 12: ...r empfehlen Ihnen deshalb den Reiniger direkt auf das Staubtuch zu sprühen damit nicht versehentlich Bestandteile aus Plastik und Metall besprüht werden Möbelschutz Dieses Gerät ist mit Anti Rutsch Gummifüßen ausgestattet um zu verhindern dass das Gerät sich während der Bedienung bewegt Diese Füße wurden aus nicht rutschendem Gummi welches so entwickelt wurde dass es keine Kratzer und Flecken auf ...

Page 13: ...lektronischer Gerätschaften Richten Sie sich nach den örtlichen Regelungen und entsorgen Sie Altgeräte nicht über den Hausmüll Durch die regelkonforme Entsorgung der Altgeräte werden Umwelt und die Gesundheit Ihrer Mitmenschen vor möglichen negativen Konsequenzen geschützt Materialrecycling hilft den Verbrauch von Rohstoffen zu verringern Konformitätserklärung Hersteller Chal Tec GmbH Wallstraße 1...

Page 14: ...tus near water Clean only with a dry cloth Do not block any ventilation openings Install in accordance with the manufacturer s instructions Do not install near any heat sources such as radiators heaters stoves or other apparatus including amplifiers that produce heat Protect the power cord from being walked on or kinked in particular where the plug is fitted and at the point where it exits from th...

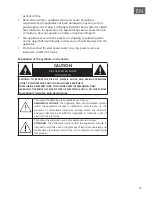
Page 15: ...CE THE RISK OF ELECTRIC SHOCK AND SERIOUS PERSONAL INJURY DO NOT REMOVE ANY COVER NO USER SERVICABLE PARTS INSIDE REFER SERVICING TO QUALIFIED SERVICE PERSONNEL ONLY WARNING TO REDUCE THE RISK OF FIRE OR ELECTRICAL SHOCK DO NOT EXPOSE THIS PRODUCT TO WATER RAIN OR MOISTURE Triangle with lightening plus explanation as follows DANGEROUS VOLTAGE The lightening flash with arrowhead symbol within the e...

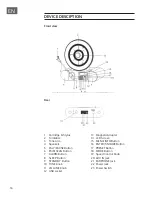
Page 16: ...AN Button 7 ALARM Button 8 SLEEP Button 9 STANDBY Button 10 TUNE Knob 11 VOLUME Knob 12 USB socket 13 Magnetic Adapter 14 LCD Screen 15 MENU INFO Button 16 ENTER SNOOZE Button 17 PRESET Button 18 MODE Button 19 Speed Control Knob 20 AUX IN Jack 21 EARPHONE Jack 22 Power Jack 23 Power Switch Front view Rear ...

Page 17: ...Press the MODE button to select the PHONO mode PHONO will be shown on the screen 3 Rotate the SPEED CONTROL KNOB on the back of the unit to the correct speed 33 1 3 45 or 78 rpm for the select record 4 Take out the MAGNETIC ADAPTER put a record on the TURNTABLE lightly then put the MAGNETIC ADAPTER back to fix the record 5 Move the tone arm over the record and lower it to point from which you want...

Page 18: ...een orderly you can choose the scan type press the SELECT BUTTON to confirm 4 In Manual tune mode rotate the TUNING knob to select the DAB station manually Select the desired DAB station and press the ENTER SNOOZE BUTTON to confirm the playing If you tune to a DAB stereo station the St will show on the display 5 In Scan mode press PAIR SCAN to start auto search the DAB stations 6 When you finished...

Page 19: ...te mode by pressing the ENTER SNOOZE button to confirm 7 Rotate the TUNE knob once again Set 12 24 hour will be shown on the screen press ENTER SNOOZE button to enter the setting mode Set 12 hour or Set 24 hour will be shown on the screen by rotating the TUNE knob You may choose the desired mode by pressing the ENTER SNOOZE button to confirm ALARM SETTING 1 Press the ALARM button to enter the alar...

Page 20: ...in 4 To turn off the alarm function permanently follow step H to set it to be off position the alarm is now off and the alarm symbol disappeared NOTE 1 If a daily repeat alarm clock has been set the alarm symbol will remain on the screen and the alarm will sound again at the next programmed day unless the alarm has been turn off 2 When you are turn off the unit the time and alarm function will be ...

Page 21: ...wn your BT of your BT device USB OPEATATION 1 Turn on the unit 2 Press the MODE button to select the USB mode USB will be shown on the screen 3 Insert a USB disk into the USB socket Reading will be shown for a few seconds playback will start automatically If no USB disk NO USB will be shown on the screen 4 During the playback press the PLAY PAUSE button to pause press it again to resume playback 5...

Page 22: ...s product is disposed of correctly you will help prevent potential negative consequences for the environment and human health which could otherwise be caused by inappropriate waste handling of this product For more detailed information about recycling of this product please contact your local council or your household waste disposal service Declaration of Conformity Producer Chal Tec GmbH Wallstra...

Page 23: ......

Page 24: ......

Reviews: